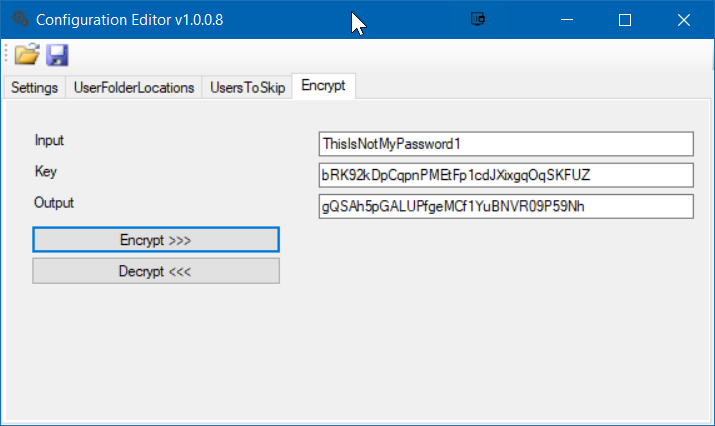
c) On the Encrypt tab, enter the password for the account that will be performing the automated placement task. Encrypt it with key bRK92kDpCqpnPMEtFp1cdJXixgqOqSKFUZ and record encrypted password
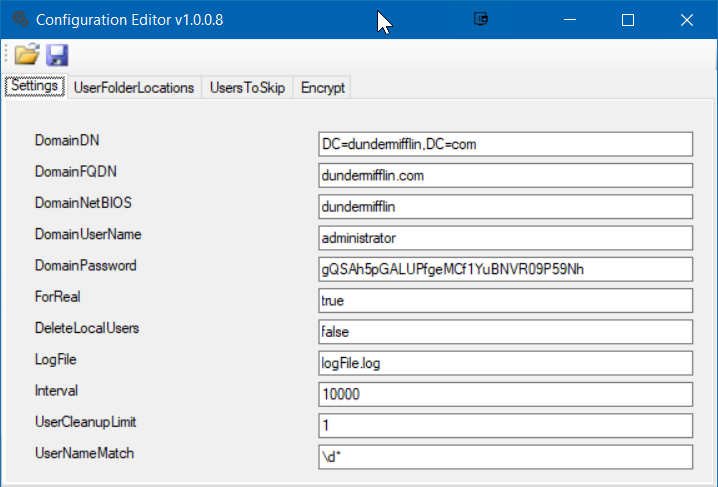
d) On the Settings tab, enter the domain information, connection username and the encrypted password recorded in step c. Configure UserNameMatch to a RegEx query that will match user account format. If you do not have a specific format, use .*
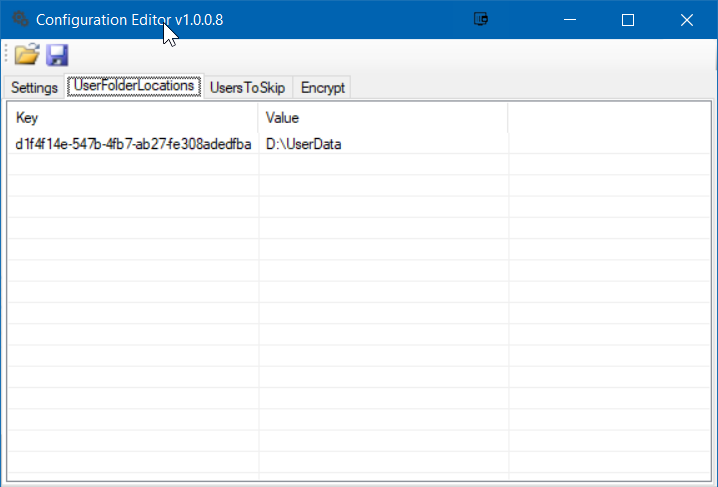
e) On the UserFolderLocations tab, specify folders to monitor to redundant user data
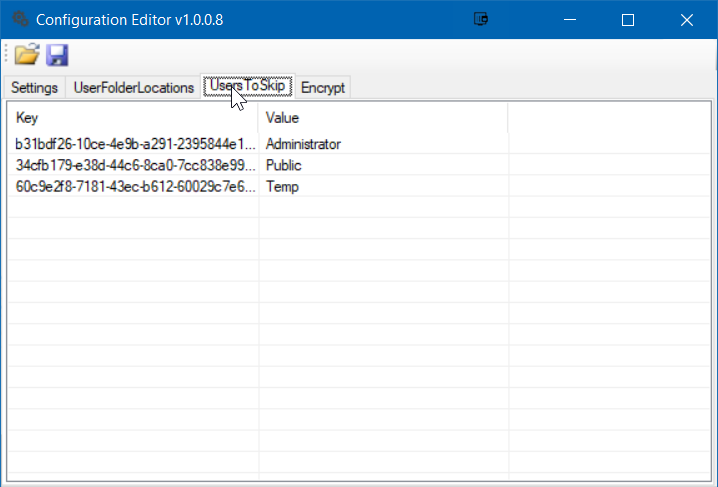
f) On the UsersToSkip tab, specify user folders to skip
Using this process will keep recover space by removing old/redundant user data, just make sure that you have backups to cheap/slower storage in case you need to recover data.
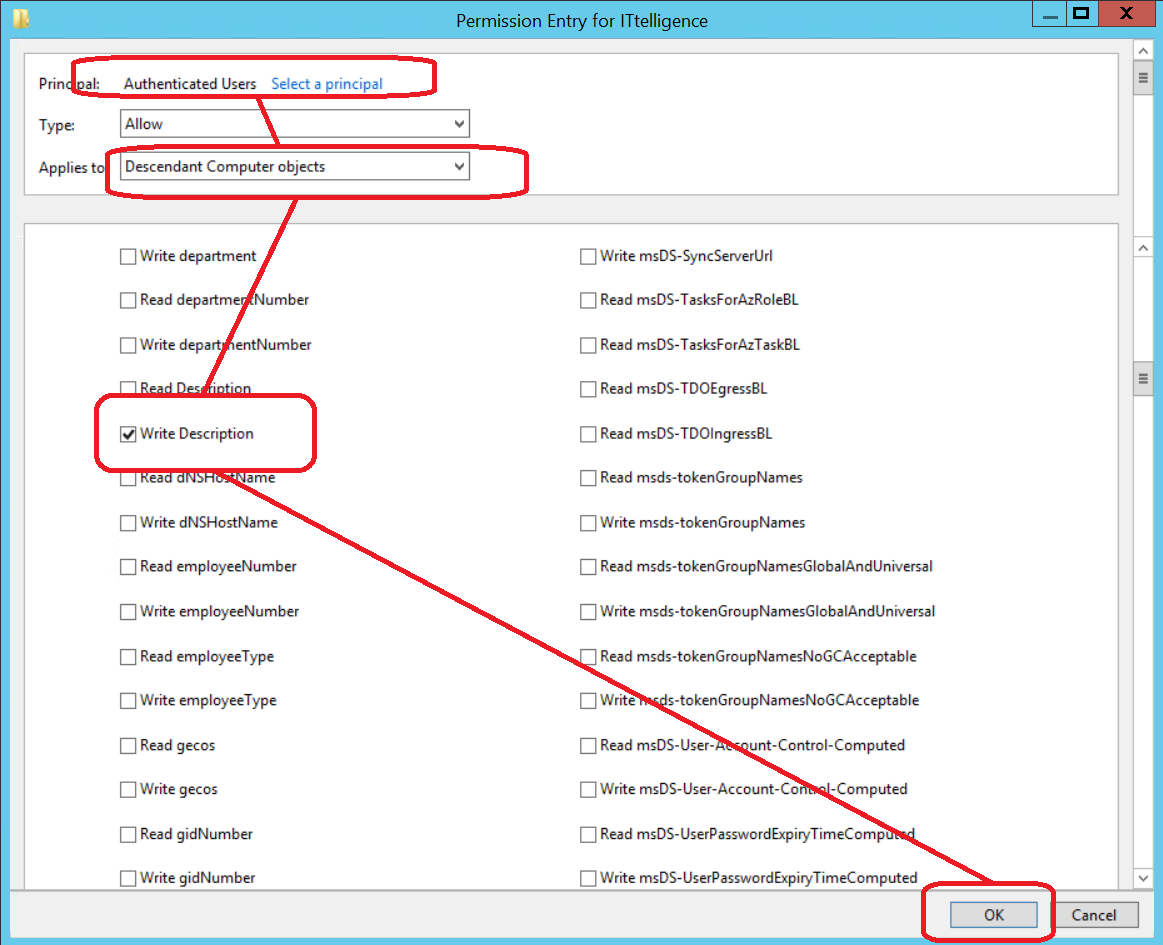
To be able to update computer descriptions you need to delegate rights.
Add the following permissions to Active Directory either to the root of the domain or any other Organizational Unit. You would add it to an Organizational Unit if you only want to use this process for some computers
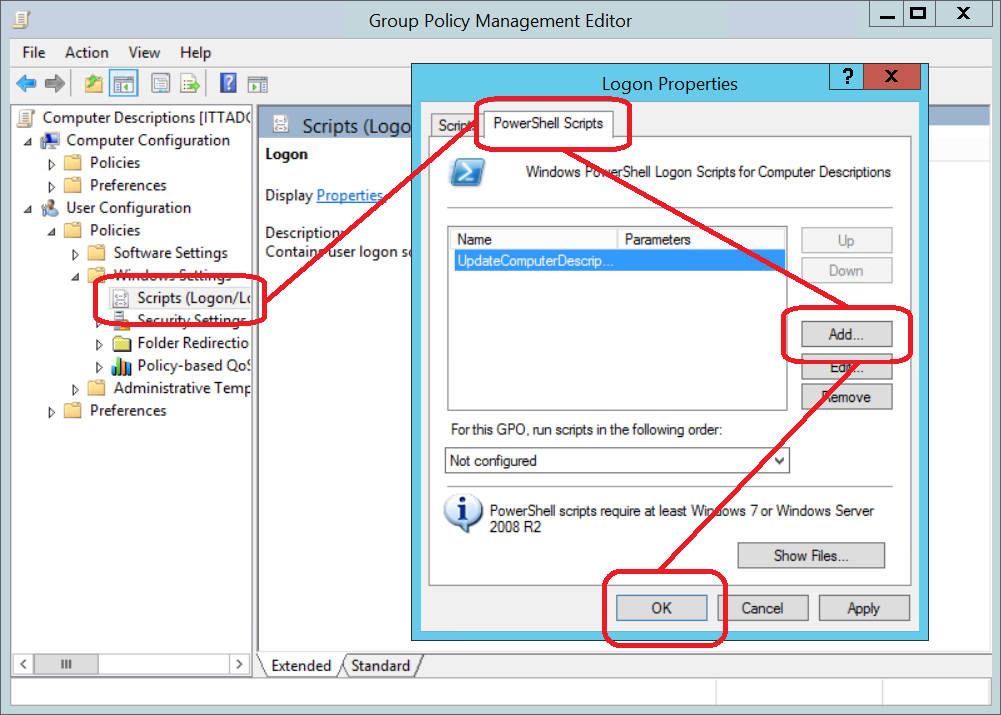
b) Powershell Script
Below is the Powershell script used to update the computer description.
It is important to note that you should not change the format of the message if you are planning to use my automated object placement process.
This script will be used within a group policy in step c
try { # Get current user name $strUserName = $env:username;
# Get current computer name $strComputerName = $env:computername;
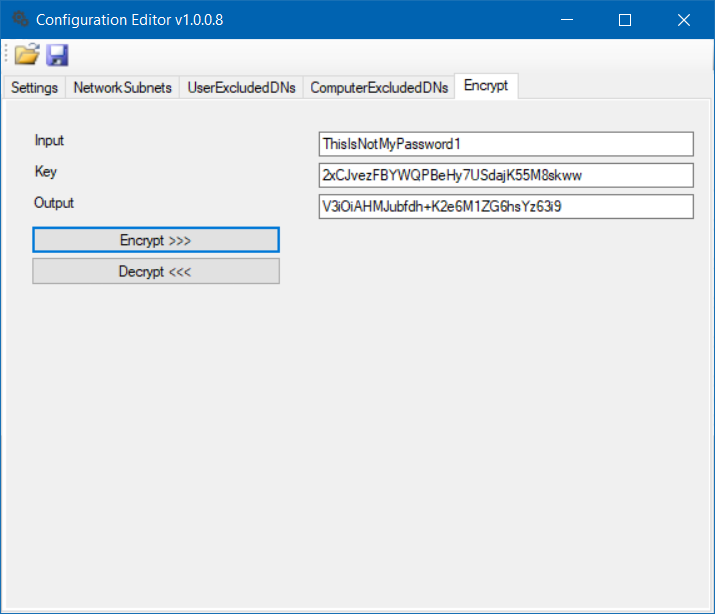
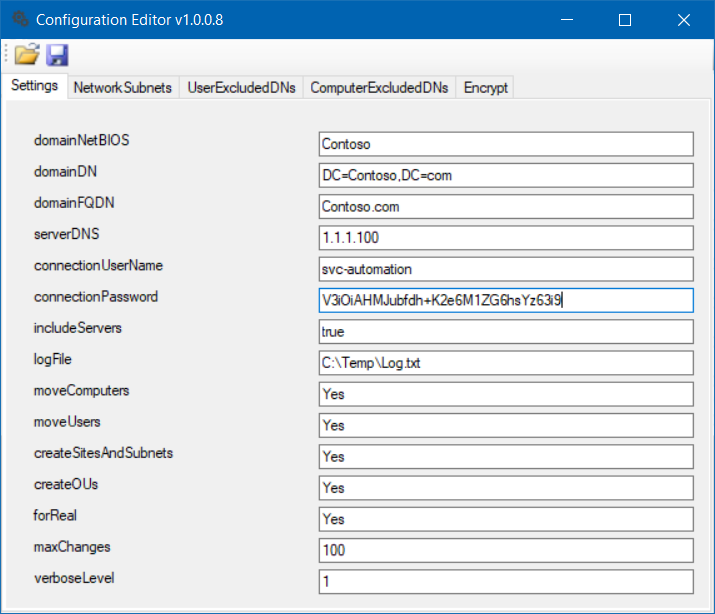
c) On the Encrypt tab, enter the password for the account that will be performing the automated placement task. Encrypt it with key 2xCJvezFBYWQPBeHy7USdajK55M8skww and record encrypted password
d) On the Settings tab, enter the domain information, connection user name and the encrypted password recorded in step 2c.
Specify which objects AutoAD should create automatically
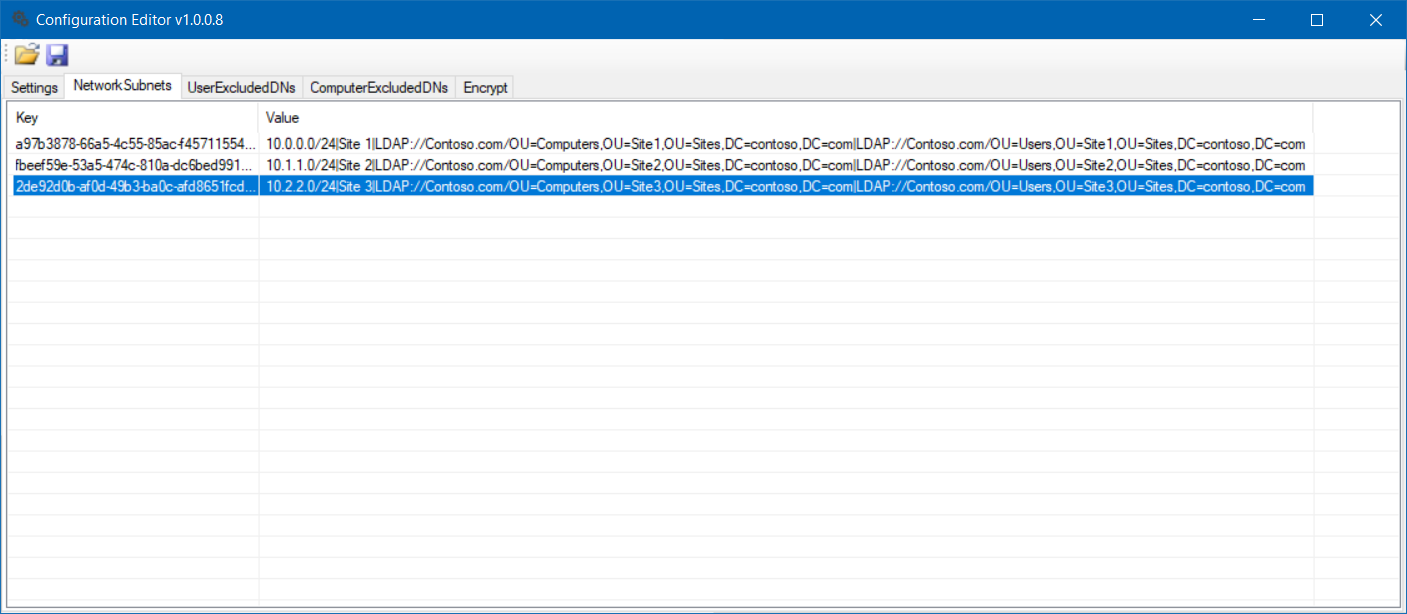
e) Specify Active Directory information. The format for these are Subnet/Bit Mask|AD Site Name|Computer DN|User DN
Subnet/Bit Mask: The subnet and mask (in bit format) for the specific entry
AD Site: The Active Directory site to which the subnet belongs
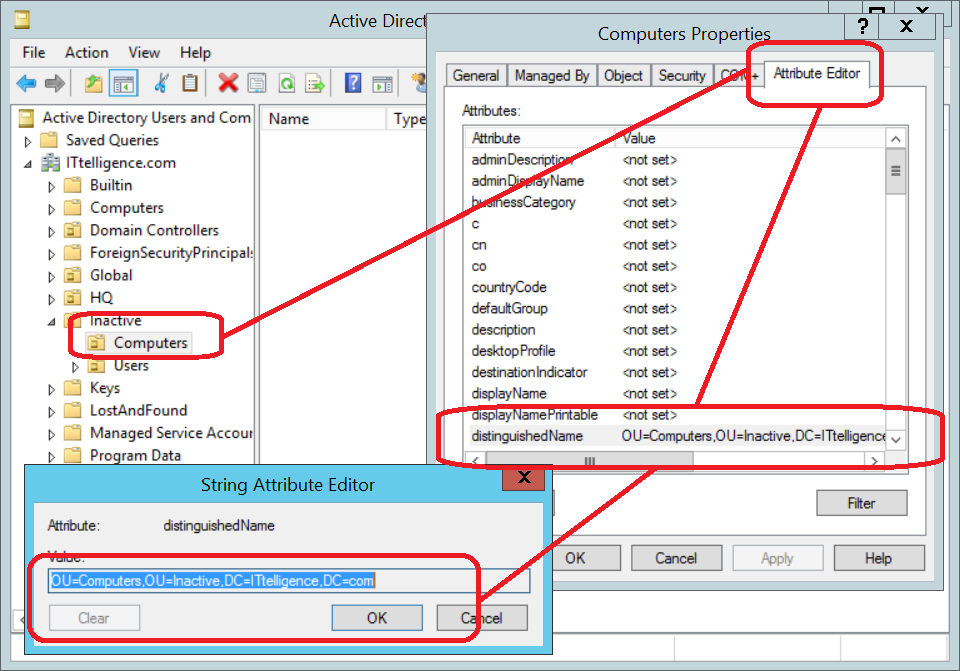
Computer DN: The distinguished name of the organizational unit where to move computers to for computer objects in this subnet
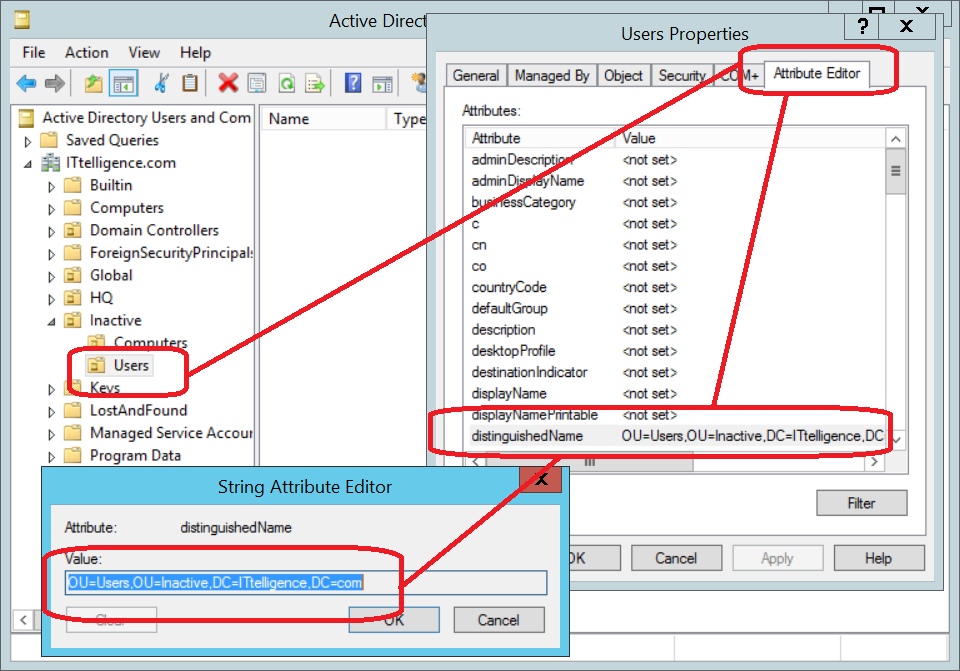
User DN: The distinguished name of the organizational unit where to move users to for user objects in this subnet
Please Note: Ensure that you do not allow users/admins to gain any additional permissions by moving users from one container to another. The reason for this is that a user move might be forced to an incorrect OU if descriptions are tampered with.
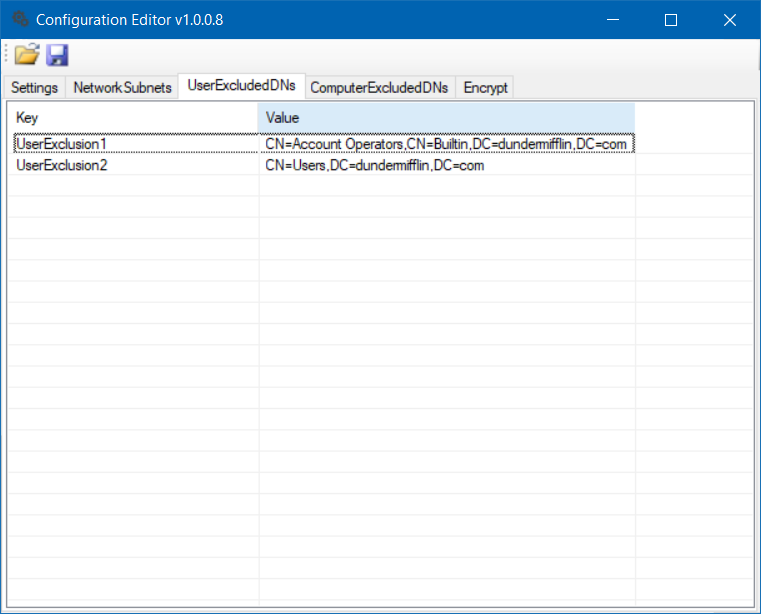
f) Specify any user DNs that should be skipped
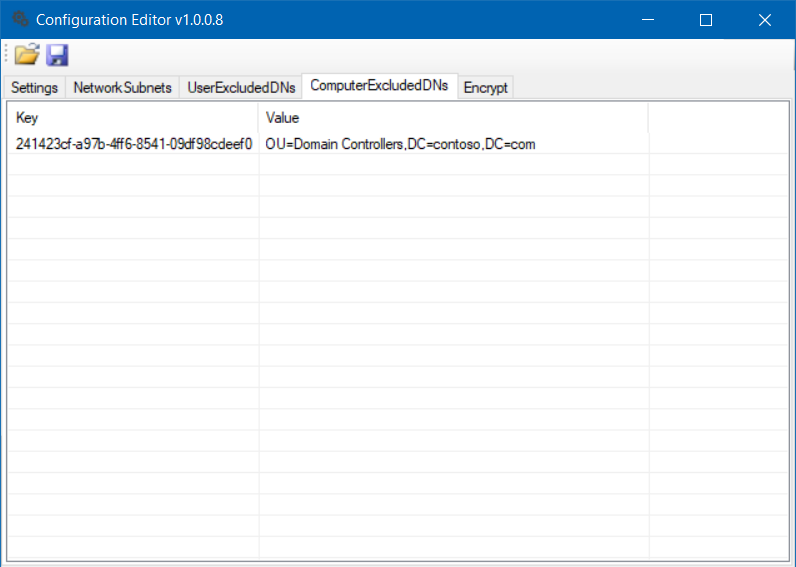
g) Specify any computer DNs that should be skipped
DEMO EXECUTION
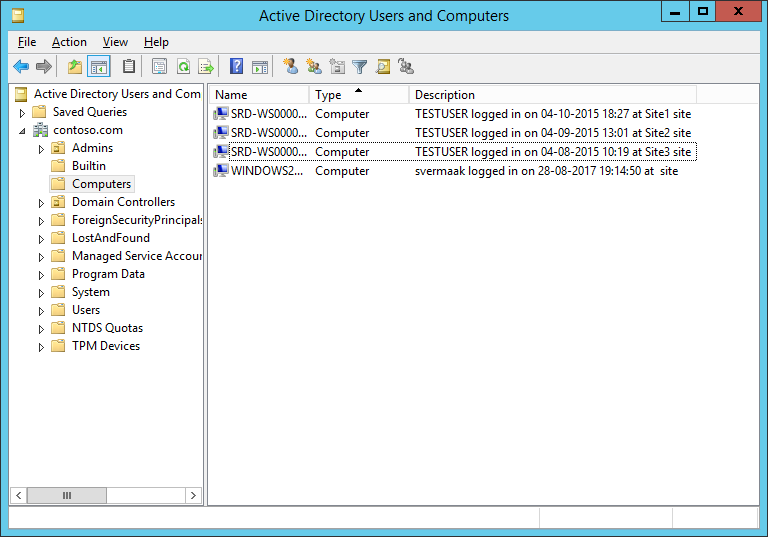
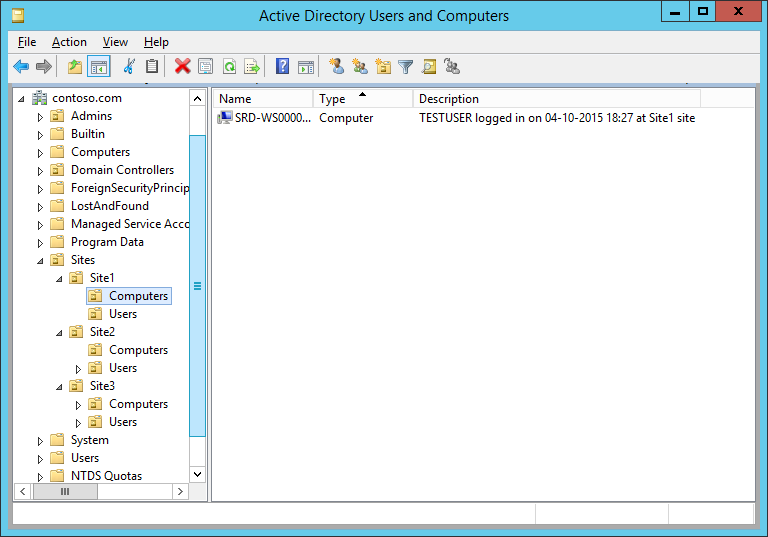
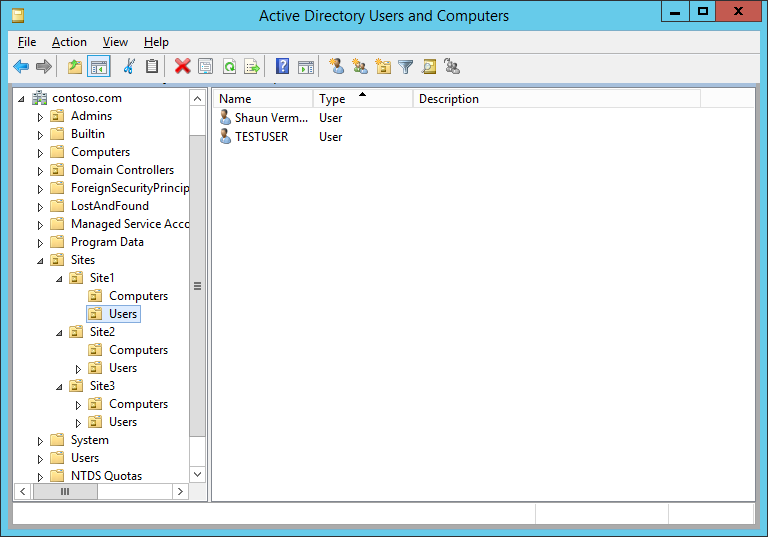
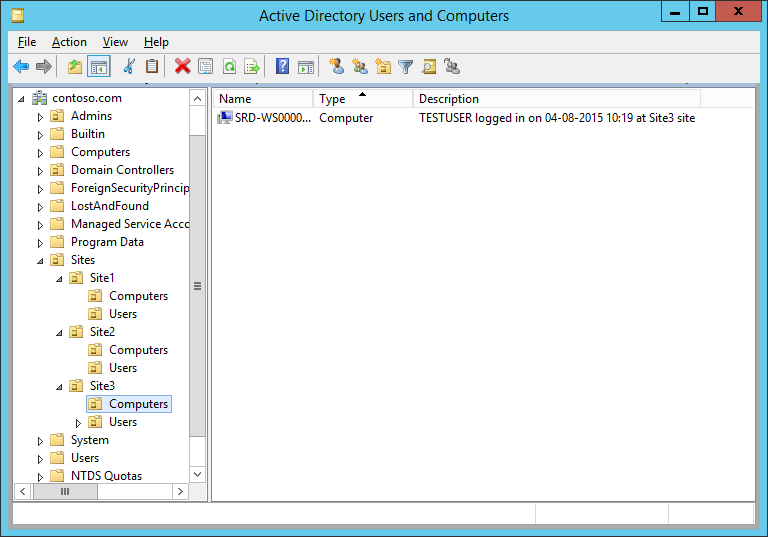
After implementing ComputerDescriptionUpdate.ps1 notice how computer descriptions are automatically updated
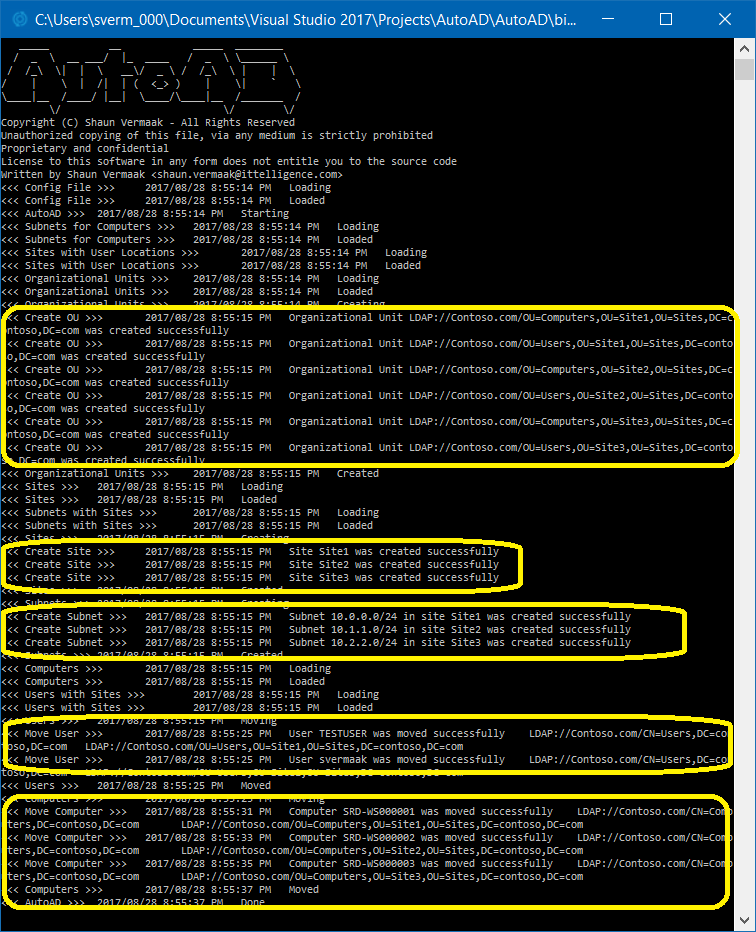
AutoAD.exe output
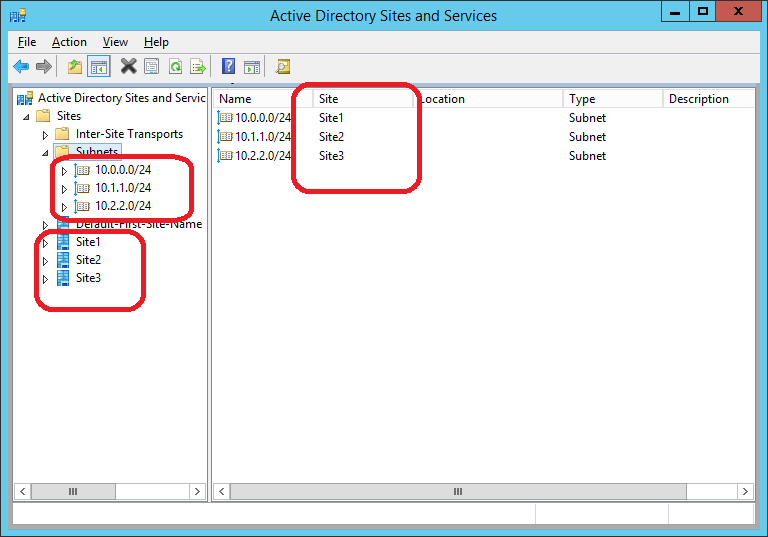
Sites and subnets automatically created by AutoAD
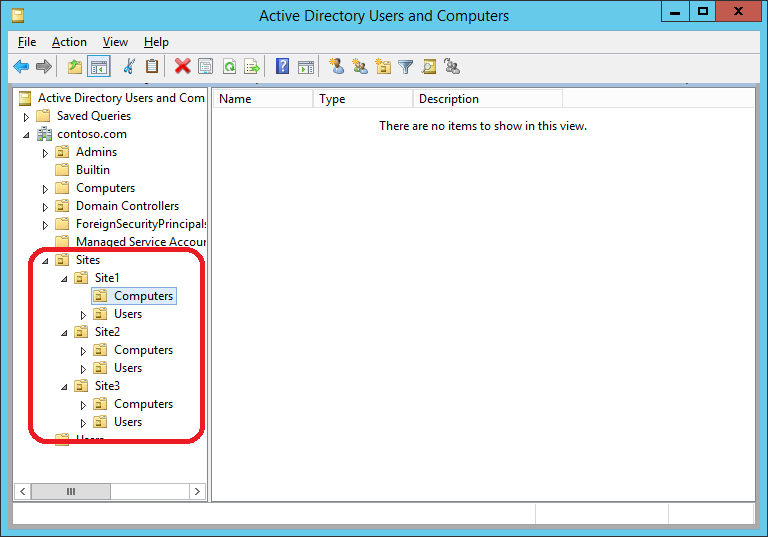
Organizational Units automatically created by AutoAD
Object placement (example 1)
Object placement (example 2)
Object placement (example 3)
Object placement (example 4)
CONCLUSION
Using this process will keep Active Directory organized and objects in the correct Organizational Units
ADCleanup is my implementation of a set-and-forget Active Directory cleanup tool. Once this tool is implemented correctly, you never need to worry about dormant accounts ever again.
IMPLEMENTATION
1) Download and extract ADCleanup.zip (here is VirusTotal scan) to a folder of your choice, saved on the computer on which it will be scheduled to run.
2) Create a location in Active Directory to store inactive user accounts and record the distinguished name (DN).
3) Create a location in Active Directory to store inactive computer accounts and record the distinguished name (DN).
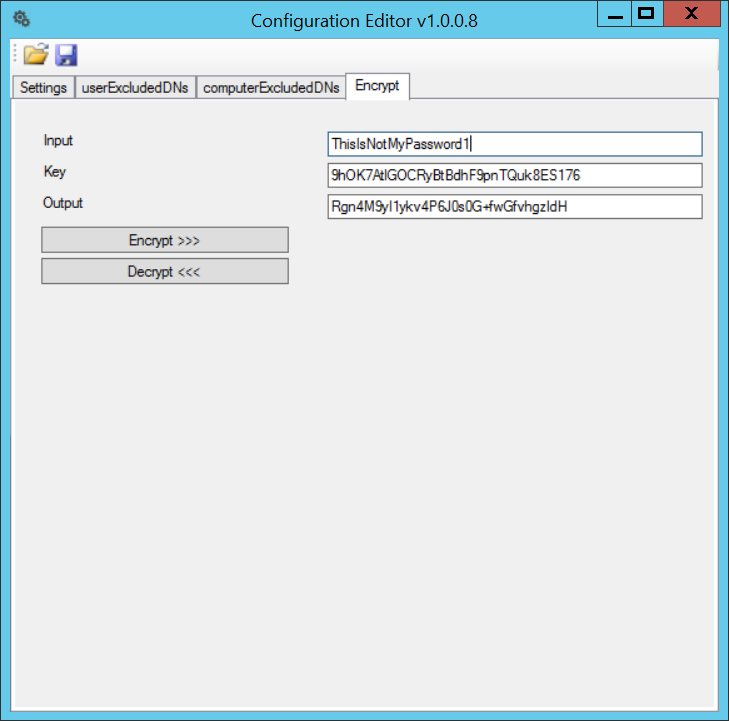
a) On the Encrypt tab, enter the password for the account that will be performing the cleanup task. Encrypt it with key 9hOK7AtlGOCRyBtBdhF9pnTQuk8ES176 and record encrypted password
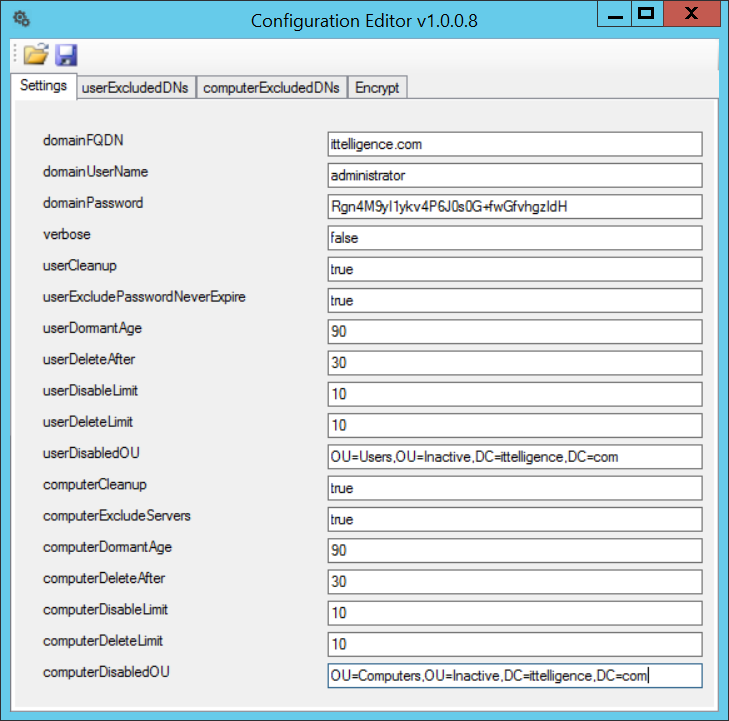
b) On the Settings tab, enter the fully qualified domain name, cleanup account user name and the encrypted password recorded in step 4a
c) Set userCleanup to true to enable the process to clean up user accounts. Set user cleanup parameters
d) Set userDisabledOUto value recorded in step 2
e) Set computerCleanup to true to enable the process to clean up user accounts. Set computer cleanup parameters
f) Set computerDisabledOU to value recorded in step3
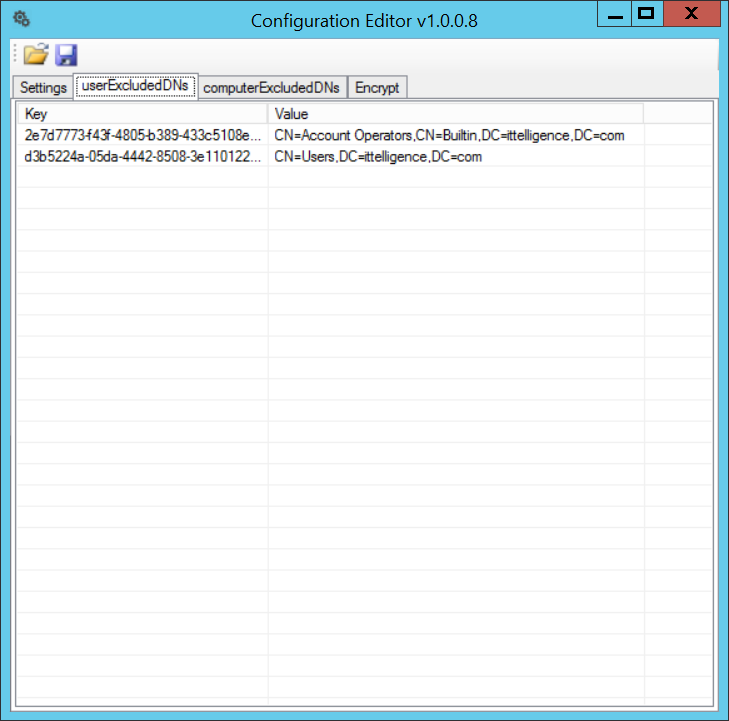
g) On the userExcludedDNs tab, specify any distinguished name of an organizational unit that should be excluded from the cleanup process (+ or INS to add, – or DEL to delete, Enter or double-click to edit)
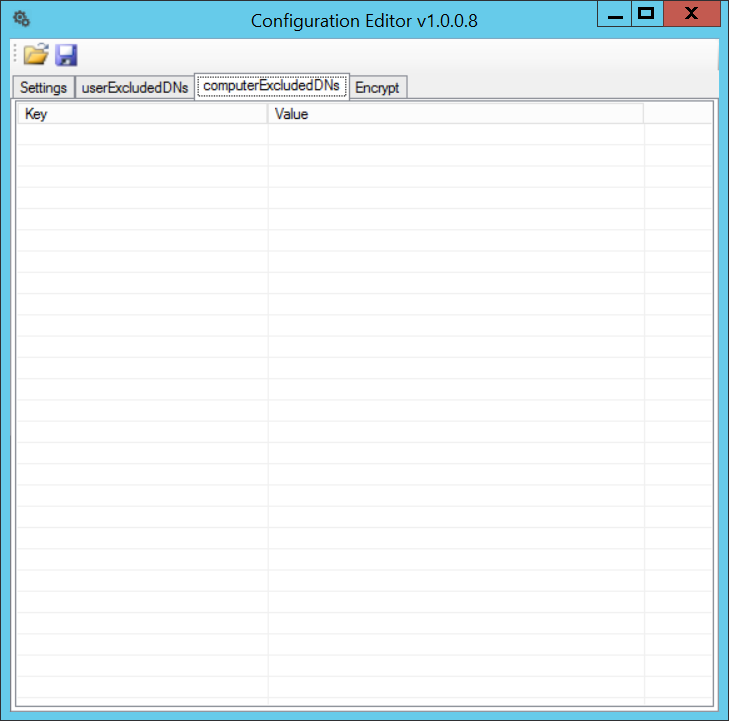
g) On the computerExcludedDN stab, specify any distinguished name of an organizational unit that should be excluded from the cleanup process (+ or INS to add, – or DEL to delete, Enter or double-click to edit)
h) Schedule ADCleanup.exe to execute via a scheduled task. Upon every execution, the tool will clean up user and computer objects as per your configuration
CONCLUSION
Using this process, (or one similar) will keep Active Directory clean from the unused computer and user objects, and increases server security in the process.
This is a process I use whenever I get an “Access Denied” message. One example of this is when I do not have access to SQL Server directly, only administrative rights to the actual server.
PROCESS
1) Download PsExec which is part of the PsTools suite
2) Extract PsTools.zip to a convenient location. I usually copy PsExec.exe to the System32 folder. This allows PsExec.exe to be executed from any folders without specifying the full path.
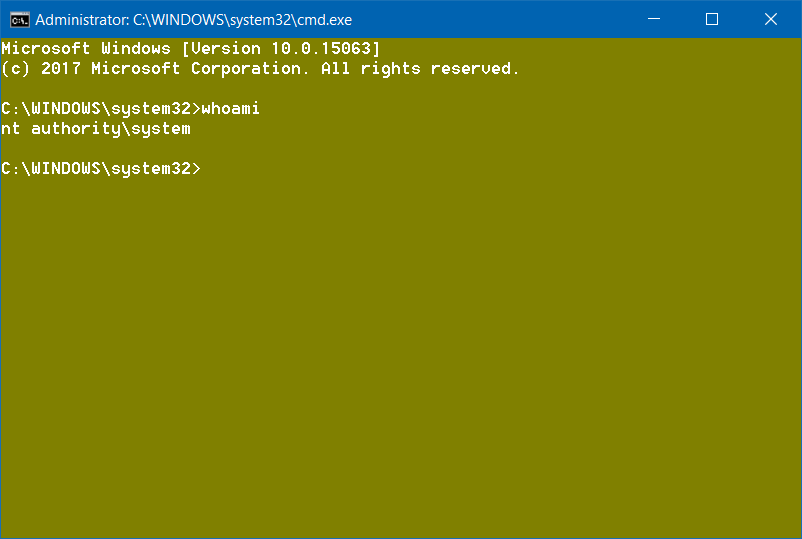
4) From within this new command prompt, everything you open will open as the SYSTEM account.
EXAMPLES
Viewing NT Secrets
Open Regedit.exe and you will be able to see content of HKEY_LOCAL_MACHINE\SECURITY
This allows you to view passwords that were stored as NT Secrets
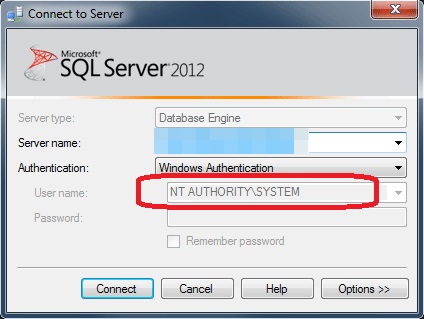
Opening SQL Server Management Studio as SYSTEM
Open SQL Management Studio and you will be able to log on with SYSTEM
This allows you to access SQL without directly having been granted SQL right yet you have administrative rights to SQL Server
You will be able to browse to any folder that only allows SYSTEM account
You can export permissions with SetACL/ICACLS to folders that administrators group might have been removed on
Kill processes that give error Access Denied when you try to terminate it with normal Administrator rights
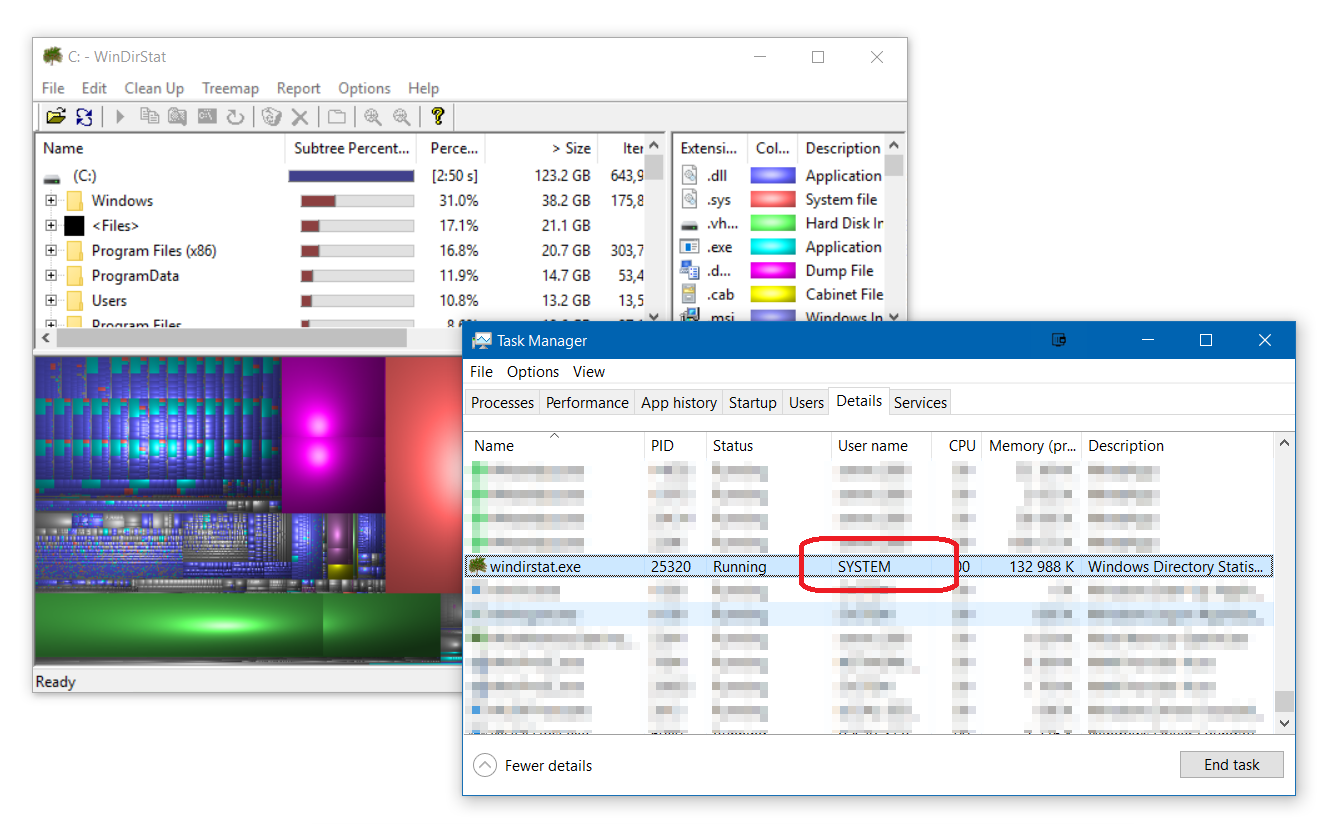
WinDirStat/TreeSize etc.
Running something like TreeSize as SYSTEM will actually give you a better view and understanding of what is using space because you will get less access denials
Some others…
Simulate GPO start scripts
Simulate GPO based MSI installation
Diagnose why scheduled tasks that run as SYSTEM don’t run as intended
Start/stop protected services
CONCLUSION
Using this process, (or one similar) will allow you to start processes as the SYSTEM account allowing you to access parts of files system, registry and application not accessible with normal Administrative rights.
Auditing domain password hashes is a commonly overlooked but critical requirement to ensuring secure passwords practices are followed.
Methods exist to extract hashes directly for a live domain however this article describes a process to extract user data, including hashes from an IFM backup.
1) Overview
Overpermission and weak/reused passwords are probably the most common security issues found in Active Directory. To address the password issues, it is important to do regular password audits, to address over permissions, see my article about Active Directory delegation.
2) Password Hashes
Passwords are stored in Active Directory (NTDS.dit encrypted with a boot key) as an unsalted MD4 hash and as such, to check for password reuse it is a simple case of checking for duplicate hashes in the extracted hashes list.
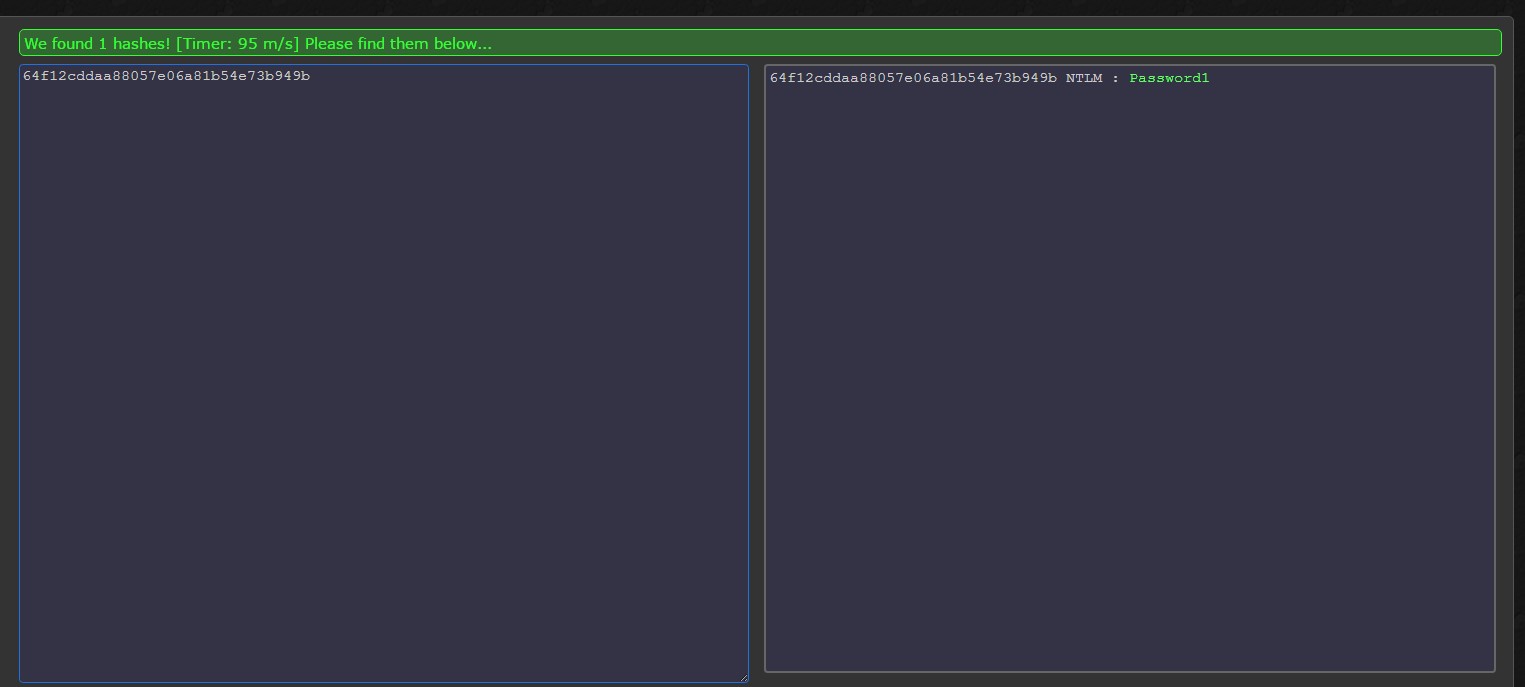
Finding weak passwords are a little trickier. You need to lookup hashes against a rainbow table to ensure you do not have any weak/compromised hashes within your environment.
Both of these are out-of-scope for this article, this article focuses on extracting password hashes.
3) Extracting Password Hashes
a) On a Domain Controller
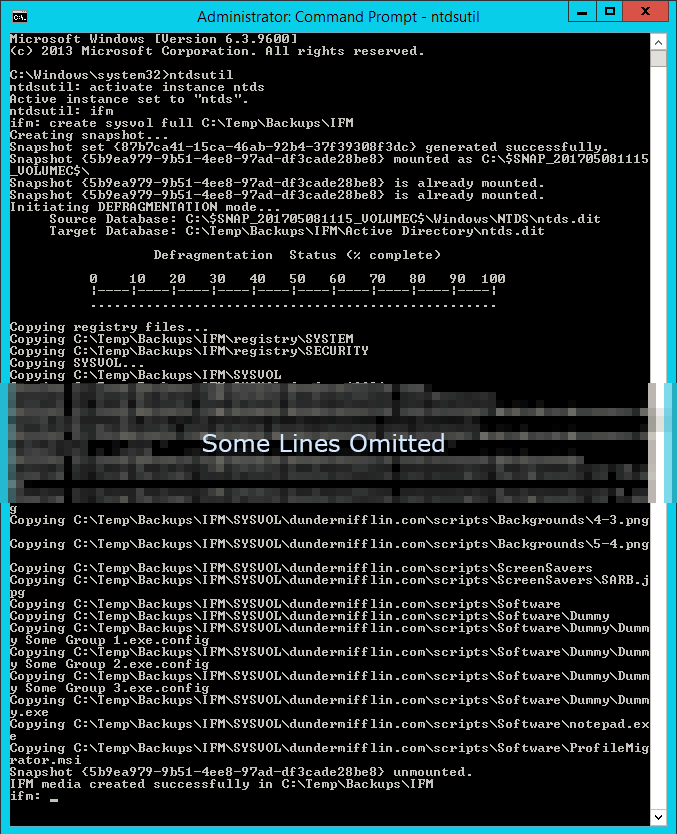
Start an elevated command prompt and run:
ntdsutil
activate instance ntds
ifm
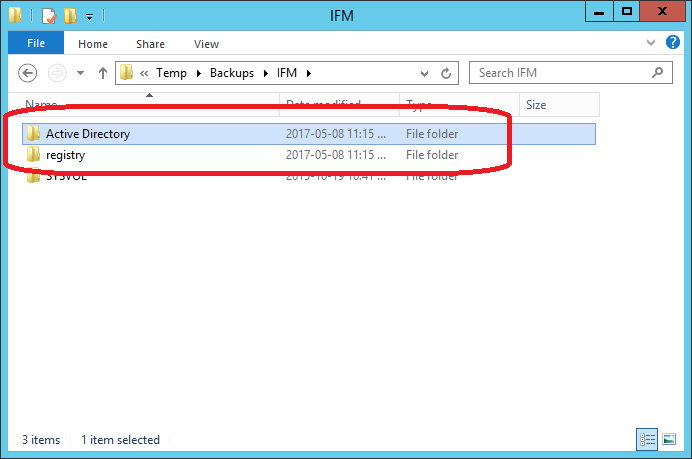
create sysvol full C:\Temp\Backups\IFM\
Command Output
IFM Files
b) On Administrative Computer
Copy the IFM folder and run the following PowerShell script elevated (just copy and paste):
//Download DSInternals from PowerShell Gallery https://www.powershellgallery.com/packages/DSInternals
Save-Module -Name DSInternals -path 'C:\temp\DSInternals'
//Install DSInternals
Install-Module -Name DSInternals
//Import DSInternals Module
Import-Module DSInternals
//Get Boot Key from Registry section of the IFM. If Boot Key is blank, Get-ADDBAccount will still return usernames
$key = Get-BootKey -SystemHivePath 'C:\Temp\Backups\IFM\registry\SYSTEM'
//Store objects data
$hashes = Get-ADDBAccount -All -DBPath 'C:\Temp\Backups\IFM\Active Directory\ntds.dit' -BootKey $key
//Convert object data to the desired format
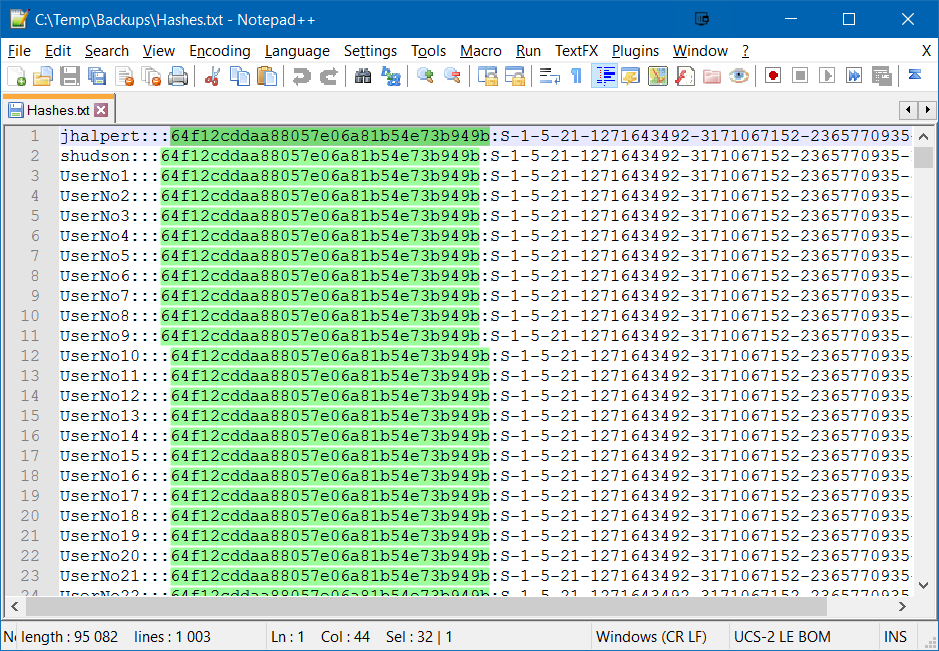
$hashes | Format-Custom -View Ophcrack | Out-File C:\Temp\Backups\Hashes.txt
Hashes.txt File
Weak Passwords Found (Getting password from hashes out-of-scope for this article)
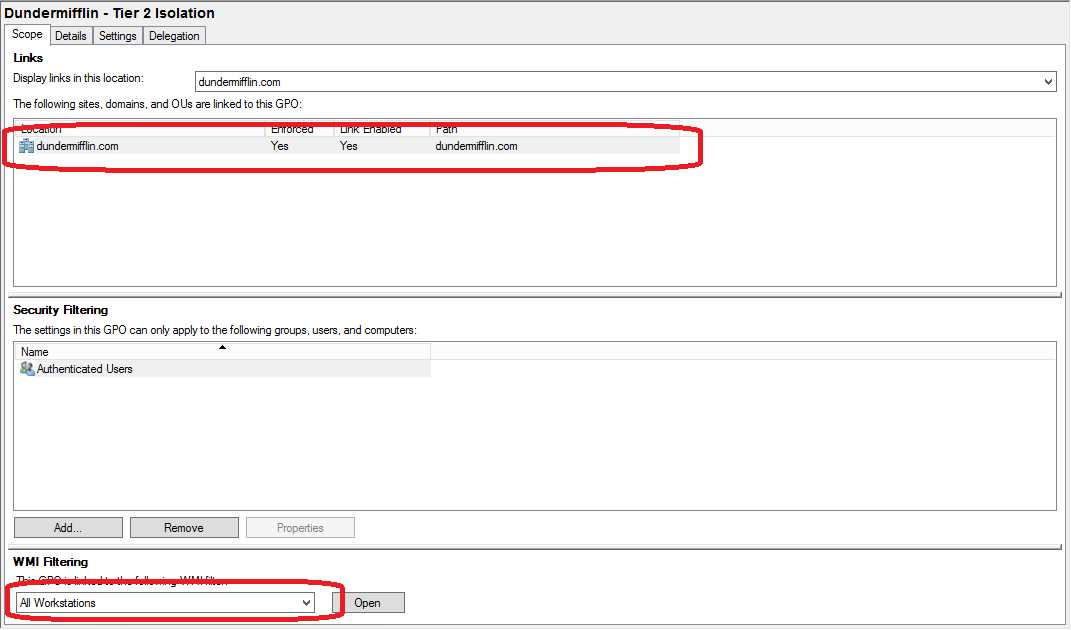
This article demonstrates probably the easiest way to configure domain-wide tier isolation within Active Directory.
If you do not know tier isolation read https://technet.microsoft.com/en-us/windows-server-docs/security/securing-privileged-access/securing-privileged-access-reference-material
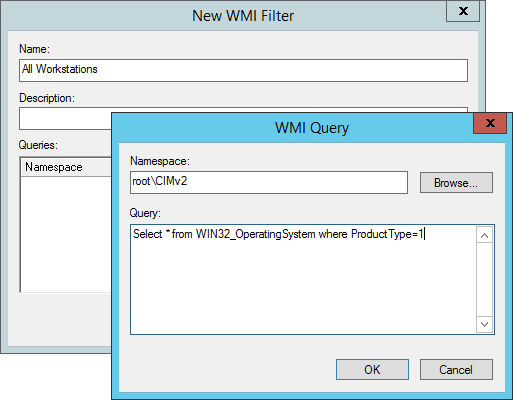
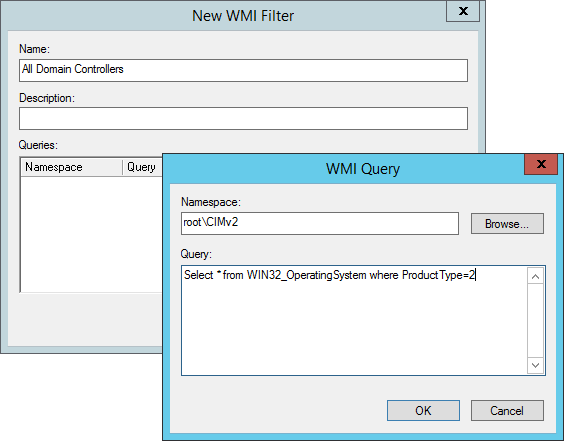
1) WMI Filters
Create WMI filter that will identify devices for each tier. In the article three tiers are used, domain controllers, servers and workstations. This provides a balance between security and simplification but this can easily be extended to other devices
or server types.
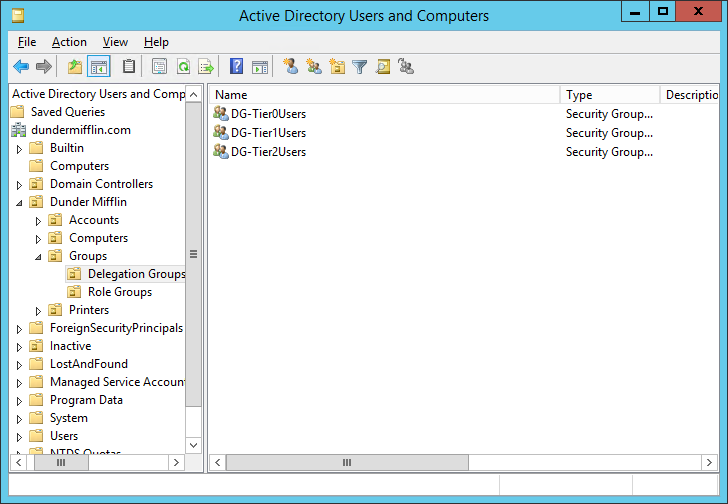
2) Groups
Create a group for each tier. This will hold the members for each tier.
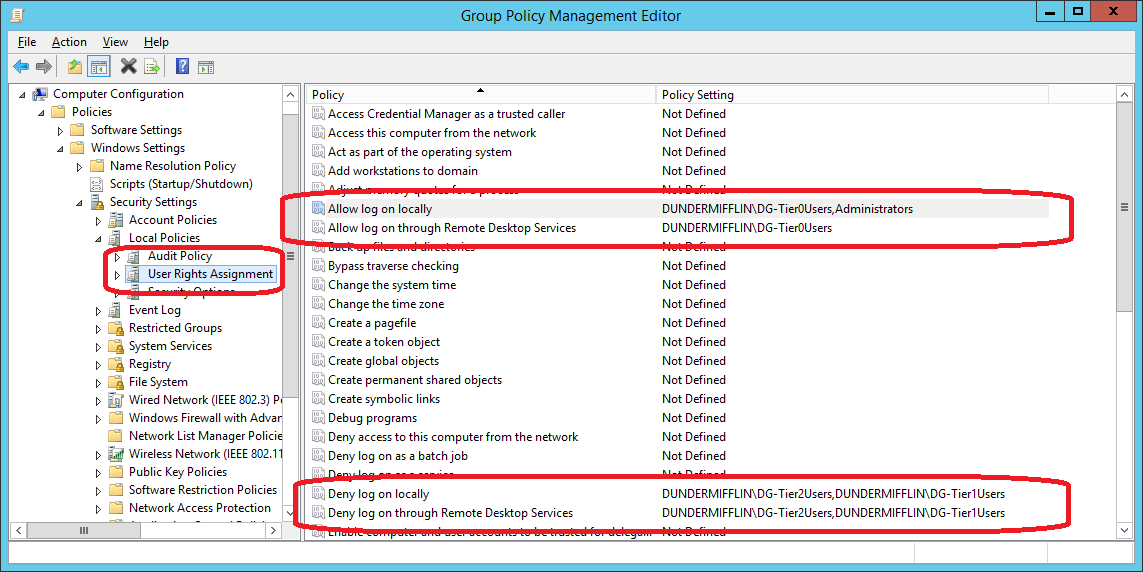
3) Group Policies
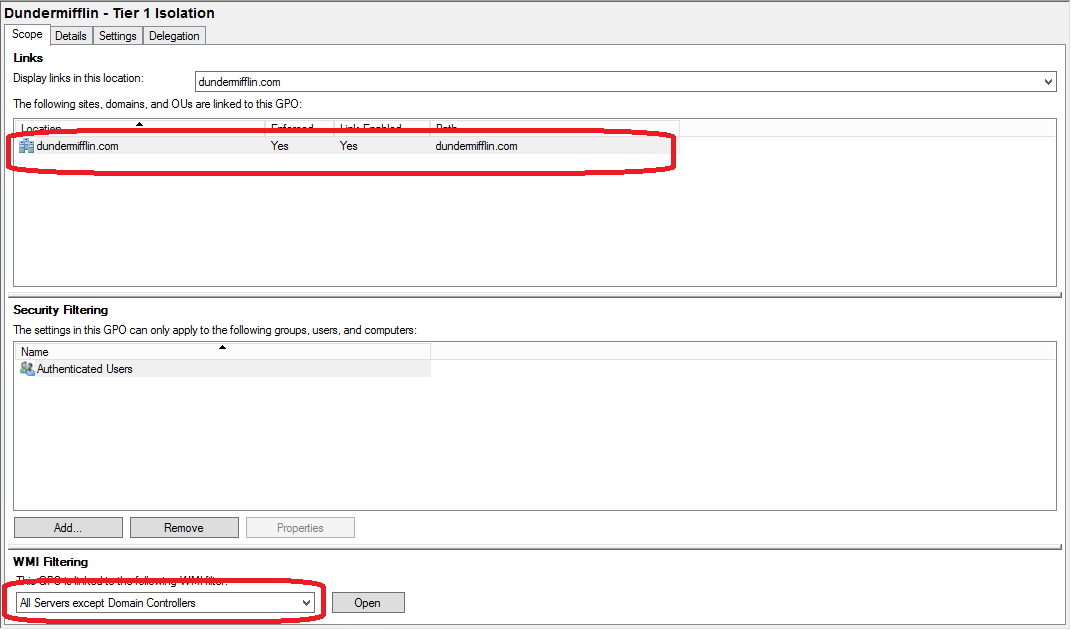
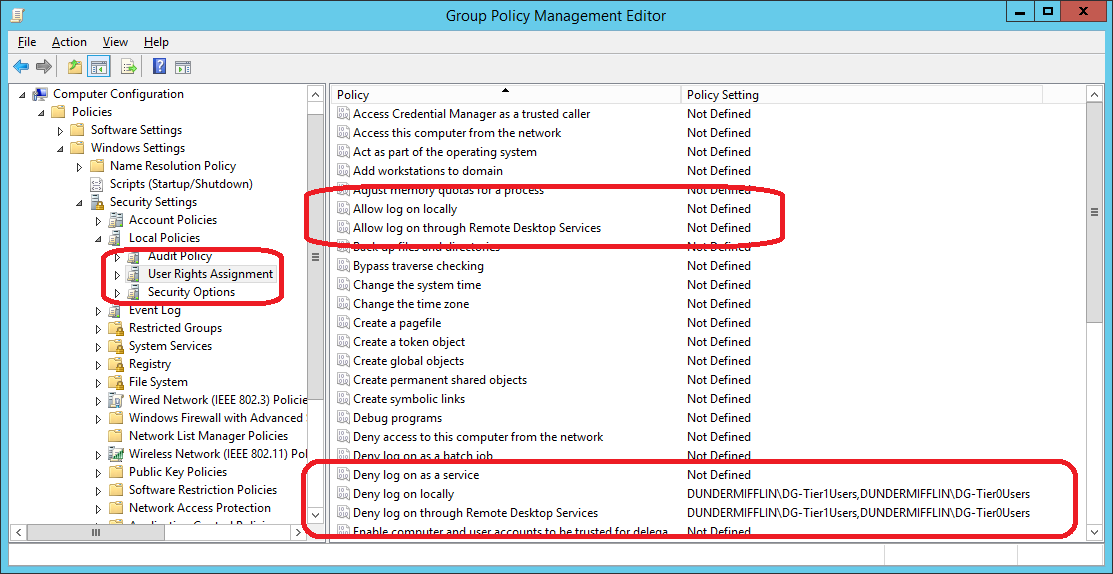
Create a group policy for each tier. It should filter based on the tier type and will contain the allow/deny rules.
4) Add members to tier groups
Finally, add your dedicated DA accounts to tier 0 group, dedicated server administrators accounts to tier 1 group. Accounts will now only be able to log in locally or via RDP if they are meant for the specific tier
This article shows the method of using the Resultant Set of Policy Tool to locate Group Policy that applies a particular setting.
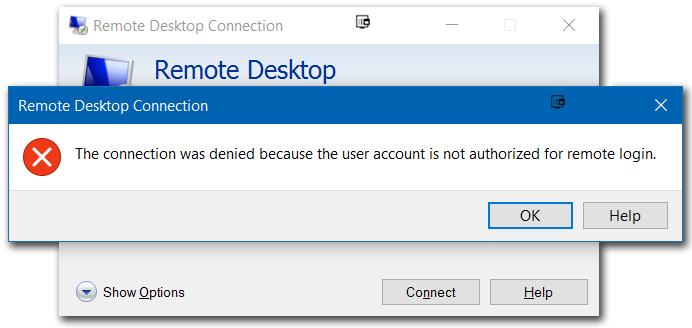
Suppose we have a computer to which we cannot Remote Desktop to but we are unsure which policy configured this.
This article shows the method of using the Resultant Set of Policy Tool to locate these settings with ease.
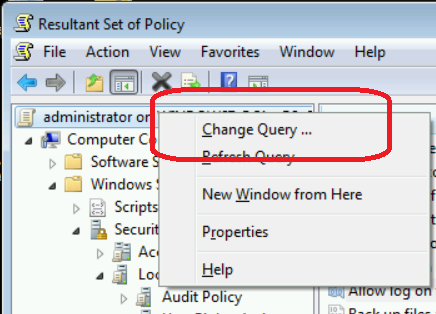
Step 1) Open RSOP.msc and change query to the user and computer to which the
setting, Allow log on through Remote Desktop Services is this case, is applied to
From the Properties Menu on the root of the RSOP tree, select Change Query
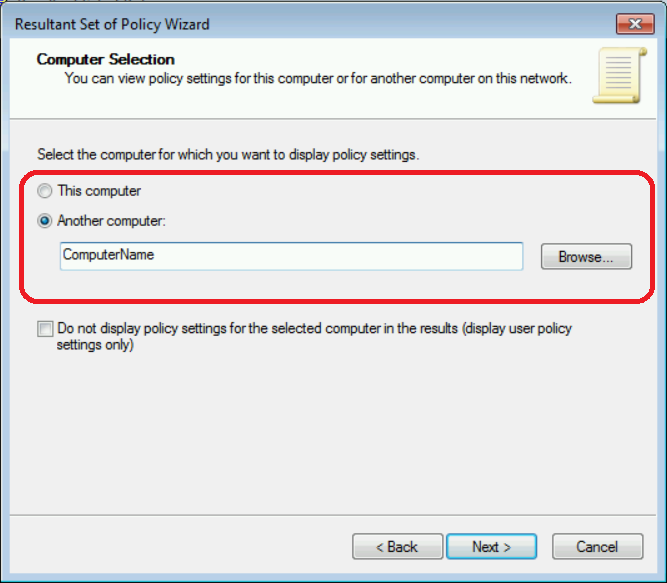
From the Resultant Set of Policy Wizard specify the computer to generate RSOP
report for. If the RSOP is for the local computer, select the This computer option and click Next
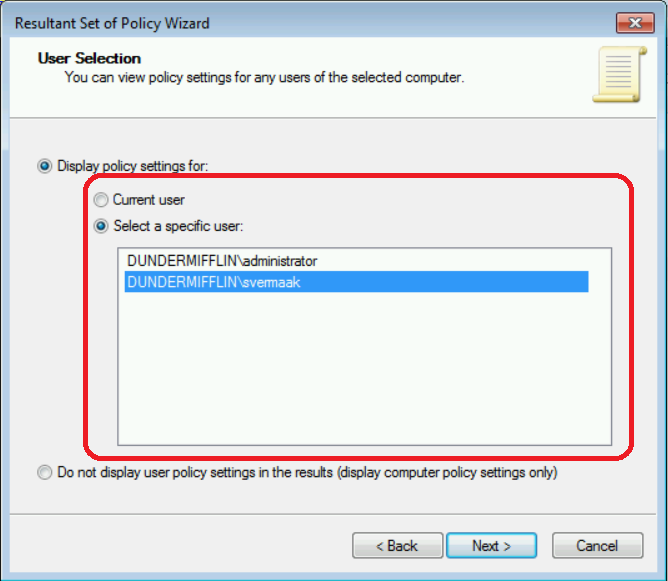
From the Resultant Set of Policy Wizard specify the user to generate RSOP
report for. If the RSOP is for the current computer, select the Current user option and click Next, Next and Finish
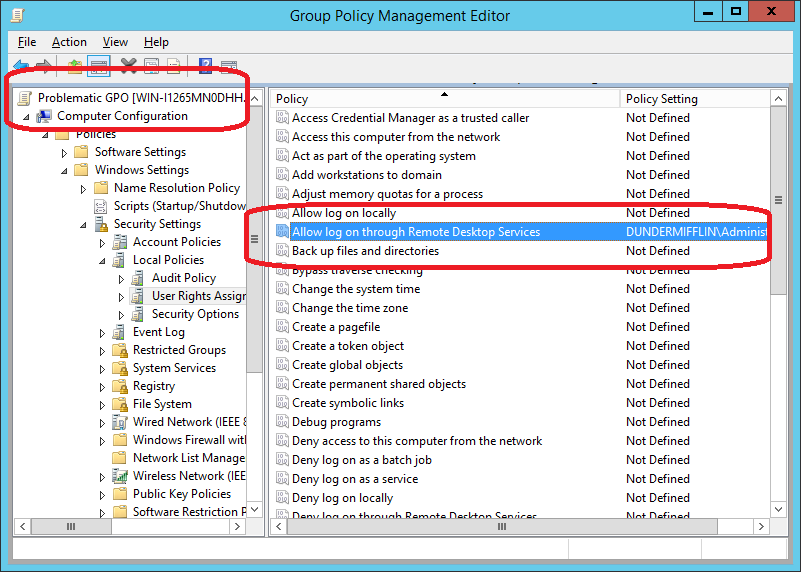
Step 2) From the Resultant Set of Policy Main Screen (1),
browse to the setting to which the Group Policy is unknown, Allow log on through Remote Desktop Services (2) is this case. As seen below, this setting originates from the Problematic GPO (3)
Step 3) Editing GPO Problematic GPO via Group Policy Management Editor shows that indeed, the setting is part of this policy
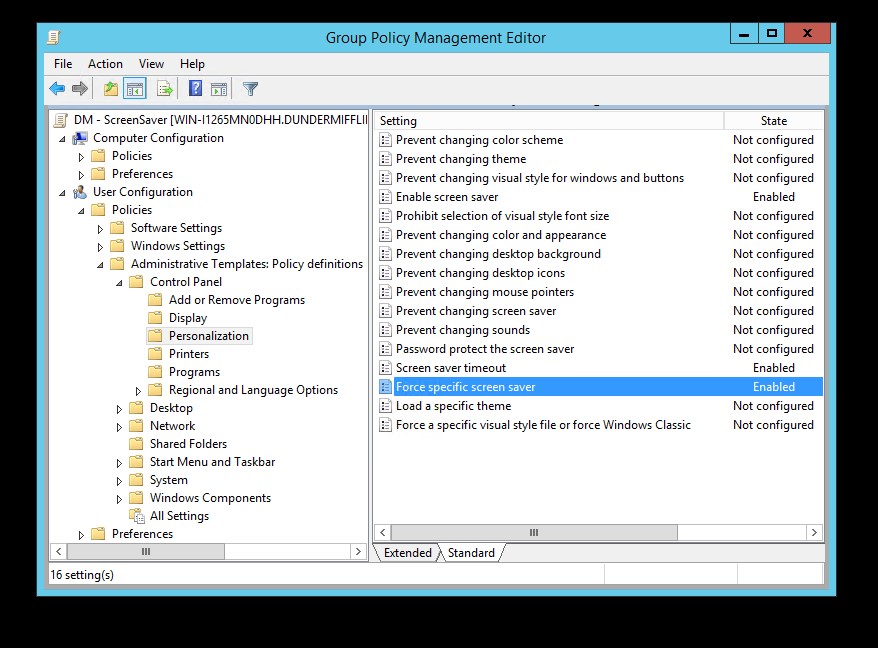
This article explains the steps required to use the default Photos screensaver to display branding/corporate images
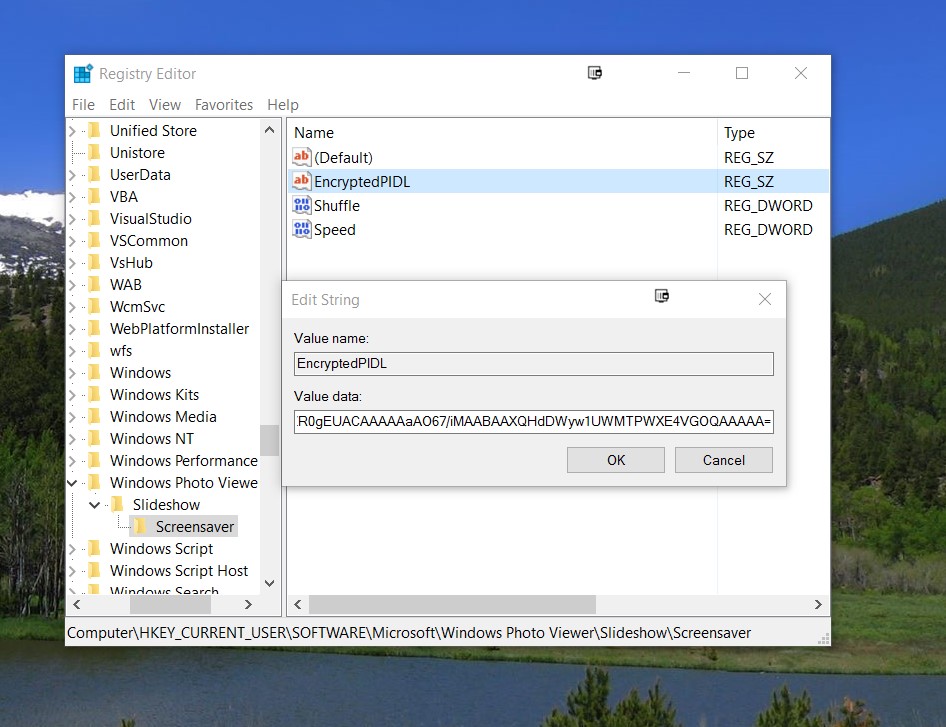
1) On reference computer, configure the default Photo screensaver including location. This is done because this value is stores as an encrypted value within the Registry. In the article C:\Winstoredranding\Dundermifflin is used.
2) Open Regedit and browse to HKCU\SOFTWARE\Microsoft\Windows Photo Viewer\Slideshow\Screensaver and record value for EncryptedPIDL
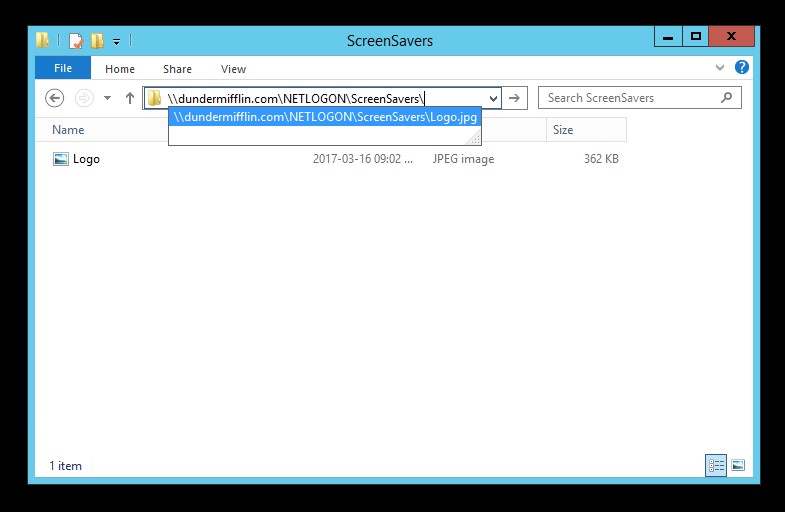
3) Store images that will be used for the screensaver in a network location The Domain DFS is perfect for small
files like these
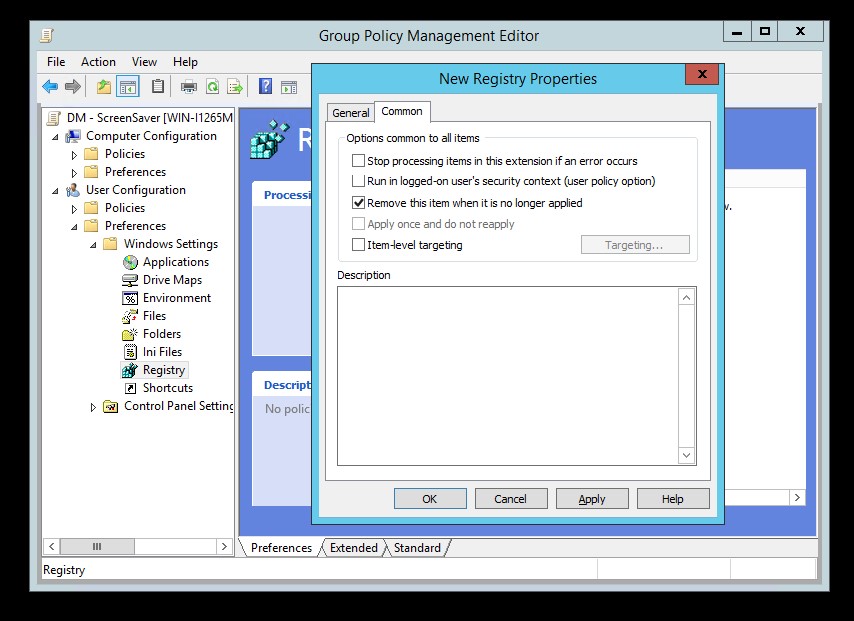
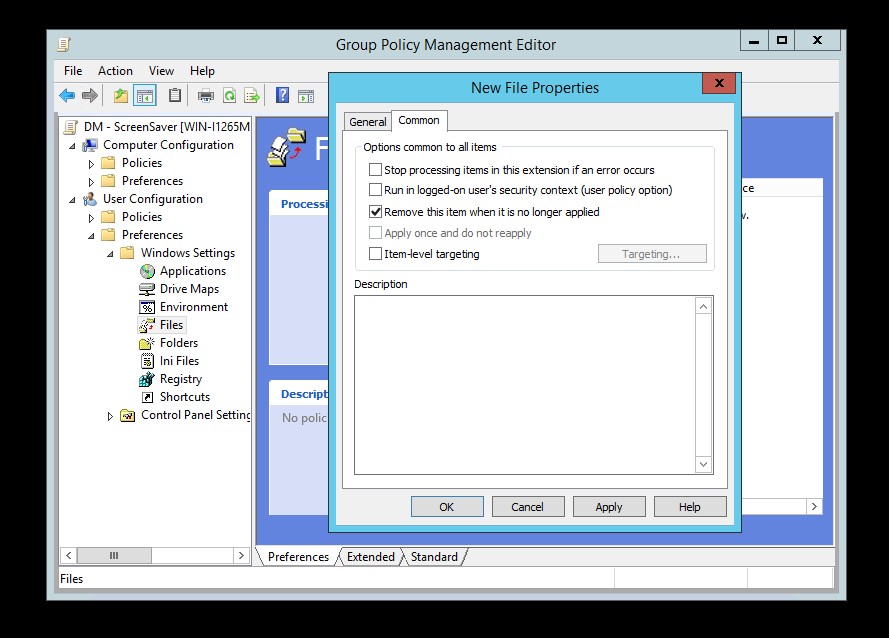
4) Create a new policy and add the EncrypedPIDL registry value to User Configuration > Preferences > Windows Settings > Registry 5) From the Common tab enable the Remove the item when it is no longer applied option
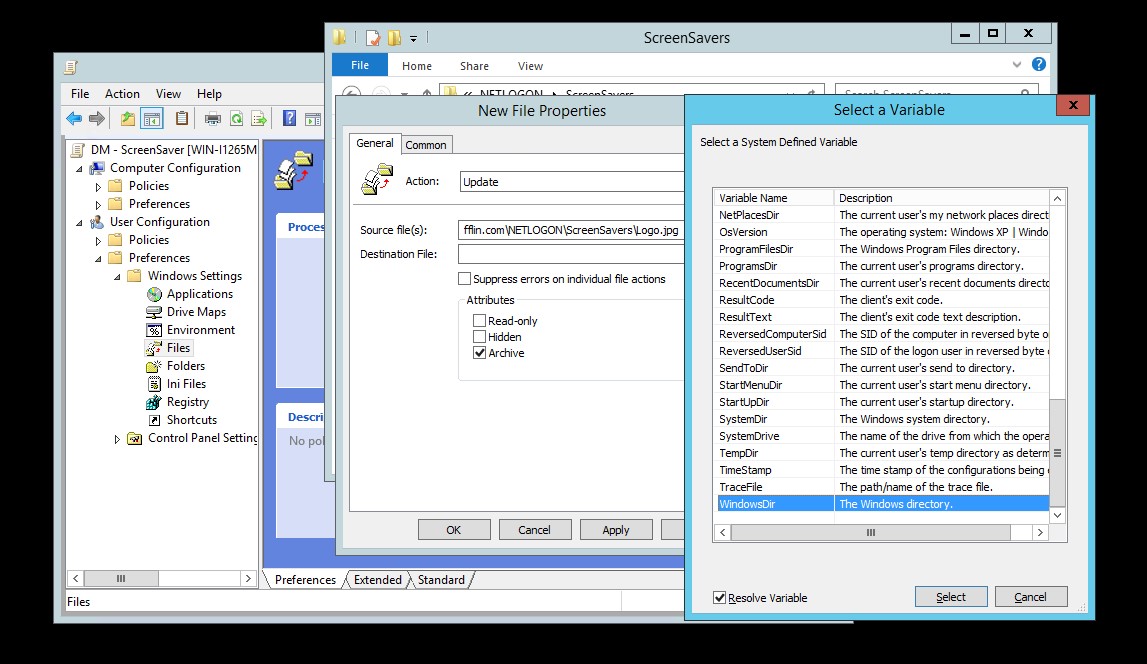
6) Add the images to User Configuration > Preferences > Windows Settings > Files. The Source File(s) should be the network location used in Step 3.
TIP: Press F3 to open Variable Reference List
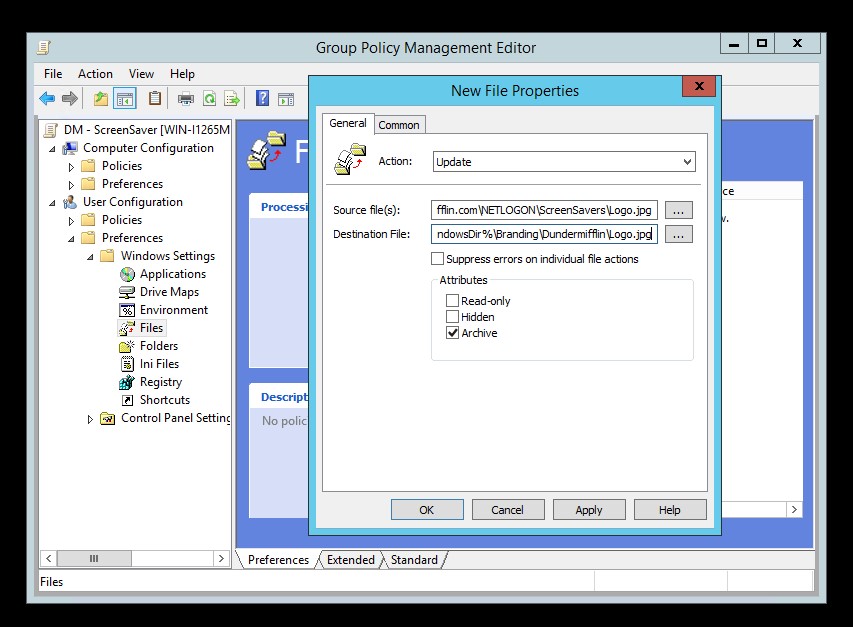
7) For the Destination File, specify filename with location from Step 1
8) From the Common tab enable the Remove the item when it is no longer applied option
9) Configure the rest of the policy as per norm for screensaver.
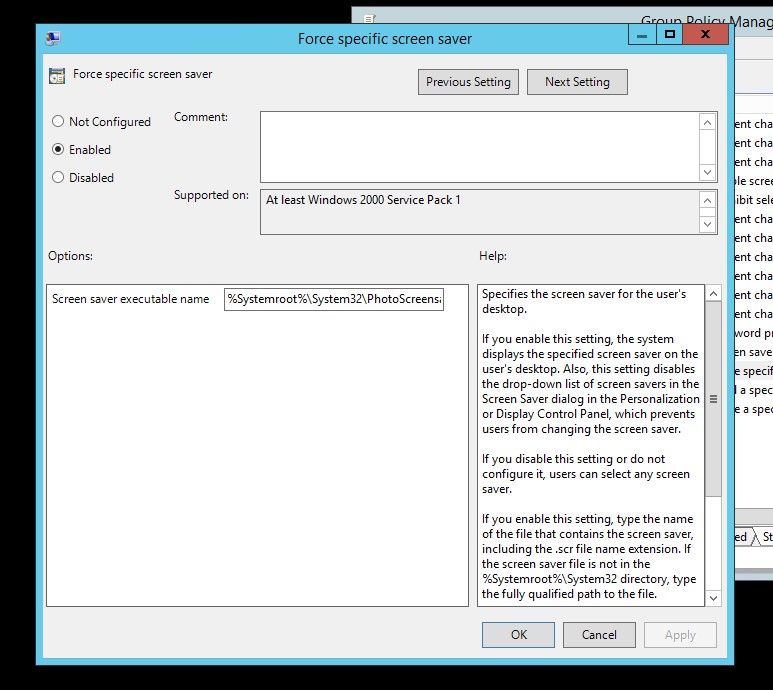
10) For the Force specific screen saver specify %Systemroot%\System32\PhotoScreensaver.scr
This article describes my battle tested process for setting up delegation.
I use this process anywhere that I need to setup delegation.
In the article I will show how it applies to Active Directory
This delegation model consists of Delegation Groups and Role Groups. These groups are explained in the following sections.
Delegation Group
Delegation groups are named according to the permission that they grant. The permission that it grants can be, but is not limited to, AD permission to do a specific task.
Characteristics
Can only contain Role Groups
Cannot be members of any groups
Some examples of a built-in Delegation Group
Domain Administrators
Account Operators
Some examples of a custom Delegation Group
Password Reset
Manage Group Memberships
Role Group
Role groups should be created based on a specific role that group of people fulfil.
These groups are used to add delegation permissions to via delegation groups.This is done by adding the Role group as a member of the delegation groups for the permissions required.
It is worth noting that this delegation is not limited to AD permissions.
If the Help Desk supports SharePoint environment, a delegation group with certain SharePoint rights can be created and assigned to the Help Desk role group. This way when a new Help Desk employee starts, it is only required to add a user account to the
Help Desk Role group.
Characteristics
Can only contain privileged user accounts
Can only be member of Delegation Groups
Some examples of a Role Group
Help Desk
Server Administrators
Benefits
No delegation against individual user accounts
Reuse of Delegation Groups
Easy to manage
Quick to determine permissions
Uncomplicated to assign correct permissions to an individual based on their function
Real world example
Typically help desks will be given delegated permissions to reset passwords. Instead of delegating permissions to various individuals or directly to the help desk group, the following should be done:
Create an intermediate group, DG-ResetPassword in this example. This is the delegation group.
Delegate the Reset Password permission to the DG-ResetPassword group.
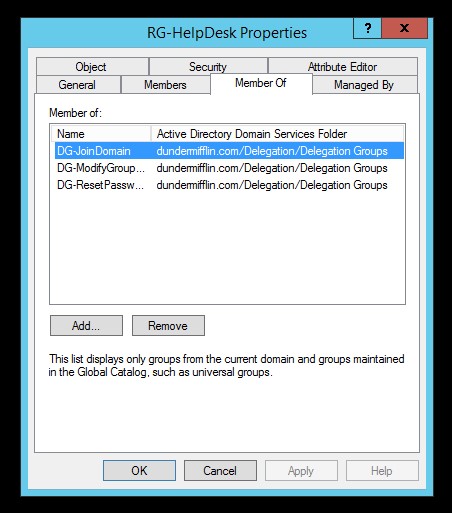
Add the help desk group role group, RG-HelpDesk in this example, to the DG-ResetPassword delegation group
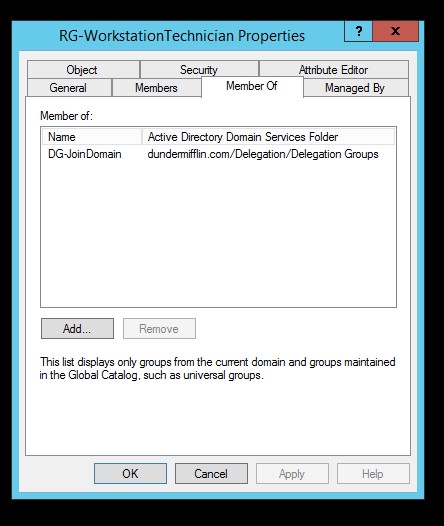
By utilising this delegation process, all delegation done to role groups is easily visible from the Member Of tab. In the example below, it is easy to see that the role group for Help Desk, RG-HelpDesk, have join domain,
modify group and reset password rights.
It also enables the reuse of delegation groups. In the example below, the same delegation group used for Help Desk, DG-JoinDomain, can be used to assign join domain rights to the Workstation Technician group.
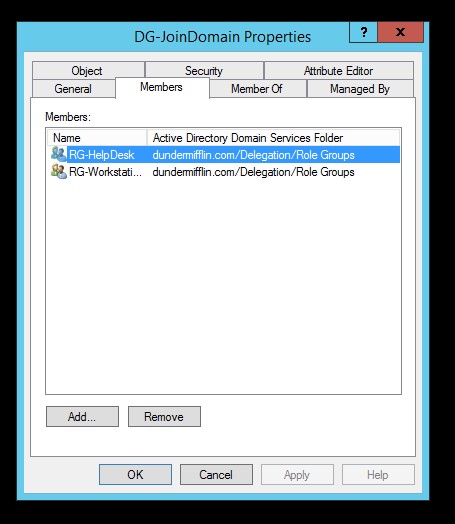
The reverse is also true. It is quick to see which groups have a particular permission. In the example below, looking
at the members of the DG-JoinDomain delegation group, it shows which role groups, RG-HelpDesk and RG-WorkstationTechnician in this case, have permissions to join computers to the domain.
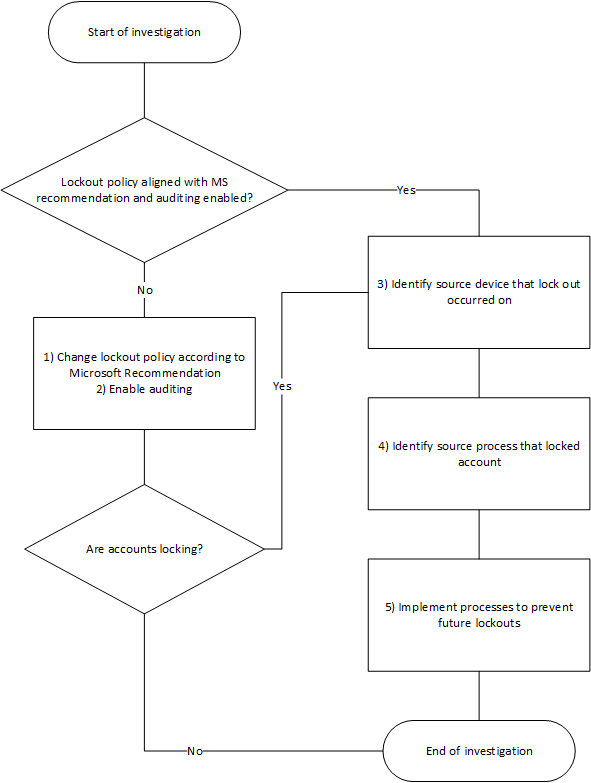
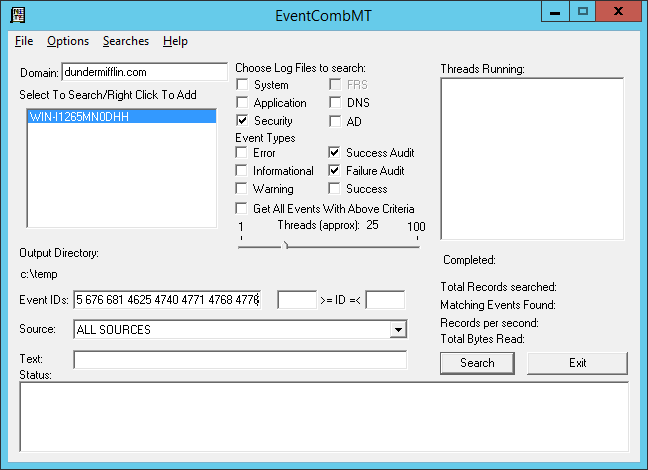
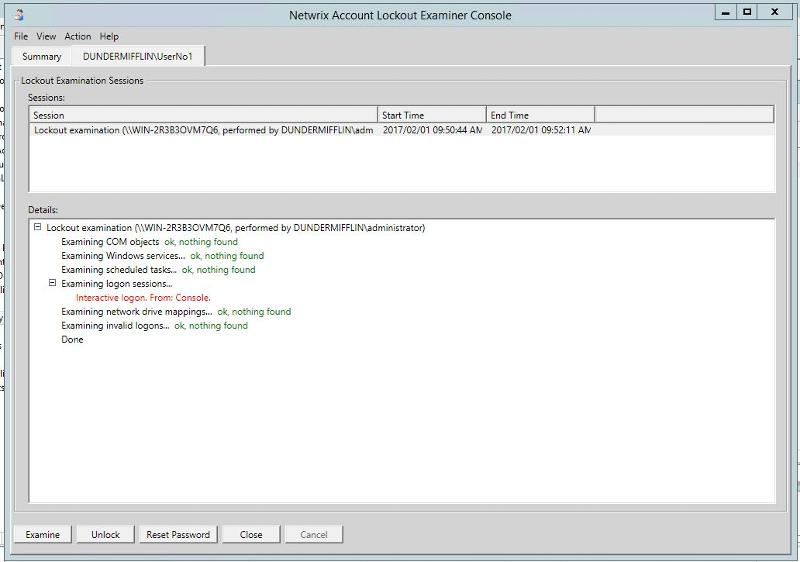
This article outlines the process to identify and resolve account lockout in an Active Directory environment.
Process
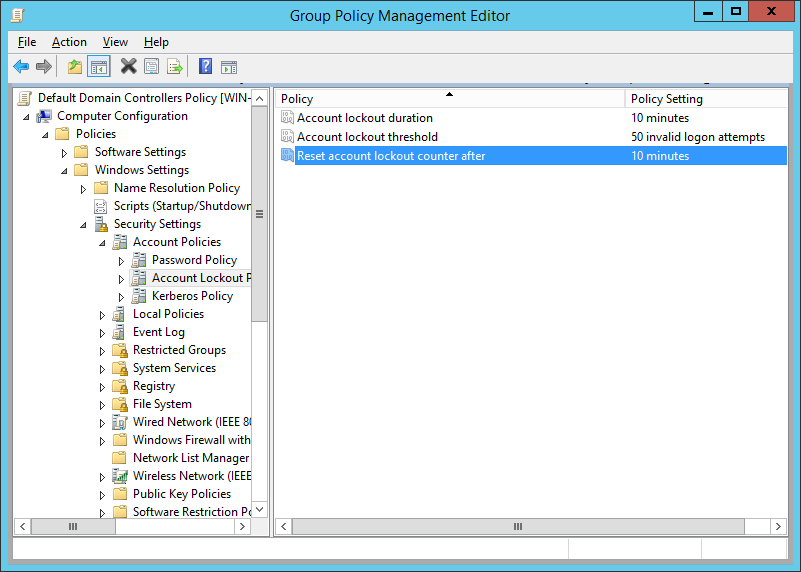
1) Change lockout policy according to Microsoft Recommendation
The lockout policy’s ultimate goal is to protect against automated password guessing (brute-force attack) and as such, the value should be high enough so that accounts are not accidentally locked out by an end user or incorrect saved password.
As per the following articles, I would recommend the following lockout settings
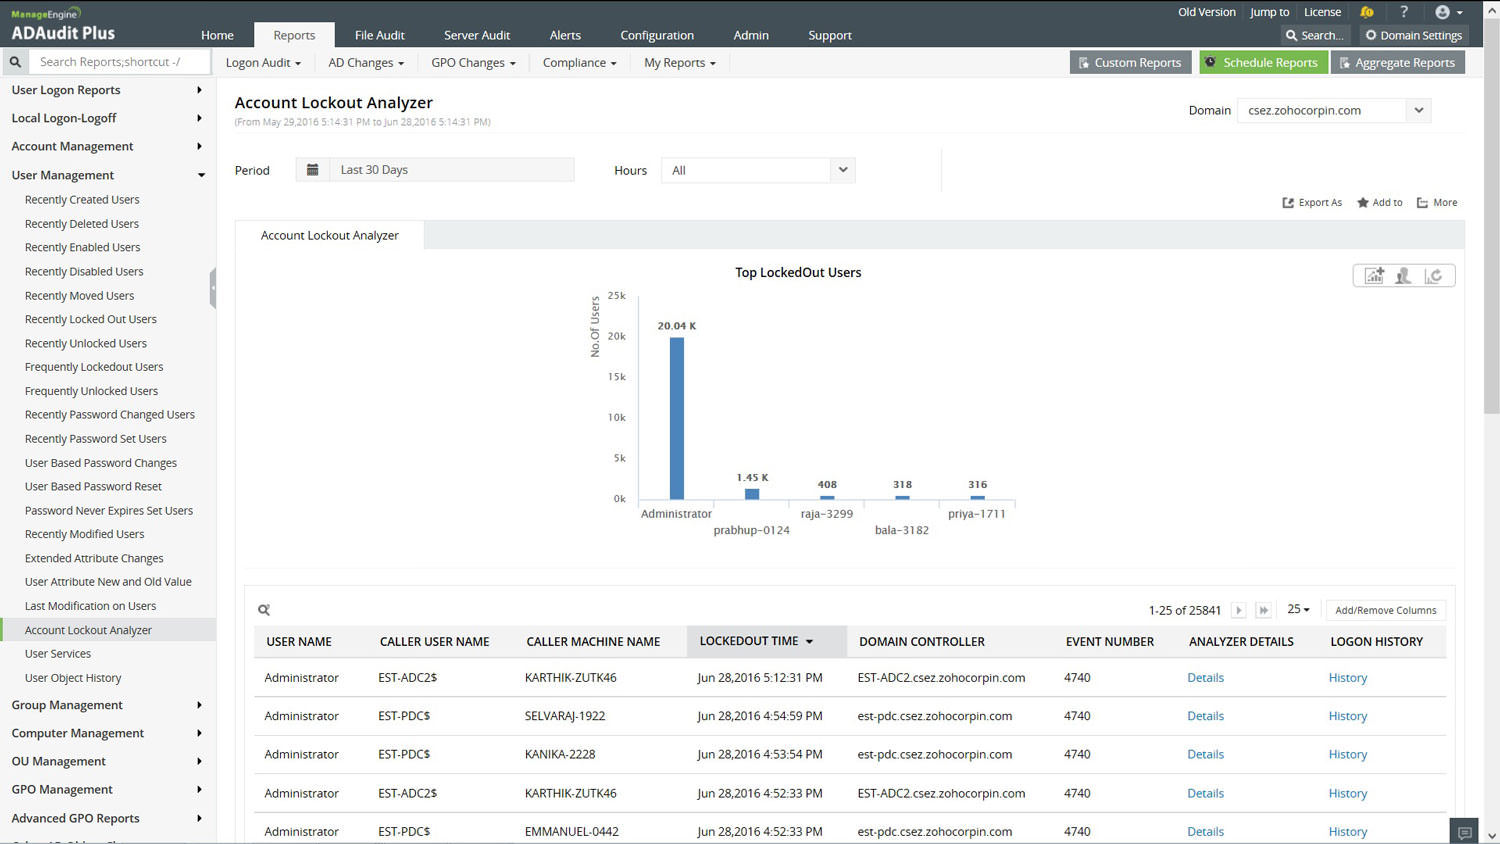
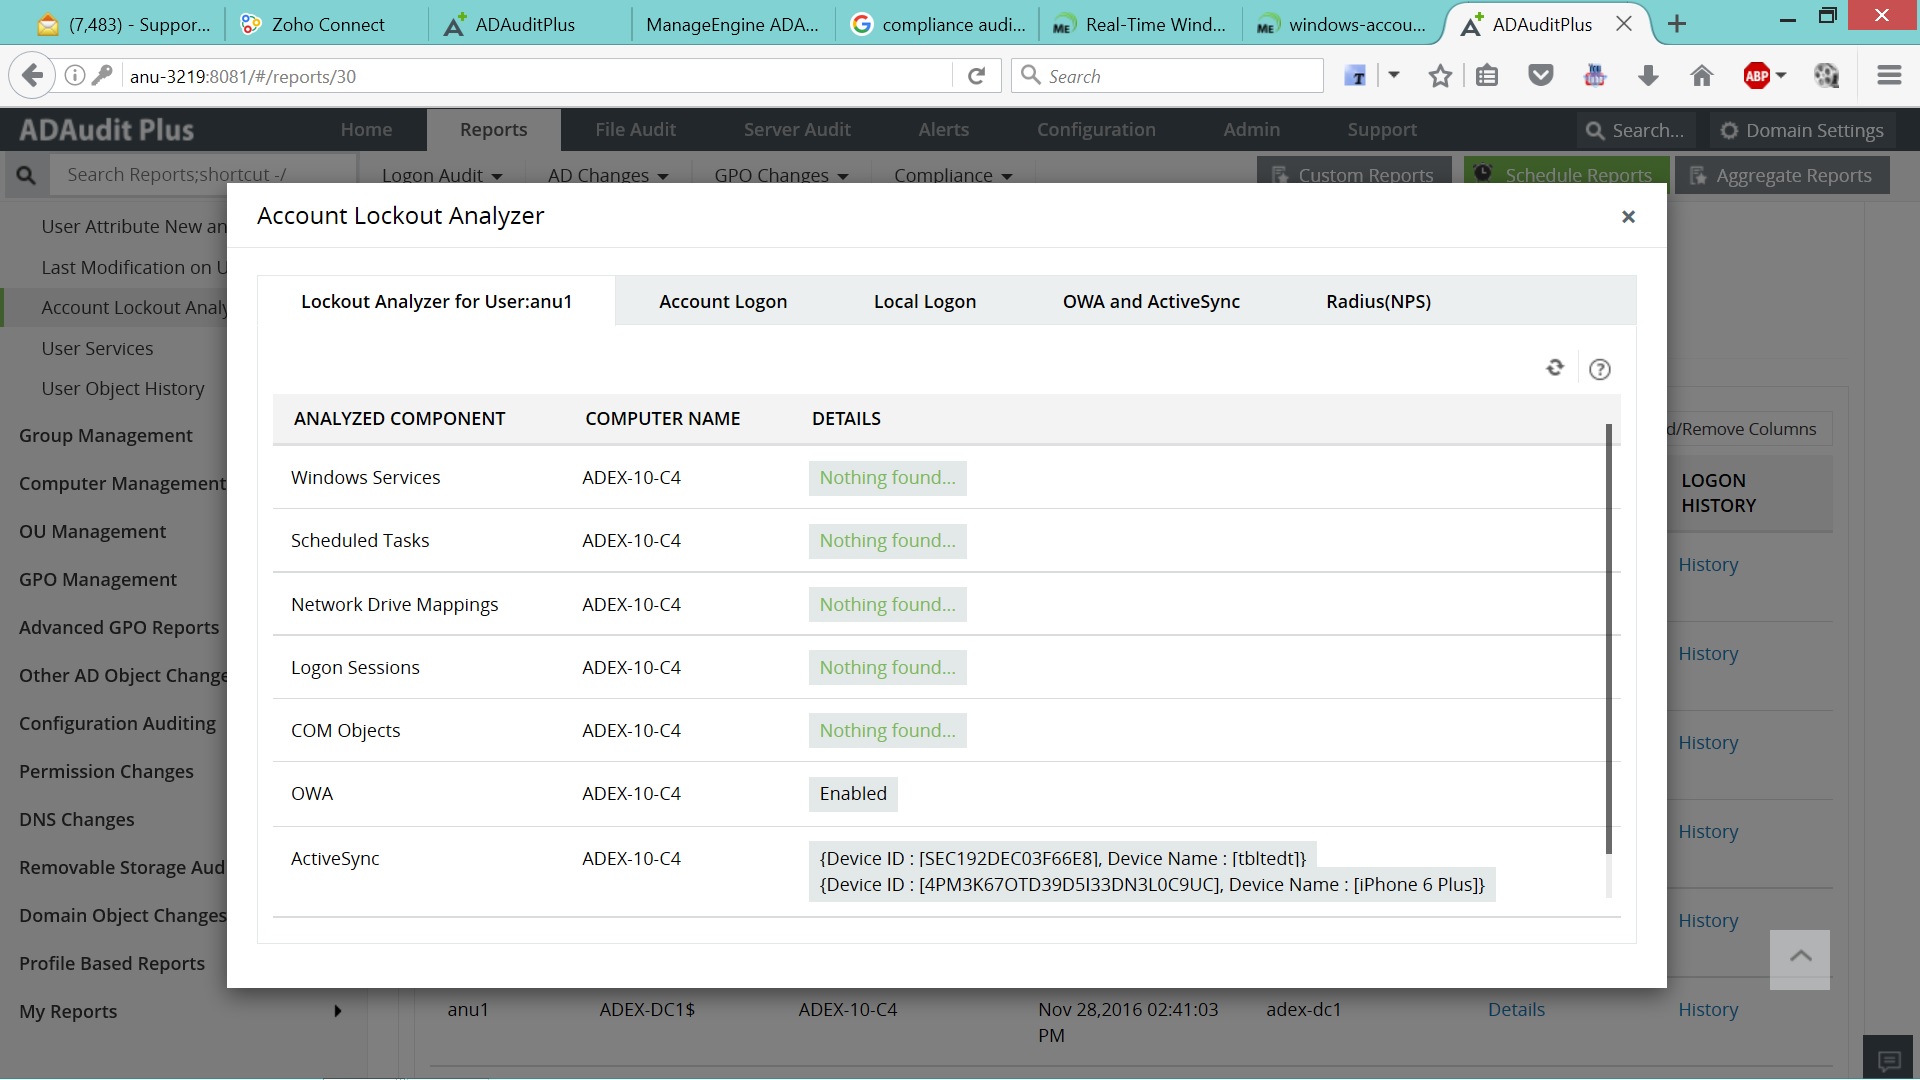
As I said before, my personal favorite. After finding source account that locks device using built-in reports, the Account Lockout Analyzer can show the source process that locks accounts
5) Implement processes to prevent future lockouts
5.1 Windows Services, Scheduled Tasks and COM Objects
Utilize service accounts with strong non-expiring passwords or managed service accounts.
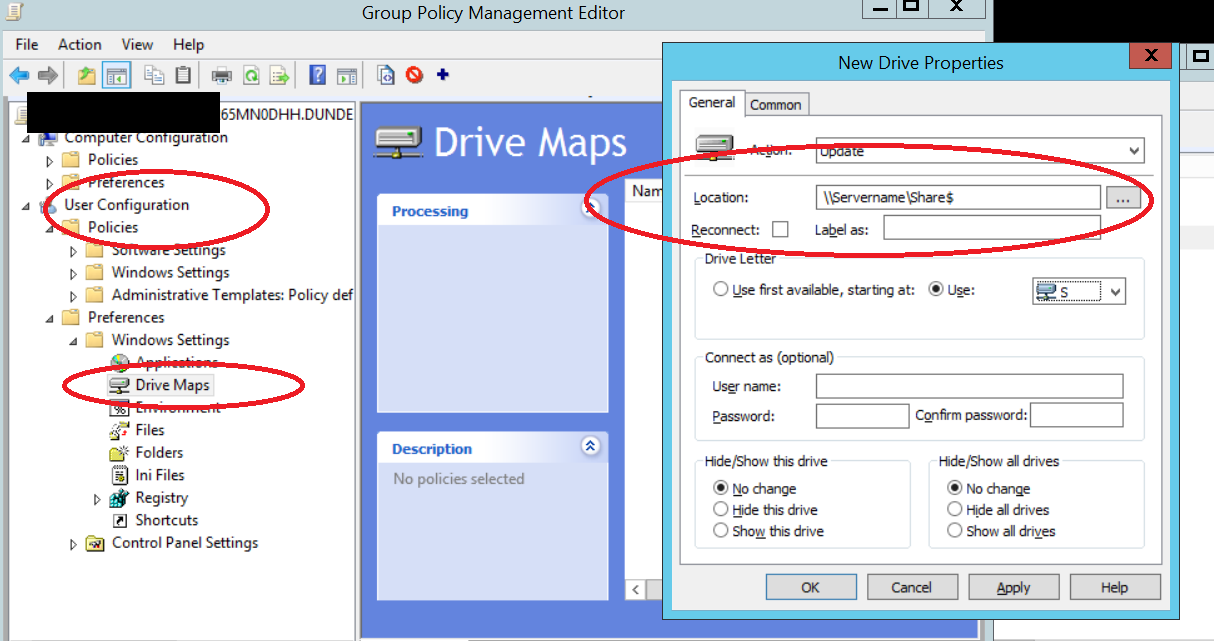
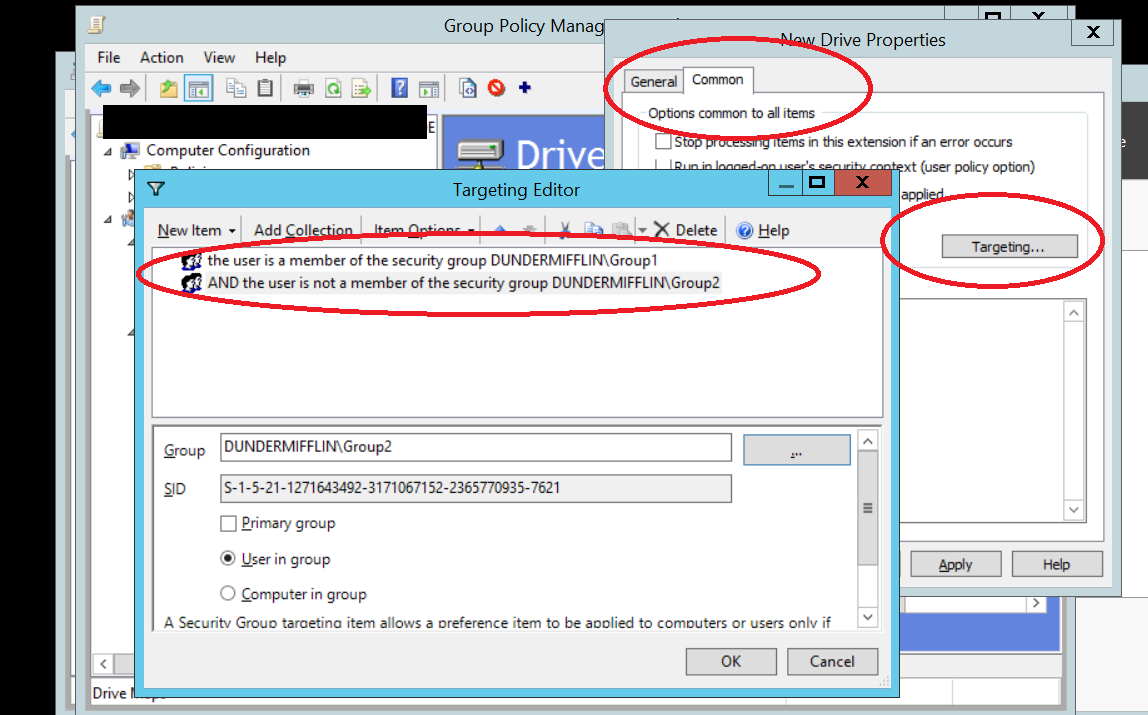
5.2 Drive Mappings
Do not map drives with explicit username and password. Utilize Group Policy User Drive Map Preference to map the drive mappings.
5.3 Logon Sessions
Implement RDP inactive/idling session logoff.
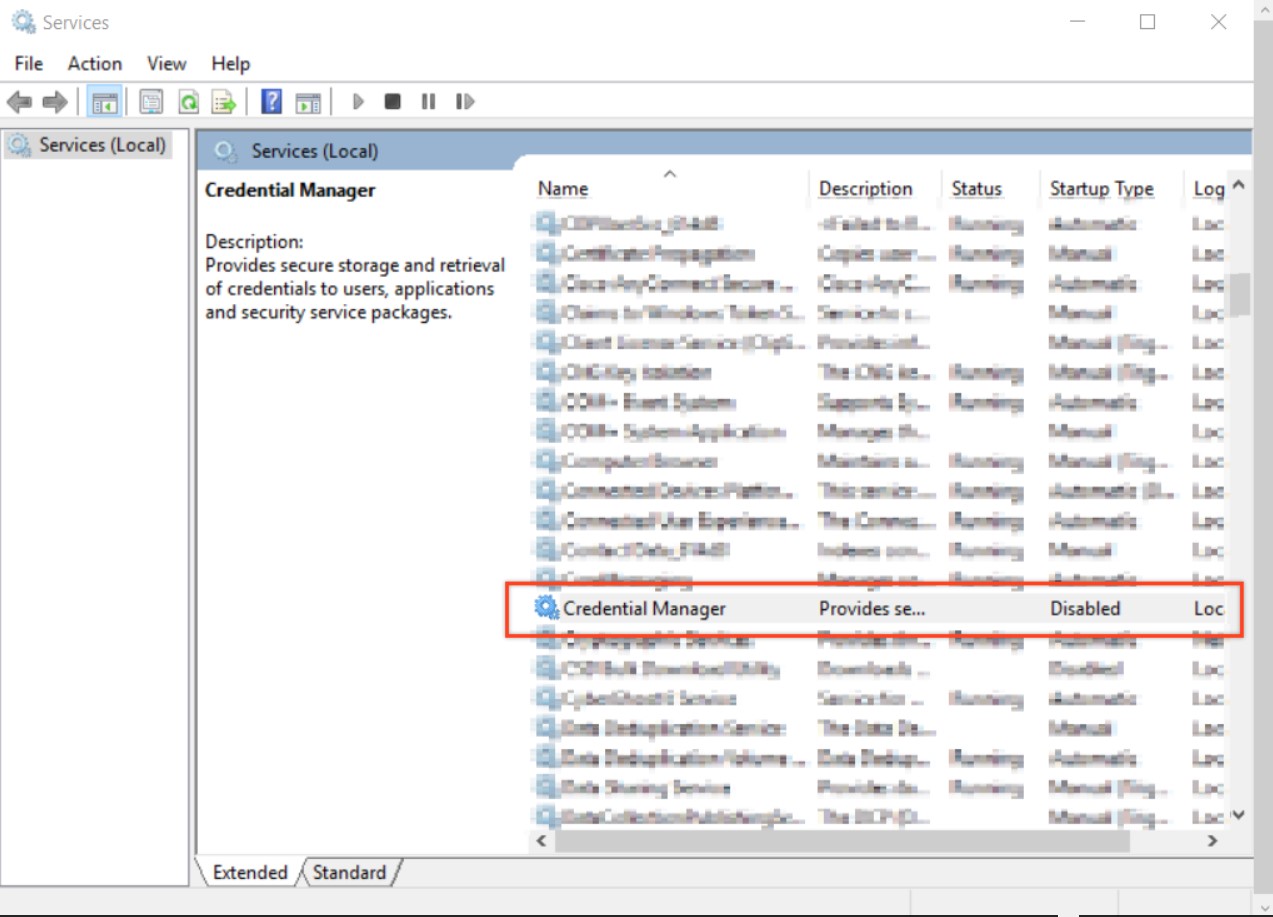
5.4 Credential Manager
Disable Credential Manager service. This will prevent users from saving/using stored passwords
Tips
If your account that you are using for the investigation is locking, rename your username for the duration of the investigation