Windows Firewall as Code

Introduction

The Windows Firewall provides an important layer of protection and a rich interface to configure it. Unfortunately, at the time of writing, the Active Directory Group Policy section for Windows Firewall with Advanced Security does not allow for the concept of item level filter, resulting in a GPO for each policy with different filtering requirements.

For example, if a handful of servers require FTP ports to be open and another group requires RDP to be allowed, you will have to create two separate GPOs. 

Over time these GPOs really add up.

The solution to this is to do “Firewall as Code” using PowerShell.

Investigation

Well-behaved applications automatically register firewall rules which means that applications will happily continue to work when the firewall is enabled. 

Unfortunately, some applications do not include this as part of their install process. These applications require a manual rule to be configured.

Involve your environment application owners, especially for providing information of running processes and supplying network diagrams. I recommend, however, that you do not directly ask application owners which ports an application needs. I’ve found that if you do that, you will usually get a massive list of irrelevant ports back, mainly because application owners will just give you a list of open ports found on the application servers.

Always check that ports which are required are limited to a specific process. This way you can whitelist the application, allowing all the required ports without actually worrying which protocols or ports are required.

This PowerShell function can be helpful to identify ports used by applications (adapted from http://blogs.microsoft.co.il/scriptfanatic/2011/02/10/how-to-find-running-processes-and-their-port-number/)

function Get-NetworkStatistics 

    $properties = 'Protocol','LocalAddress','LocalPort' 
    $properties += 'RemoteAddress','RemotePort','State','ProcessName','ProcessPath','ProcessCompany','PID' 


    netstat -ano | Select-String -Pattern '\s+(TCP|UDP)' | ForEach-Object { 


        $item = $_.line.split(" ",[System.StringSplitOptions]::RemoveEmptyEntries) 


        if($item[1] -notmatch '^\[::') 
        {
            if (($la = $item[1] -as [ipaddress]).AddressFamily -eq 'InterNetworkV6') 
            { 
               $localAddress = $la.IPAddressToString 
               $localPort = $item[1].split('\]:')[-1] 
            } 
            else 
            { 
                $localAddress = $item[1].split(':')[0] 
                $localPort = $item[1].split(':')[-1] 
            }  


            if (($ra = $item[2] -as [ipaddress]).AddressFamily -eq 'InterNetworkV6') 
            { 
               $remoteAddress = $ra.IPAddressToString 
               $remotePort = $item[2].split('\]:')[-1] 
            } 
            else 
            { 
               $remoteAddress = $item[2].split(':')[0] 
               $remotePort = $item[2].split(':')[-1] 
            }  


            New-Object PSObject -Property @{ 
                PID = $item[-1] 
                ProcessName = (Get-Process -Id $item[-1] -ErrorAction SilentlyContinue).Name
                ProcessPath = (Get-Process -Id $item[-1] -ErrorAction SilentlyContinue).Path
                ProcessCompany = (Get-Process -Id $item[-1] -ErrorAction SilentlyContinue).Company
                Protocol = $item[0] 
                LocalAddress = $localAddress 
                LocalPort = $localPort 
                RemoteAddress =$remoteAddress 
                RemotePort = $remotePort 
                State = if($item[0] -eq 'tcp') {$item[3]} else {$null} 
            } | Select-Object -Property $properties 
        } 
    } 
}

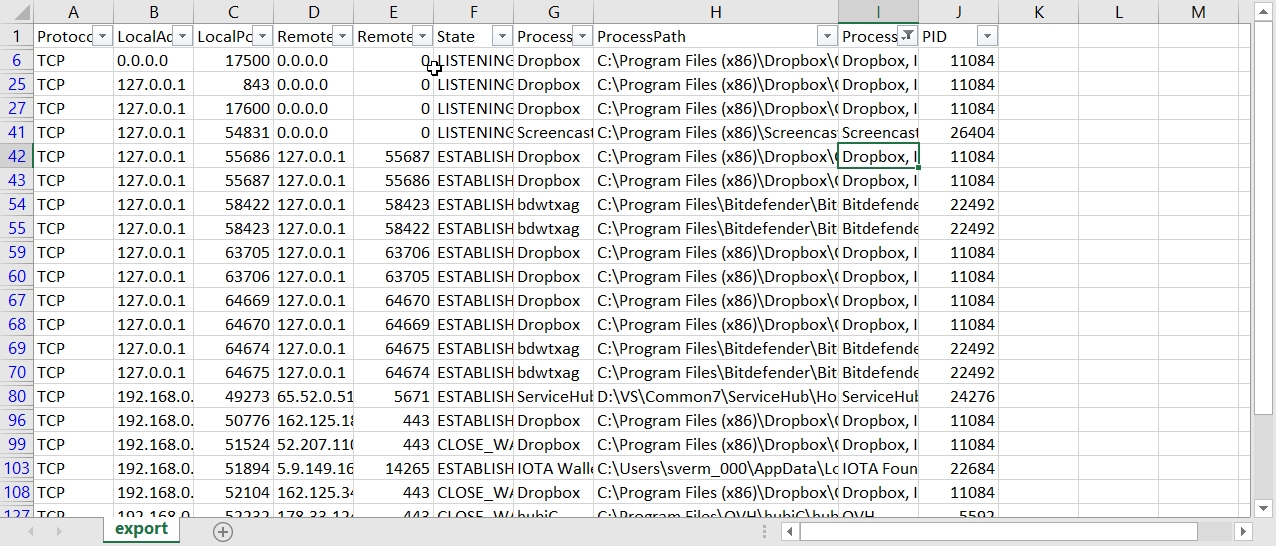
To get a report, run the following after importing the function

Get-NetworkStatistics | Export-Csv -NoTypeInformation .\Ports.csv

Sample export from PowerShell function

Prestage rules

The key to enabling Windows Firewall involves pre-staging firewall rules well in advance of actually flipping the switch. This is achieved with a PowerShell script, executed at an interval on all devices. Conditions within the script selectively create the appropriate rule.

For example, you only want MSSQL firewall rule on servers running MSSQL,

Create PowerShell Script

Although many options exist that would be able to achieve this, I picked PowerShell because of its popularity amongst Windows Administrators.

The PowerShell script to achieve this consists of the following concepts;

  • Environmental Variables
  • Global Variables
  • Local Variables
  • Conditions
  • Rules

Environmental Variables

Specifically, to creating path conditions and rules, it is always better to use Environmental variables if the application is installed into one of these common locations.

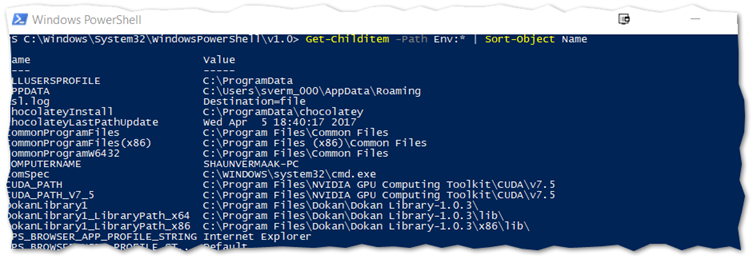
To get these variable names, use the following PowerShell command

# List PowerShell's Environmental Variables
Get-Childitem -Path Env:* |Sort-Object Name

Global Variables

Global variables are variables that are used multiple times within the script thus, it makes sense to move these to the top of the file so that they are only evaluated once. The only downside to having multiple instances of these throughout the file is that the script will take longer to execute.


Some examples:

Computer account membership

$computerGroupMembers = ([adsisearcher]"(&(objectCategory=computer)(cn=$env:COMPUTERNAME))").FindOne().Properties.memberof -replace '^CN=([^,]+).+$','$1';

Application registry key

$SqlKey = Get-ChildItem -ErrorAction SilentlyContinue "HKLM:\SOFTWARE\Microsoft\Microsoft SQL Server";

Computer system information

$Computer = Get-WmiObject -Class Win32_ComputerSystem 

Local Variables

When a variable is changed from one condition to another and/or needs to be re-evaluated from one condition to the next, use a local variable.

Conditions

Conditions determine if a particular rule will be applied. That said, a rule without a condition is considered a global rule because it applies to all devices


Some examples:

Domain Roles

switch -regex ($computer.DomainRole)
{
    "0|1"
    { #Rules for workstations go here }
    "2|3"
    { #Rules for servers go here }
    "4|5"
    { #Rules for domain controllers go here }
}

Group membership

If ($computerGroupMembers -contains "Group01") { #Rules go here }

Multiple group membership

If ($computerGroupMembers -contains "Group01" -or $computerGroupMembers -contains "Group01") { #Rules go here }

Application binary exists at path using environmental variables

If (Test-Path -Path "$($Env:programfiles)\SomePath\SomeApp.exe"){ #Rules go here }
If (Test-Path -Path "$($Env:SystemDrive)\SomePath\SomeApp.exe "){ #Rules go here }
If (Test-Path -Path "$(${Env:ProgramFiles(x86)})\SomePath\SomeApp.exe") { #Rules go here }

Application binary running (notice the local variable)

$processPath = (Get-Process -Name SomeProcessName).path;
If (Test-Path -Path "$($processPath)") { #Rules go here }

Rules

Each rule name must be unique and descriptive and if applicable to a specific protocol, add the protocol to the rule name within parentheses.

Please note: PowerShell has a powerful CMDLet called New-NetFirewallRule that vastly simplifies the addition of firewall rule. Unfortunately, older versions of PowerShell do not contain it and as such, NETSH is used because it is compatible with more devices. The downside of NETSH is that we first need to delete the rule to ensure we do not create duplicate rules on subsequent executions.


Some examples:

Management range that bypass firewall completely

netsh advfirewall firewall delete rule name="Sample Rule Name"
netsh advfirewall firewall add rule name="Sample Rule Name" protocol=any action=allow dir=IN remoteip=10.1.1.0/24,10.2.2.0/24,10.3.3.0/24

TCP single port rule

netsh advfirewall firewall delete rule name="FTP (TCP)"
netsh advfirewall firewall add rule name="FTP (TCP)" protocol=6 action=allow dir=IN localport="21"

TCP multiple port ranges rule

netsh advfirewall firewall delete rule name="Sample Rule Name (TCP)"
netsh advfirewall firewall add rule name="Sample Rule Name (TCP)" protocol=6 action=allow dir=IN localport="900,1000-2000,3000-4000"

TCP and UDP port range rule

netsh advfirewall firewall delete rule name="Sample Rule Name (TCP)"
netsh advfirewall firewall delete rule name="Sample Rule Name (UDP)"
netsh advfirewall firewall add rule name="Sample Rule Name (TCP)" protocol=6 action=allow dir=IN localport="1000-2000"
netsh advfirewall firewall add rule name="Sample Rule Name (UDP)" protocol=17 action=allow dir=IN localport="1000-2000"

Absolute path application rule

netsh advfirewall firewall delete rule name="Sample Rule Name"
netsh advfirewall firewall add rule name="Sample Rule Name" dir=in action=allow program="C:\SomePath\SomeApp.exe"

Multiple combined environmental variable application rules

netsh advfirewall firewall delete rule name="Sample Rule Name 01"
netsh advfirewall firewall delete rule name="Sample Rule Name 02"
netsh advfirewall firewall delete rule name="Sample Rule Name 03"
netsh advfirewall firewall add rule name="Sample Rule Name 01" dir=in action=allow program="$($Env:programfiles)\SomePath\SomeApp.exe"
netsh advfirewall firewall add rule name="Sample Rule Name 02" dir=in action=allow program="$($Env:ProgramFiles(x86))\SomePath\SomeApp.exe"
netsh advfirewall firewall add rule name="Sample Rule Name 02" dir=in action=allow program="$($Env:SystemDrive)\SomePath\SomeApp.exe"

Using local variable

netsh advfirewall firewall delete rule name="Sample Rule Name"
netsh advfirewall firewall add rule name="Sample Rule Name" dir=in action=allow program="$($processPath)"

Predefined rules

netsh advfirewall firewall set rule group="remote desktop" new enable=yes

Firewall.ps1 example

$computerGroupMembers = ([adsisearcher]"(&(objectCategory=computer)(cn=$env:COMPUTERNAME))").FindOne().Properties.memberof -replace '^CN=([^,]+).+$','$1';
$SqlKey = Get-ChildItem -ErrorAction SilentlyContinue "HKLM:\SOFTWARE\Microsoft\Microsoft SQL Server";

If ($computerGroupMembers -contains "FirewallAllowFTP")
{
netsh advfirewall firewall delete rule name="FTP (TCP)"
netsh advfirewall firewall add rule name="FTP (TCP)" protocol=6 action=allow dir=IN localport="21"
}

If ($computerGroupMembers -contains "FirewallAllowRDP")
{
netsh advfirewall firewall set rule group="remote desktop" new enable=yes
}

If (Test-Path -Path "$($Env:SystemDrive)\App\bin\Engine.exe")
{
netsh advfirewall firewall delete rule name="App01"
netsh advfirewall firewall add rule name="App02" dir=in action=allow program="$($Env:SystemDrive)\App\bin\App.exe"
}

If ($SqlKey -ne $null)
{
netsh advfirewall firewall delete rule name="MSSQL - SQL Server"
netsh advfirewall firewall delete rule name="MSSQL - SQL Admin Connection"
netsh advfirewall firewall delete rule name="MSSQL - SQL Database Management"
netsh advfirewall firewall delete rule name="MSSQL - SQL Service Broker"
netsh advfirewall firewall delete rule name="MSSQL - SQL Debugger/RPC"
netsh advfirewall firewall delete rule name="MSSQL - SQL Server Browse Button Service"
netsh advfirewall firewall delete rule name="MSAS - SQL Analysis Services"
netsh advfirewall firewall delete rule name="MSAS - SQL Browser"
netsh advfirewall firewall delete rule name="MSRS - HTTP"
netsh advfirewall firewall delete rule name="MSRS - SSL"

netsh advfirewall firewall add rule name="MSSQL - SQL Server" dir=in action=allow protocol=TCP localport=1433
netsh advfirewall firewall add rule name="MSSQL - SQL Admin Connection" dir=in action=allow protocol=TCP localport=1434
netsh advfirewall firewall add rule name="MSSQL - SQL Database Management" dir=in action=allow protocol=UDP localport=1434
netsh advfirewall firewall add rule name="MSSQL - SQL Service Broker" dir=in action=allow protocol=TCP localport=4022
netsh advfirewall firewall add rule name="MSSQL - SQL Debugger/RPC" dir=in action=allow protocol=TCP localport=135
netsh advfirewall firewall add rule name="MSSQL - SQL Server Browse Button Service" dir=in action=allow protocol=UDP localport=1433
netsh advfirewall firewall add rule name="MSAS - SQL Analysis Services" dir=in action=allow protocol=TCP localport=2383
netsh advfirewall firewall add rule name="MSAS - SQL Browser" dir=in action=allow protocol=TCP localport=2382
netsh advfirewall firewall add rule name="MSRS - HTTP" dir=in action=allow protocol=TCP localport=80
netsh advfirewall firewall add rule name="MSRS - SSL" dir=in action=allow protocol=TCP localport=443

$SubKeys = Get-ChildItem "HKLM:\SOFTWARE\Microsoft\Microsoft SQL Server";
ForEach ($SubKey in $SubKeys)
{
If ($SubKey.Name.Contains("\MSSQL") -And !$SubKey.Name.Contains("\MSSQLServer"))
{
$InstanceName = $SubKey.Name.Split("\")[4]
$RegistryKey = Get-ItemProperty "HKLM:$($SubKey.Name)\Setup" -name SQLBinRoot;
$EXEPath = "$($RegistryKey.SQLBinRoot)\sqlservr.exe";

netsh advfirewall firewall delete rule name="MSSQL - $($InstanceName)"
netsh advfirewall firewall add rule name="MSSQL - $($InstanceName)" dir=in action=allow program="$($EXEPath)"
}
If ($SubKey.Name.Contains("\MSAS"))
{
$InstanceName = $SubKey.Name.Split("\")[4]
$RegistryKey = Get-ItemProperty "HKLM:$($SubKey.Name)\Setup" -name SQLBinRoot;
$EXEPath = "$($RegistryKey.SQLBinRoot)\msmdsrv.exe";

netsh advfirewall firewall delete rule name="MSAS - $($InstanceName)"
netsh advfirewall firewall add rule name="MSAS - $($InstanceName)" dir=in action=allow program="$($EXEPath)"
}
}
}

Implementation

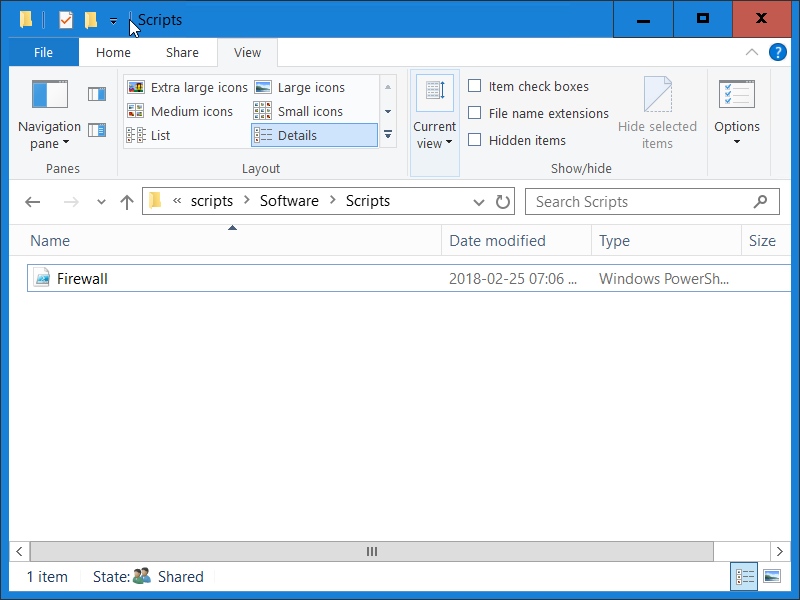
1) Copy Firewall.ps1 to shared location (\\ittelligence.com\NETLOGON\Software\Scripts in this case)

2) Deploy file via GPO Files Preferences

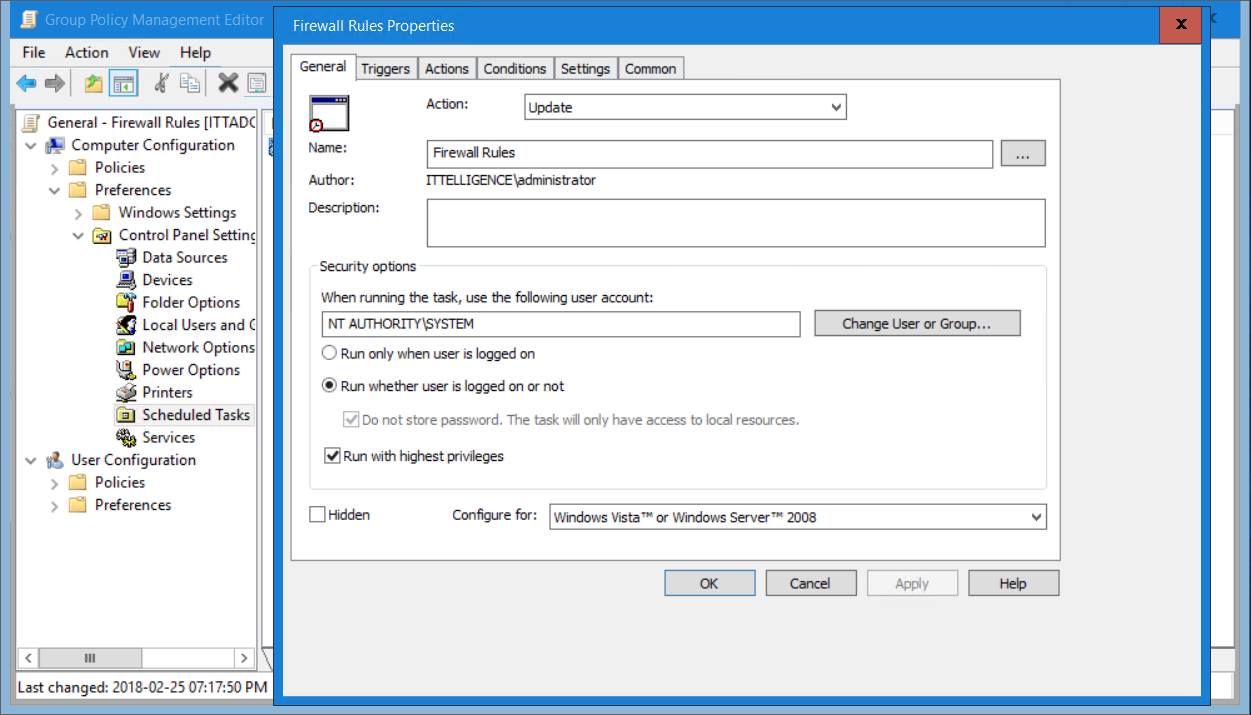
3) Create a scheduled task with GPO Scheduled Tasks running as NT AUTHORITY\SYSTEM

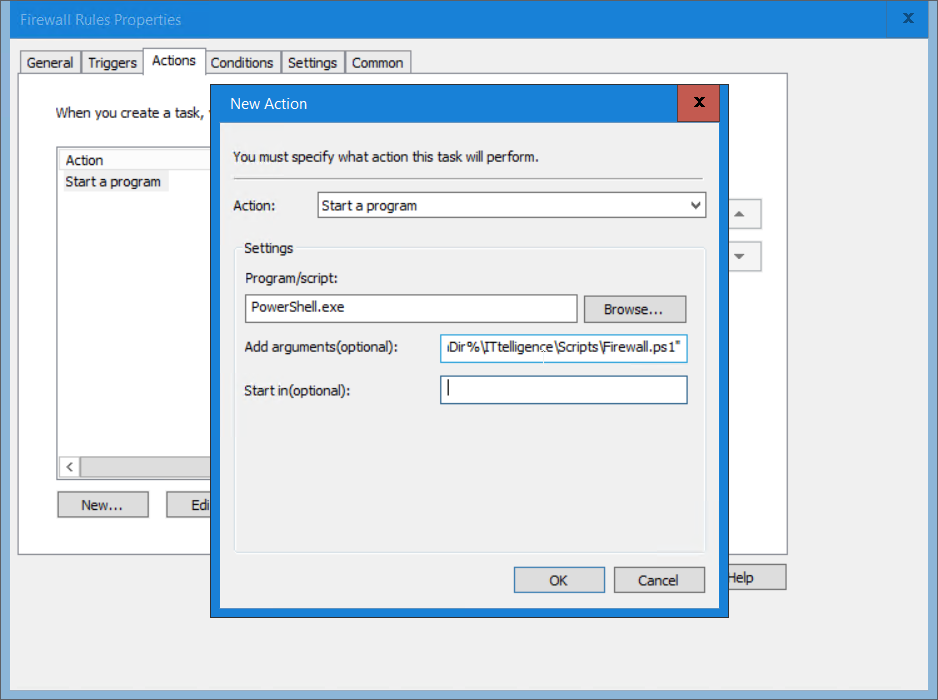
4) Specify the following as options;

Program/scripts: PowerShell.exe

Add arguments (optional): -ExecutionPolicy Bypass -File “%CommonAppdataDir%\ITtelligence\Scripts\Firewall.ps1”

5) After running this GPO for a few days do some spot checks. If rules are creating successfully, enable the firewall.
 

Active Directory – Securely Set Local Account Passwords

How it works

A token is generated for a supplied account with the desired password. 

Example of a token: k8vVeIYZeI+6rkvlvw8eLOEnHK2yTcBfHQP4UEZrCgigcagy7+qt969LISkmHH/7CS5KfVWLEZh8cZMzCkVYGw==

This token (an AES-256 encrypted version of the username and the password) is passed to the SecurelySetPassword tool which is executed at start-up via an Active Directory Group Policy.

The token is decrypted and used to set the password for the specified account to the desired password.

Step 1: Download

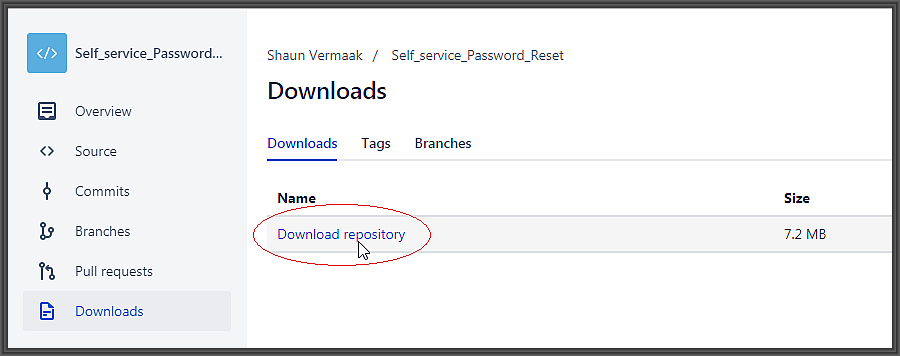
Download SecurelySetPassword tool

Step 2: Create and Test Token

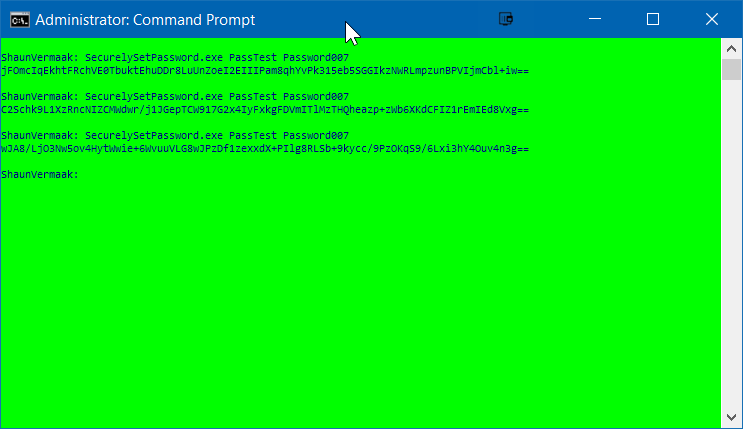
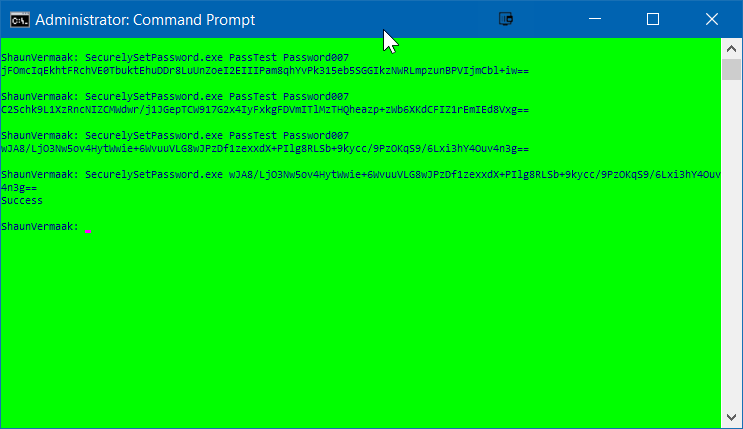
1) Run SecurelySetPassword.exe USERNAME PASSWORD (Note how the generated token is different on each run, this is because the value is salted for added security)

2) Copy token. It will be used in the implementation steps

3) To test the token, run SecurelySetPassword.exe TOKEN (Note for a successful test the user needs to exists)

Step 3: Copy SecurelySetPassword.exe to a network share

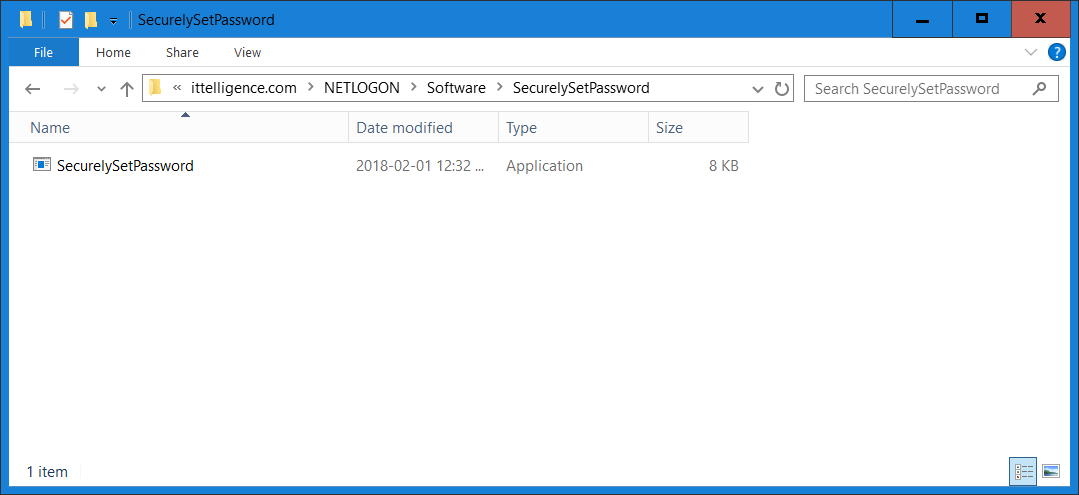
Copy SecurelySetPassword.exe to a network share accessible by all users (such as NETLOGON share)

Step 4: Implement Active Directory Group Policy

1) Start Microsoft Group Policy Management Console (GPMC.msc

2) Create and link a new Group Policy with the desired scope

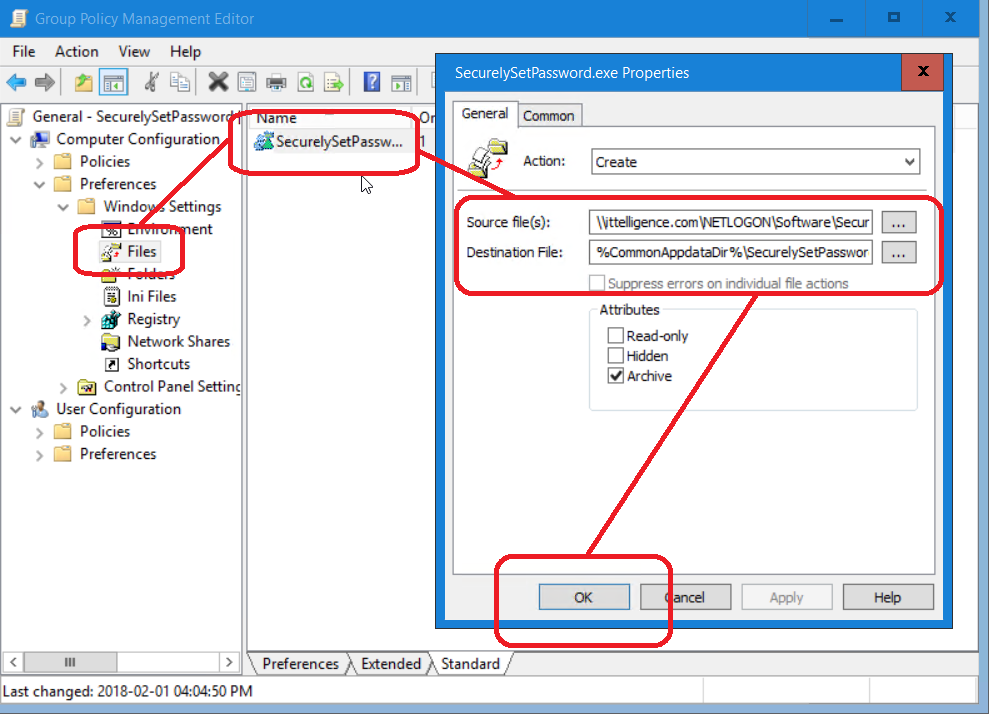
3) Browse to Computer Configuration > Preferences > Windows Settings > Files and add a new file object

4) Set the Source files(s) path to the location of SecurelySetPassword.exe (\\ittelligence.com\NETLOGON\Software\SecurelySetPassword\SecurelySetPassword.exe in my case)

5) Set the Destination file to %CommonAppdataDir%\SecurelySetPassword\SecurelySetPassword.exe

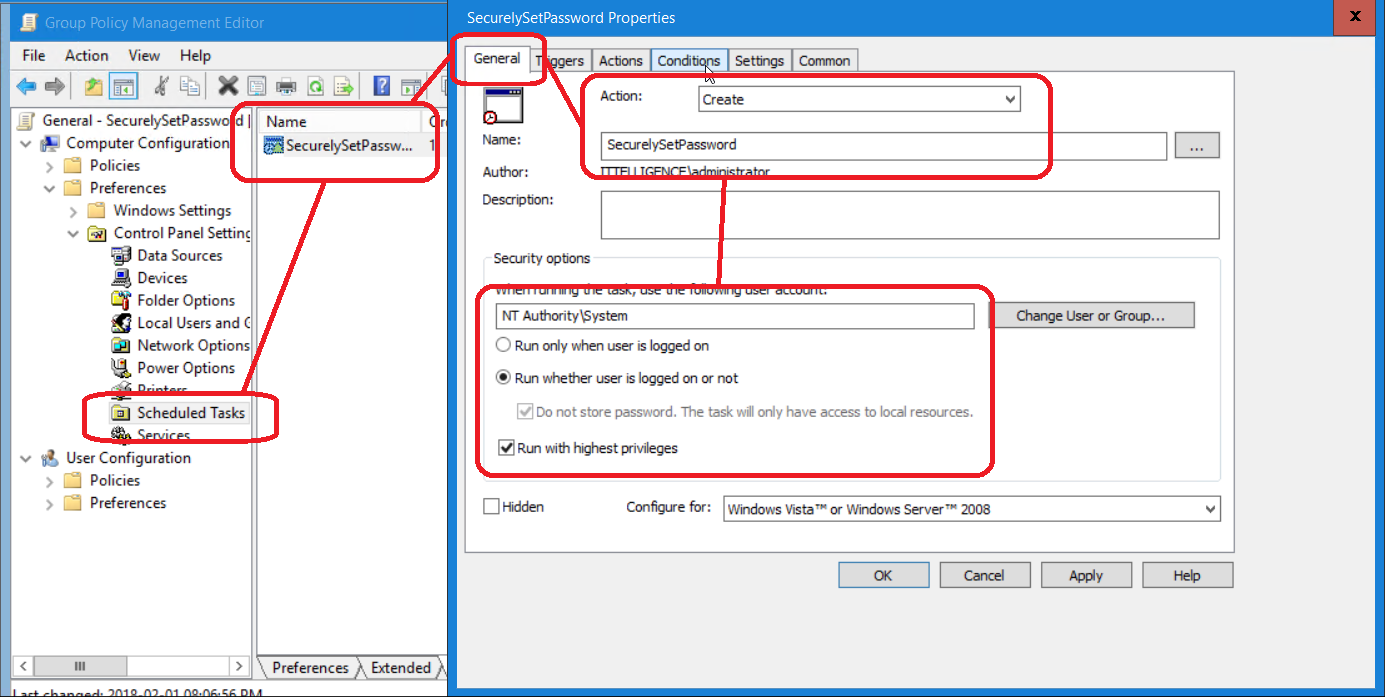
6) Browse to Computer Configuration > Preferences > Control Panel Settings > Scheduled Tasks and add a new scheduled task object 

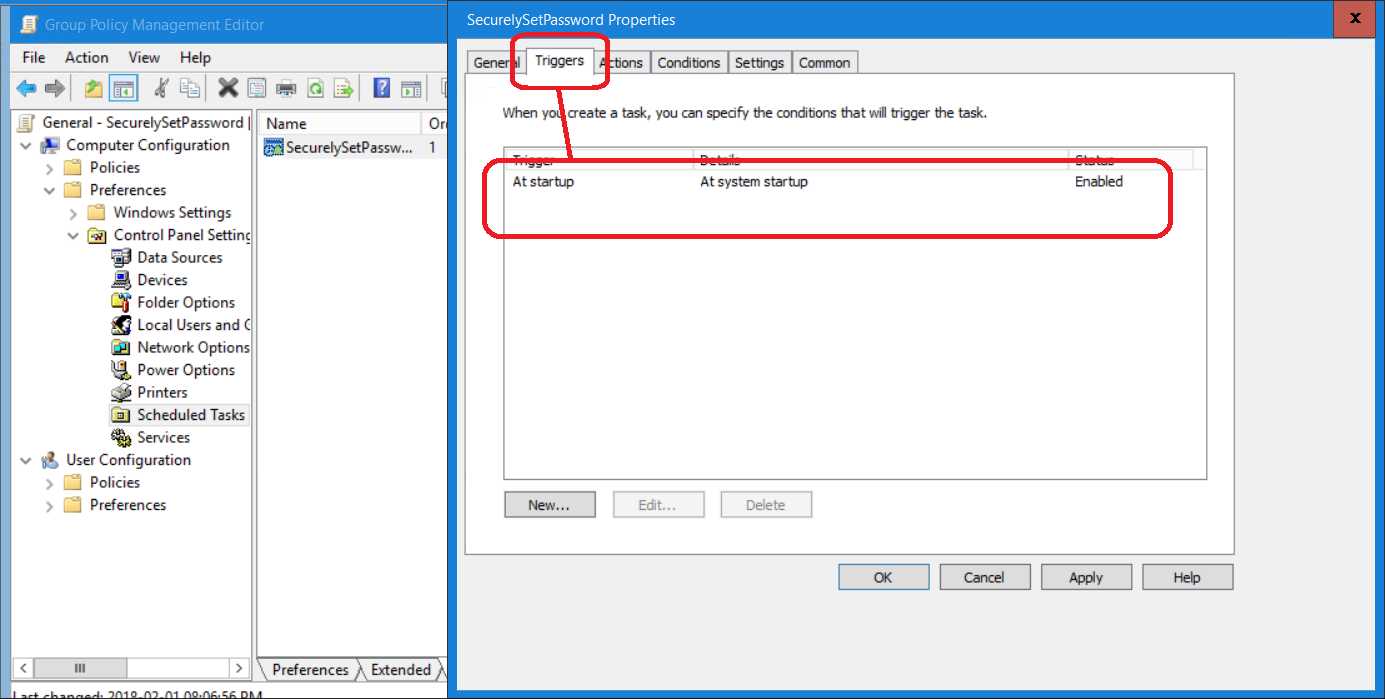
7) On the Triggers tab create new trigger and set to At startup

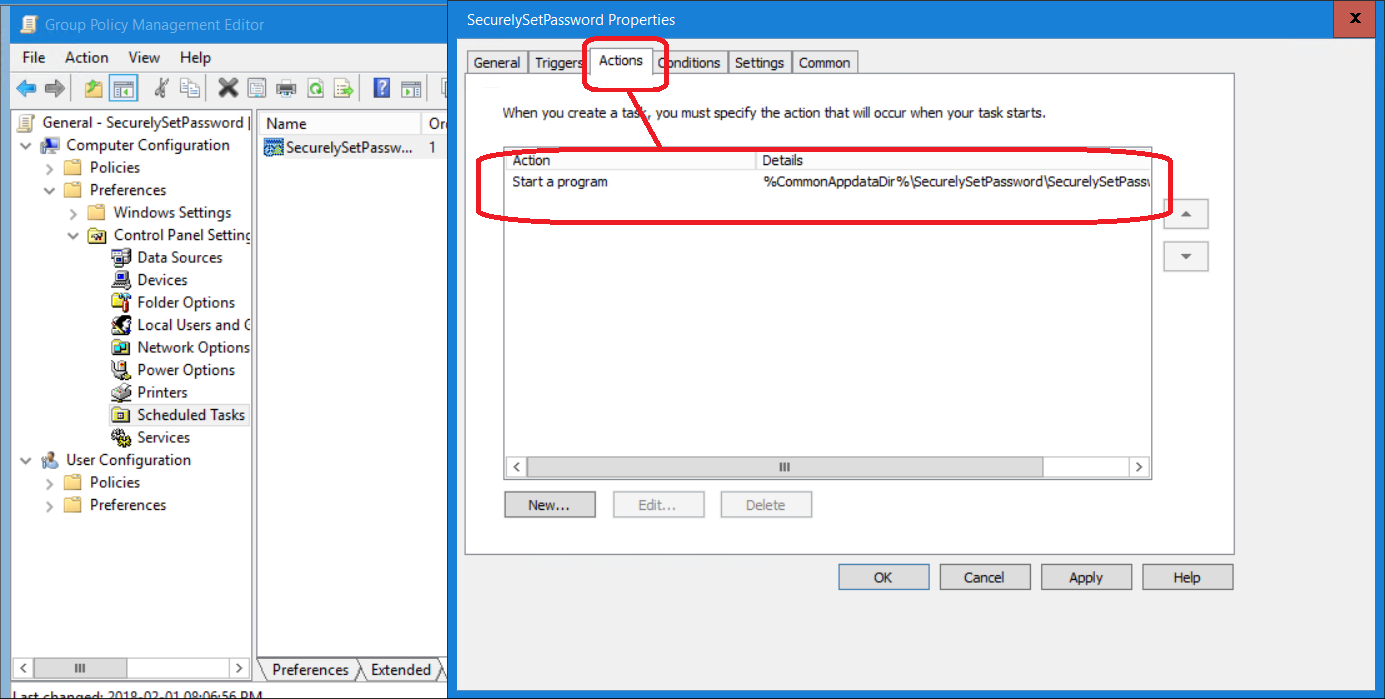
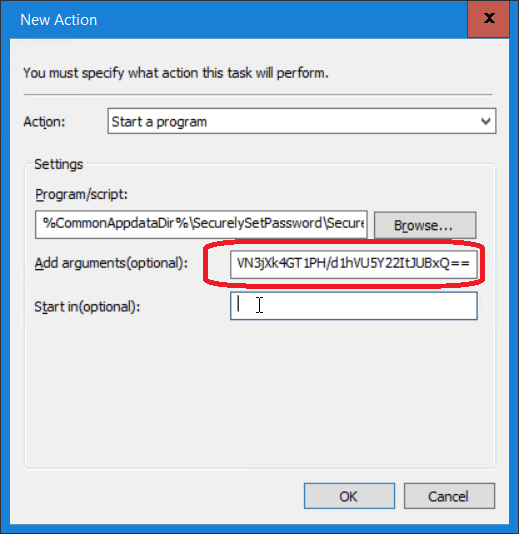
8) On the Actions tab create a Start a program action to %CommonAppdataDir%\SecurelySetPassword\SecurelySetPassword.exe with token as argument

I hope you found this tutorial useful. You are encouraged to ask questions, report any bugs or make any other comments about it below.
Active Directory – Securely Set Local Account Passwords

Prerequisites: The following assumptions have been made in this tutorial. Readers should have a basic working knowledge of Microsoft Active Directory, SQL Server and Visual Studio software.

Step 1:  Create ACTIVE DIRECTORY SERVICE ACCOUNT

Create an Active directory service account with password reset as well as user account unlock permissions.

Step 2:  Download Visual Studio Project

1) Download the provided source zip file by clicking this link  (See below)

2) Extract and open the project in Visual Studio

Step 3:  Create database

Note: The basic steps for creating the database are listed below. Explaining MS SQL functionality is beyond the scope of this article, but I am happy to answer any questions in the comments section below.

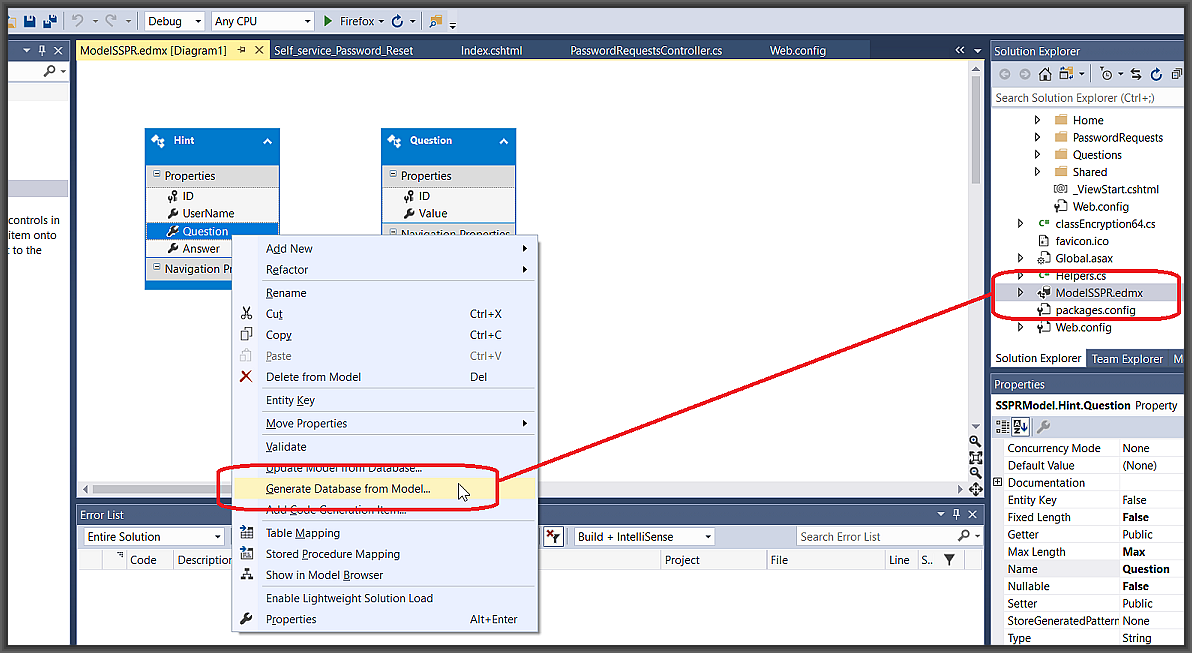
1) From the Open Project in Visual Studio, open ModelSSPR.edmx

2) Right-click on white-space on the diagram page

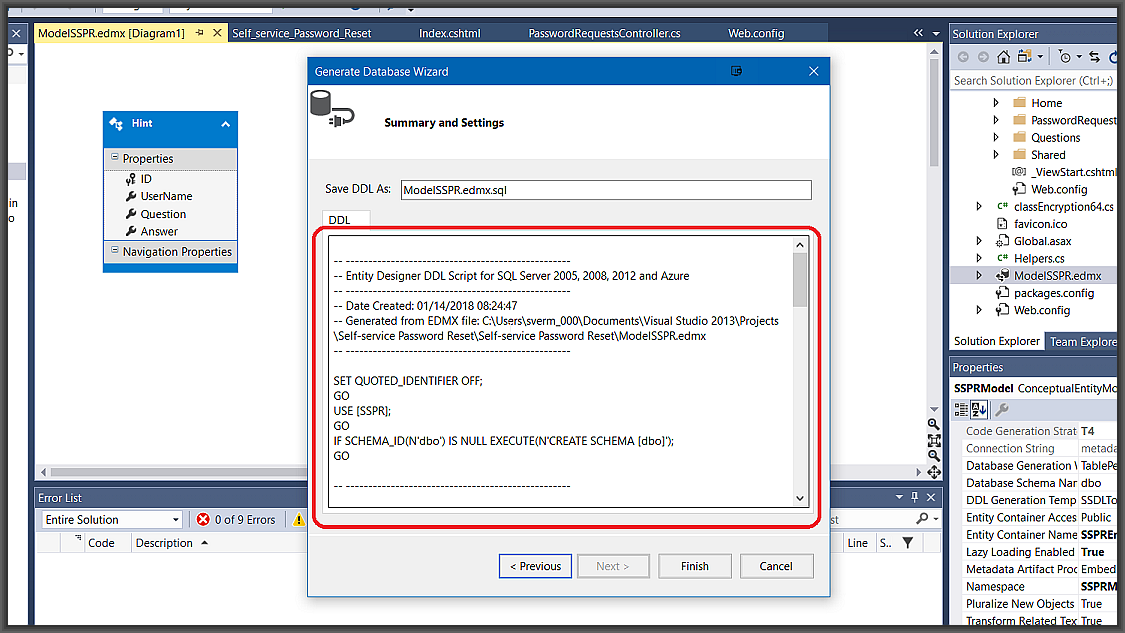
3) Then select Generate Database from Model as shown below

4) Save the SQL script and use it on Microsoft SQL Server to build the database schema

5) Create an MS SQL user and grant it DB owner rights

step 4:  Modify config file

1) From the open project in Visual Studio

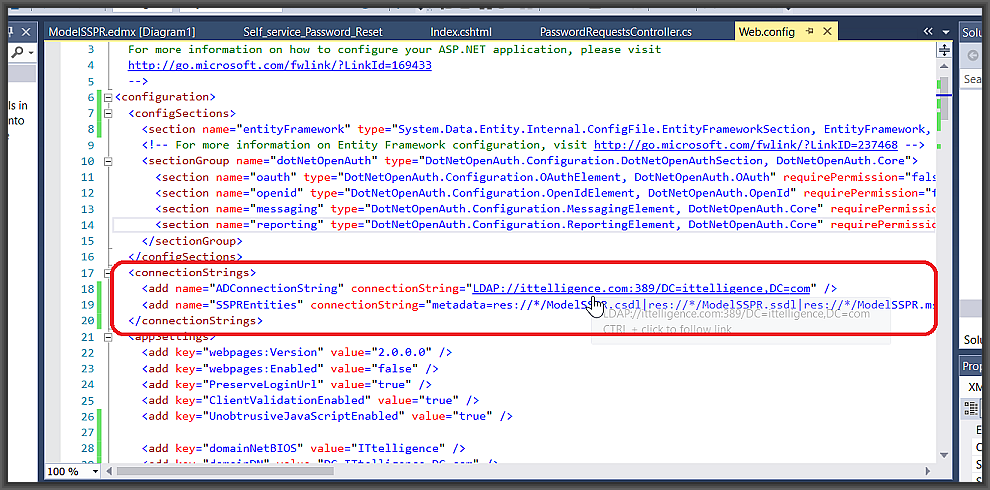
2) Replace the ADConnectionString connection string with the Active Directory LDAP string for the domain used in the Create Active Directory Service Account (Step 1)

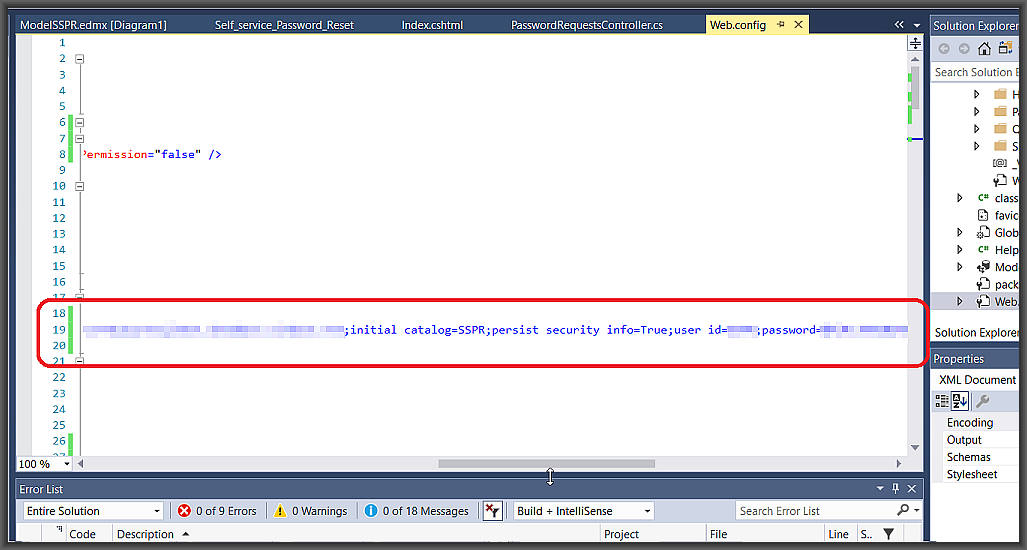
3) Replace the SSPREntities connection string with the connection string of the database used in the Create Database (Step 3)

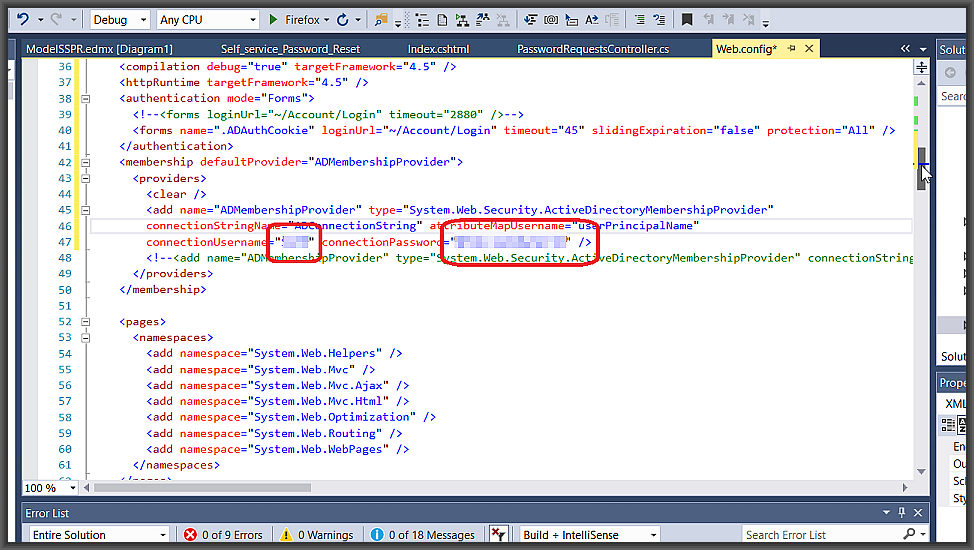
4) Configure ADMembershipProvider to the account created in the Create Active Directory Service Account (Step 1)

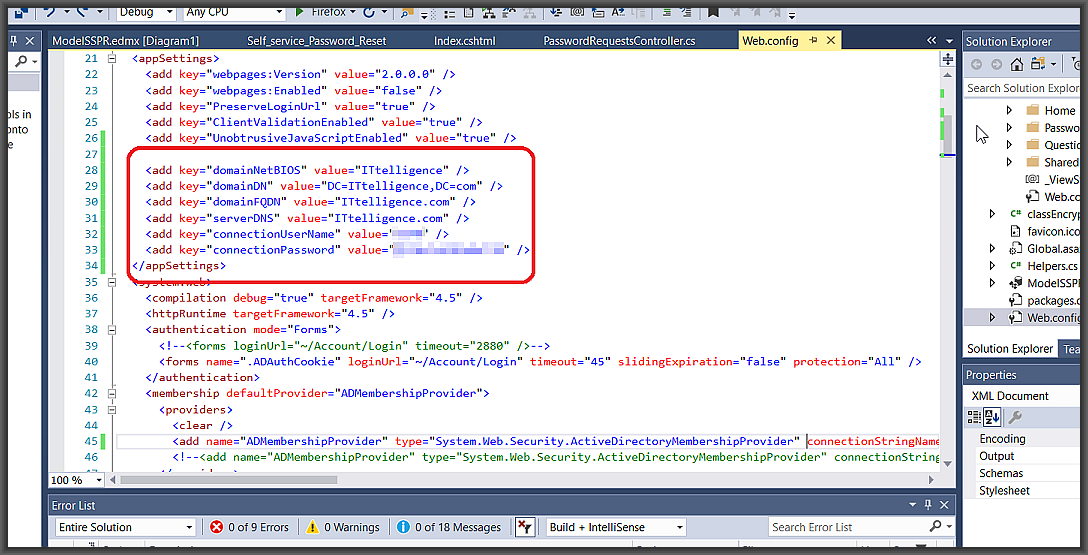
5) Replace the appSettings values with the correct information for the domain and account used in the Create Active Directory Service Account (Step 1)

Step 5:  Publish Site

Please Note: Explaining Visual Studio publishing is beyond the scope of this article, but I am happy to answer any questions in the comments section below.

1) From the open project in Visual Studio

2) Publish site with the Visual Studio Publishing wizard

step 6:  Testing Site

Registering password hints

1) Browse to site published in Publish Site (Step 5)

2) Click on Log in

3) Specify the Username and Password for the account to register for self-service password reset.

Note: Username must be in UPN format

4) Create password hints by adding questions and answers

Note: At least four hints need to be specified to utilize the self-service password reset function.

Self-Service Password Reset Request

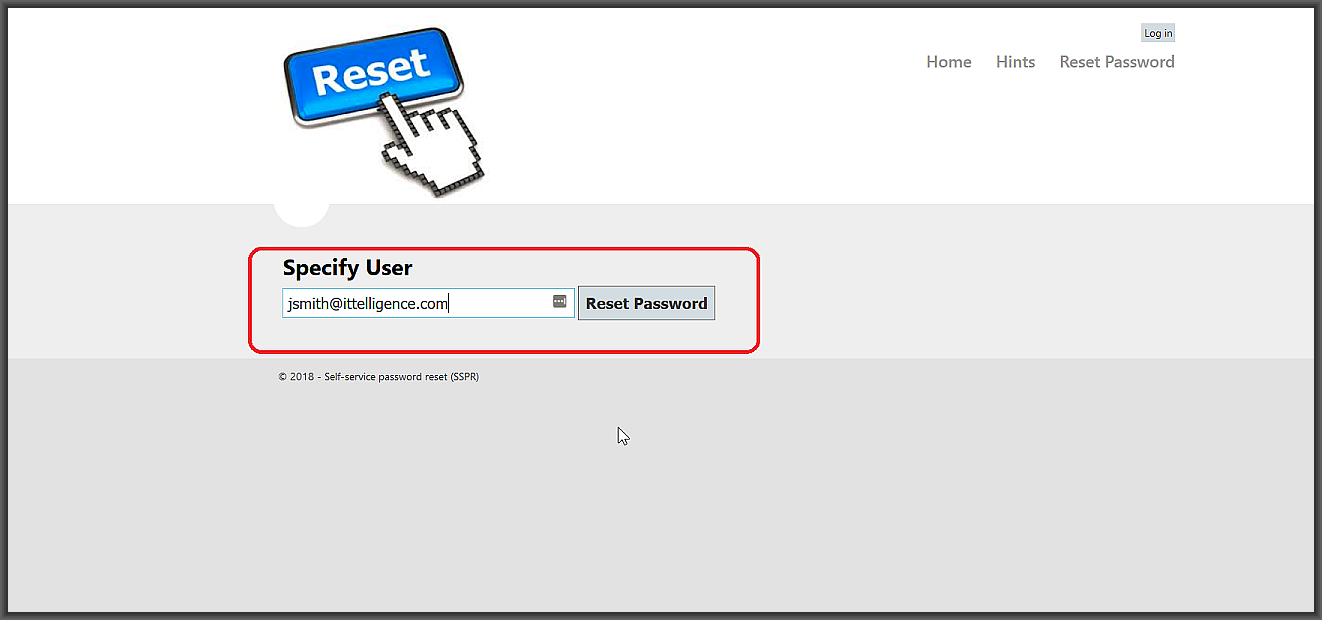
1) Browse to the site published in the Publish Site (Step 5)

2) Click on Reset Password

3) Enter the Username for the account to reset the password for as shown below

Note: Username must be in UPN format

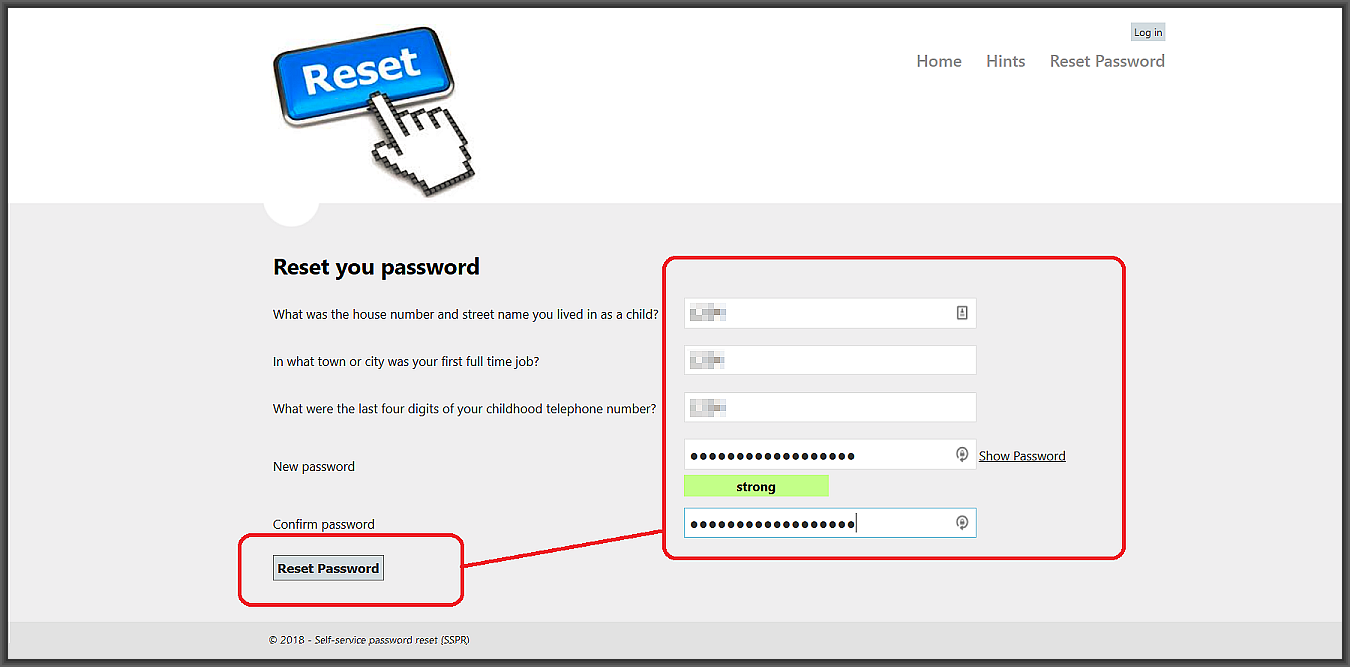
4) Enter answers to the security questions and provide new password

Note: Three random questions will be selected out of the hints configured

5) Click Reset Password

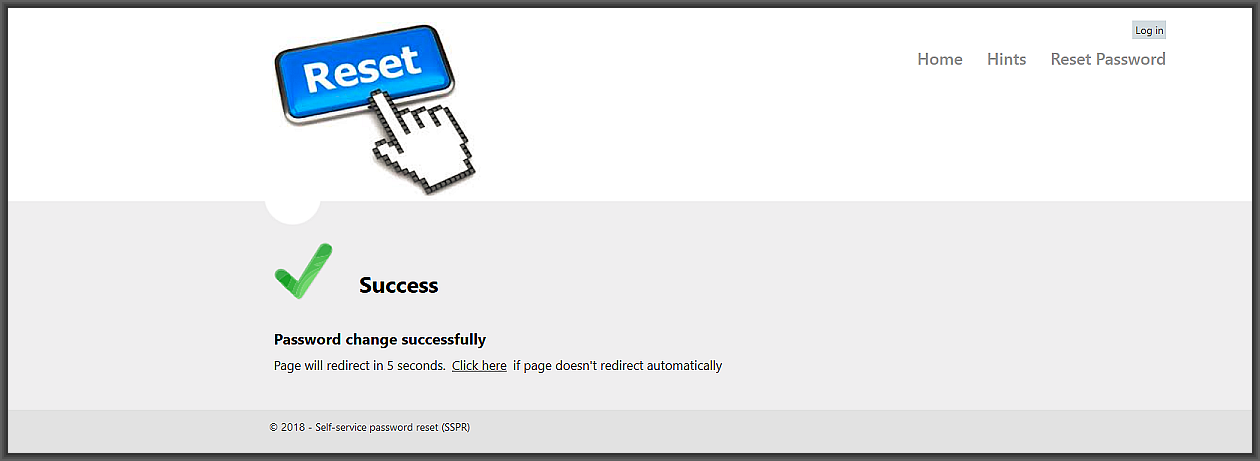
6) If the password was successfully reset, the following screen will display

I hope you found this tutorial useful. You are encouraged to ask questions, report any bugs or make any other comments about it below.

UserResourceCleanup

INTRODUCTION

A GPO exist that can be configured to automatically delete old user profiles and a process such as CircularLogArchivercan be used to clean up log or old data but what about user data?

UserResouceCleanup can take care of this by monitoring the user data folders and Active Directory.

CONFIGURING USERRESOURCECLEANUP

a) Download and extract UserResourceCleanup.zip (here is VirusTotal scan) to a folder of your choice on the computer which it will be scheduled to run on.

b) Run Configurator.exe (Configurator Editor).

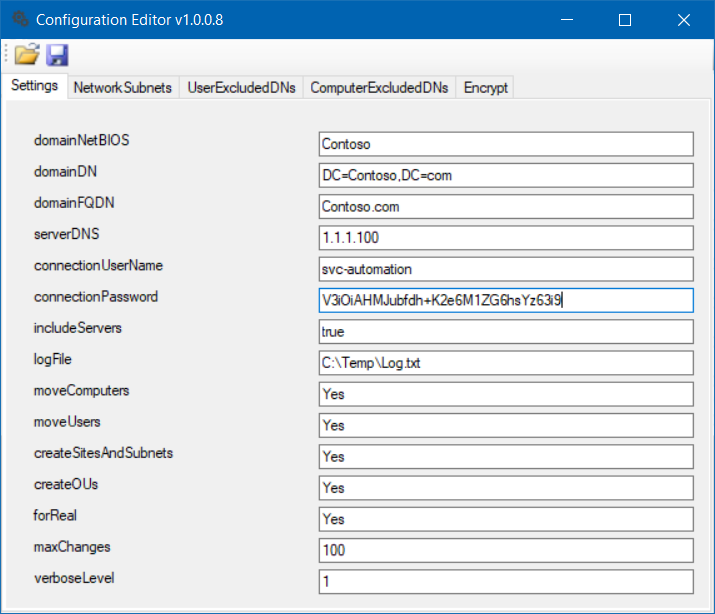
c) On the Encrypt tab, enter the password for the account that will be performing the automated placement task. Encrypt it with key bRK92kDpCqpnPMEtFp1cdJXixgqOqSKFUZ and record encrypted password

d) On the Settings tab, enter the domain information, connection username and the encrypted password recorded in step c. Configure UserNameMatch to a RegEx query that will match user account format. If you do not have a specific format, use .*

e) On the UserFolderLocations tab, specify folders to monitor to redundant user data

f) On the UsersToSkip tab, specify user folders to skip

g) Save configuration files

h) Schedule UserResourceCleanup.ConsoleApp.exe as a scheduled tasks

CONCLUSION

Using this process will keep recover space by removing old/redundant user data, just make sure that you have backups to cheap/slower storage in case you need to recover data.

Automated object placement using AutoAD

IMPLEMENTATION

1) Computer Description Update Process

a) Delegation

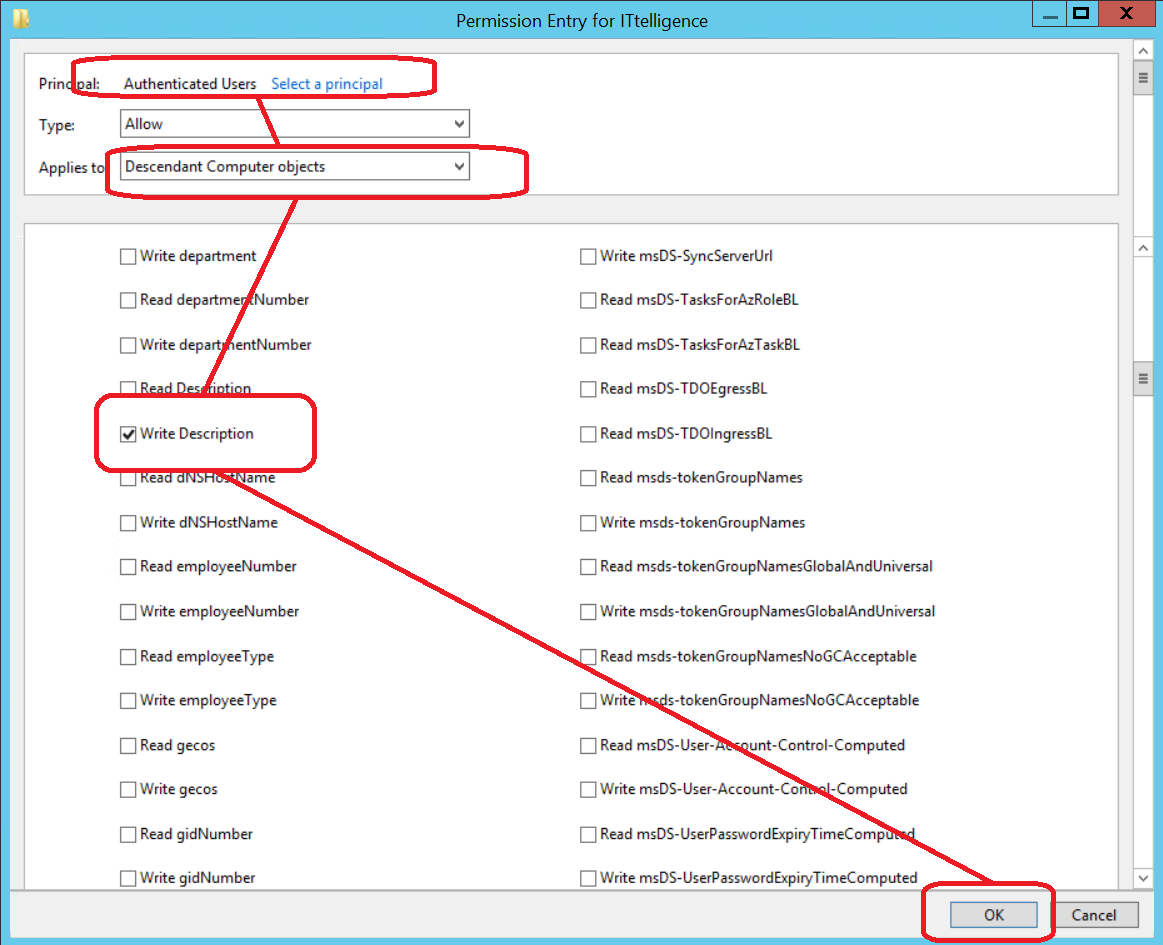
To be able to update computer descriptions you need to delegate rights.

Add the following permissions to Active Directory either to the root of the domain or any other Organizational Unit. You would add it to an Organizational Unit if you only want to use this process for some computers

b) Powershell Script

Below is the Powershell script used to update the computer description.

It is important to note that you should not change the format of the message if you are planning to use my automated object placement process.

This script will be used within a group policy in step c

try
    {
        # Get current user name
        $strUserName = $env:username;

        # Get current computer name
        $strComputerName = $env:computername;

        $objADSystemInfo = New-Object -ComObject ADSystemInfo;
        $objType = $objADSystemInfo.GetType();

        # Get current site name
        $strSiteName = $objType.InvokeMember('SiteName', 'GetProperty', $null, $objADSystemInfo, $null);

        # Get current date and time
        $strLogonDate = Get-Date -Format "dd-MM-yyyy HH:mm:ss";

        # Build message
        $strMessage = "$($strUserName) logged in on $($strLogonDate) at $($strSiteName) site";

        # Get computer object from Active Directory
        $strFilter = "(&(objectCategory=Computer)(name=$strComputerName))"
        $objSearcher = New-Object System.DirectoryServices.DirectorySearcher
        $objSearcher.Filter = $strFilter
        $objPath = $objSearcher.FindOne()
        $objComputer = $objPath.GetDirectoryEntry()

        # Update computer object description with message in Active Directory
        $objComputer.InvokeSet("Description", $strMessage)
        $objComputer.CommitChanges()
    }
catch
    {
        throw
    }

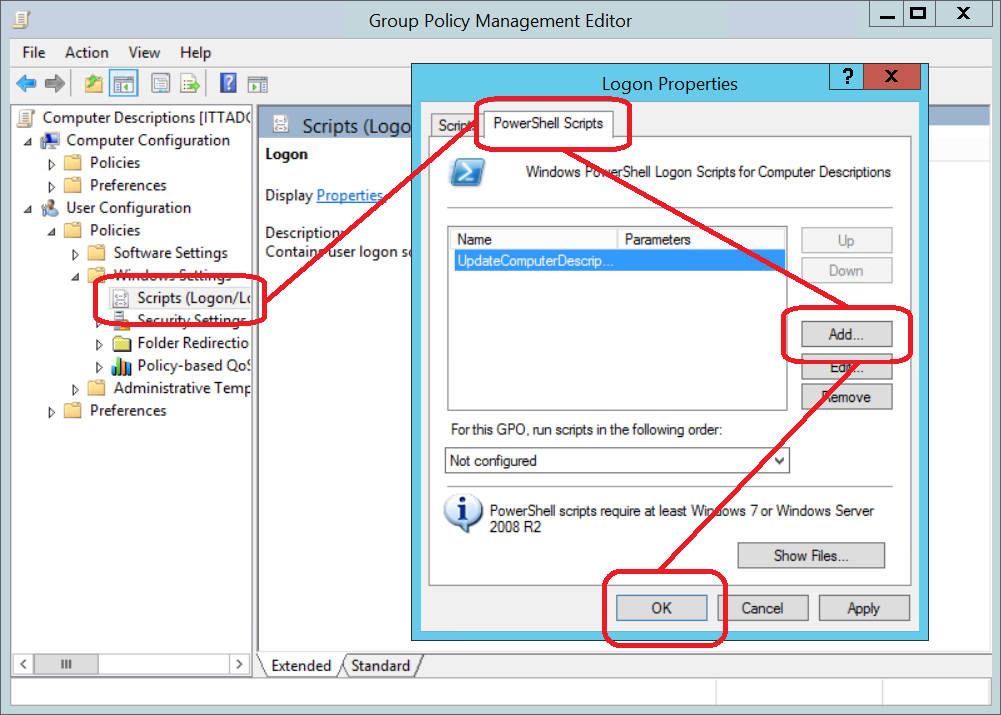
c) Group Policy Object

Create a GPO and link it to the root of a domain or Organizational Unit used in step a

Add the PowerShell script from step b as a User Logon script

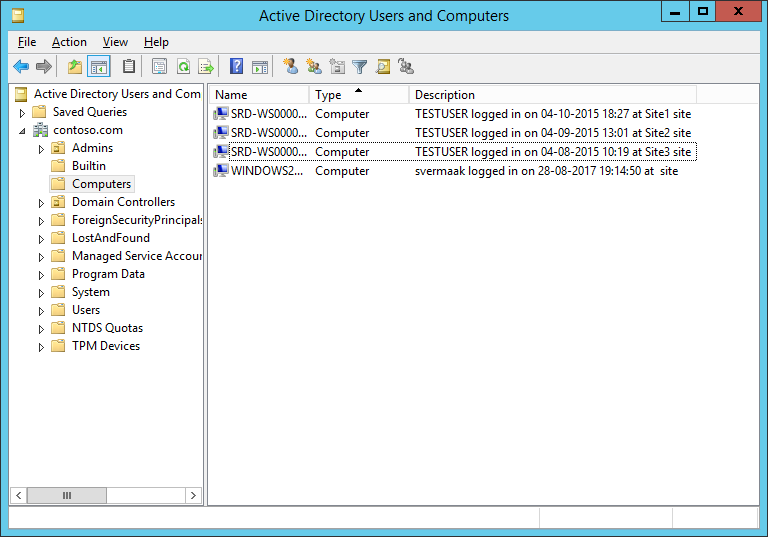
d) Result

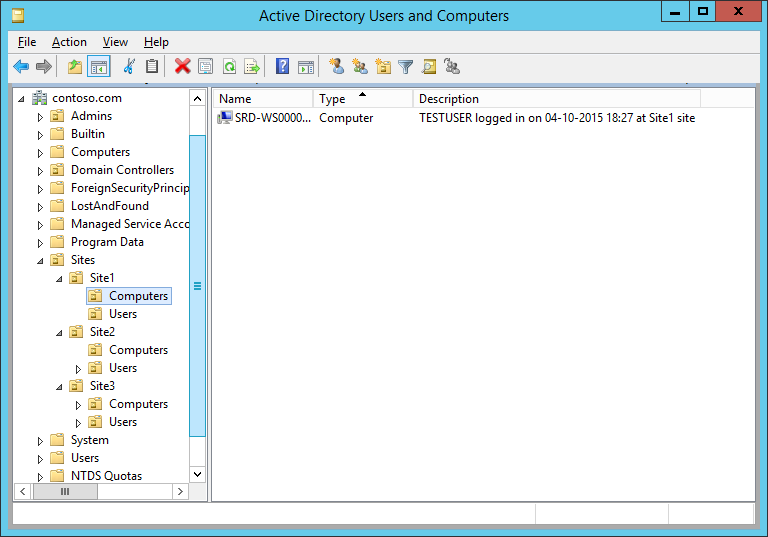
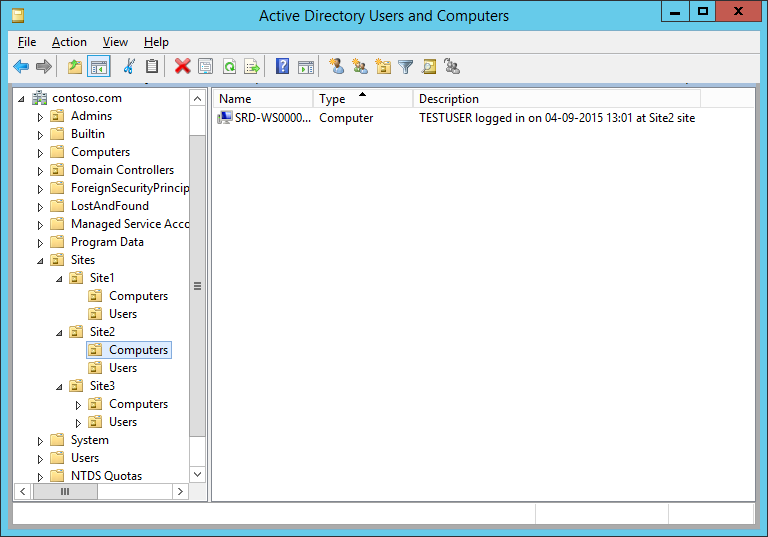
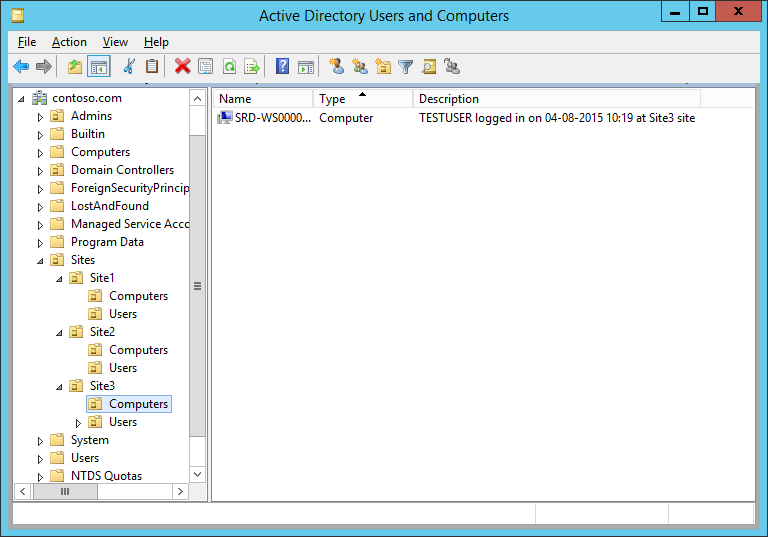
After these steps, notice how the computer descriptions are automatically populated once the users log on to their computers

2) AutoAD

a) Download and extract AutoAD.zip (here is VirusTotal scan) to a folder of your choice on the computer which it will be scheduled to run on.

b) Run Configurator.exe (Configurator Editor).

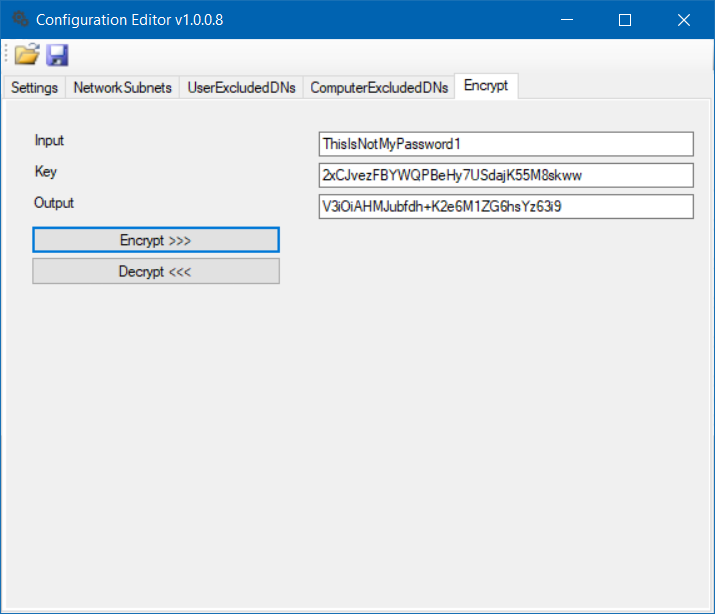
c) On the Encrypt tab, enter the password for the account that will be performing the automated placement task. Encrypt it with key 2xCJvezFBYWQPBeHy7USdajK55M8skww and record encrypted password

d) On the Settings tab, enter the domain information, connection user name and the encrypted password recorded in step 2c.

Specify which objects AutoAD should create automatically

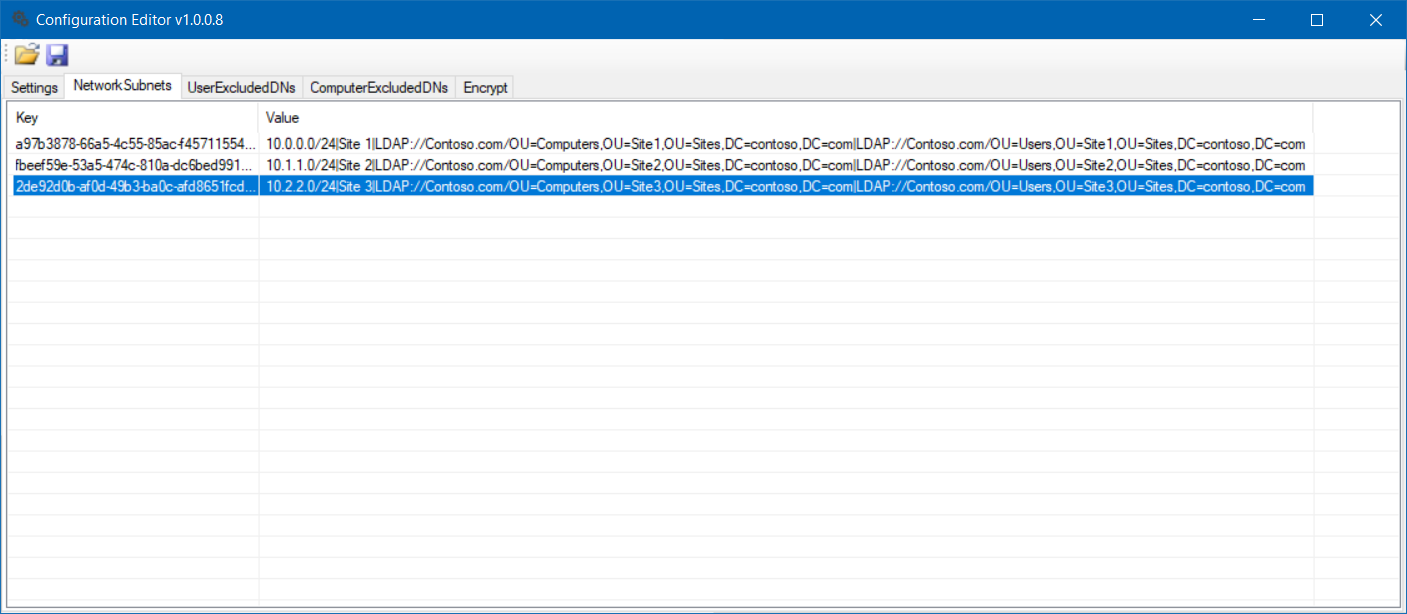
e) Specify Active Directory information. The format for these are Subnet/Bit Mask|AD Site Name|Computer DN|User DN

Subnet/Bit Mask: The subnet and mask (in bit format) for the specific entry

AD Site: The Active Directory site to which the subnet belongs

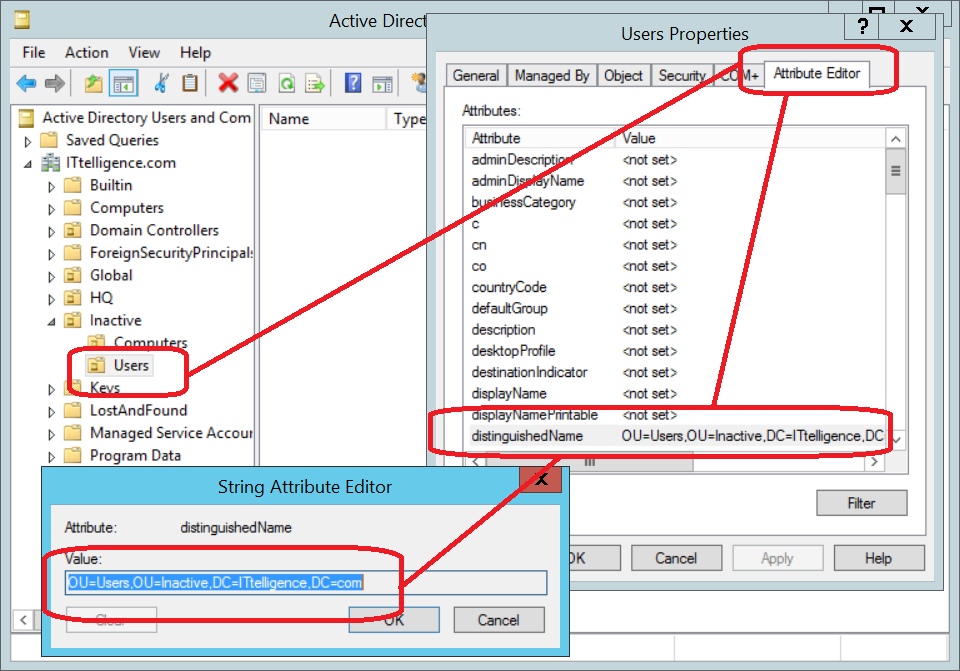
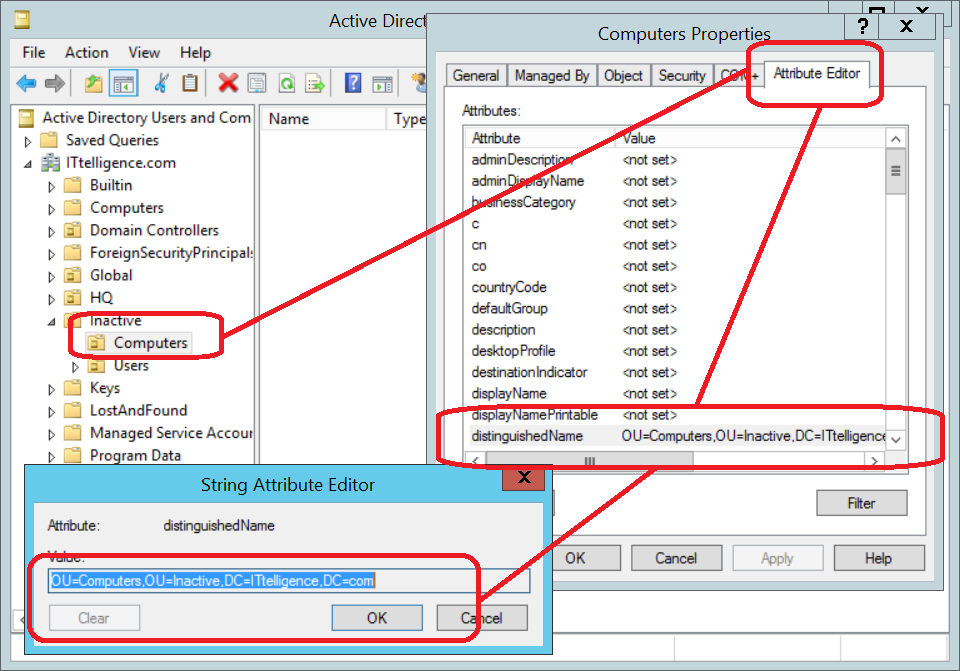
Computer DN: The distinguished name of the organizational unit where to move computers to for computer objects in this subnet

User DN: The distinguished name of the organizational unit where to move users to for user objects in this subnet

Please Note: Ensure that you do not allow users/admins to gain any additional permissions by moving users from one container to another. The reason for this is that a user move might be forced to an incorrect OU if descriptions are tampered with. 

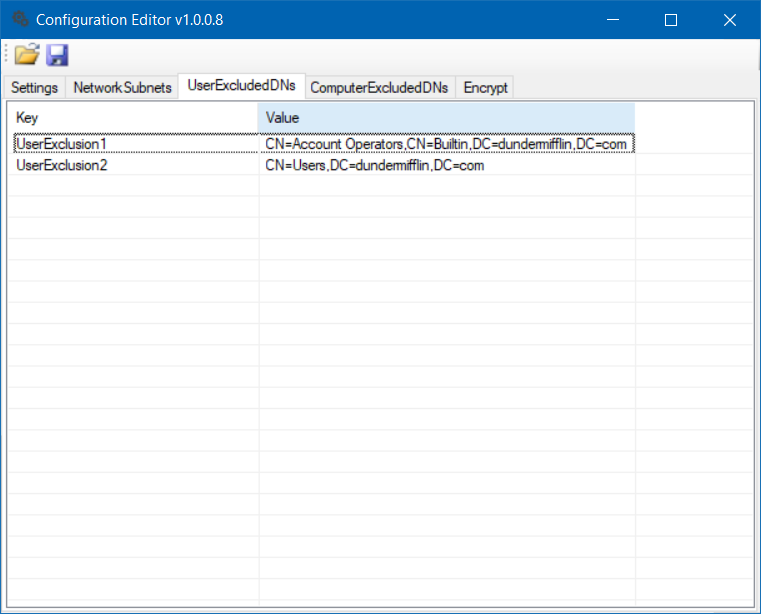
f) Specify any user DNs that should be skipped

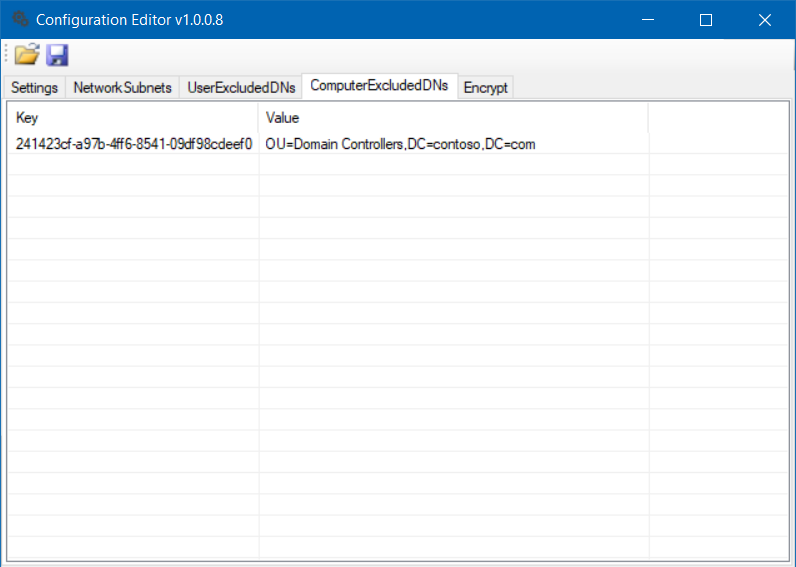
g) Specify any computer DNs that should be skipped

DEMO EXECUTION

After implementing ComputerDescriptionUpdate.ps1 notice how computer descriptions are automatically updated

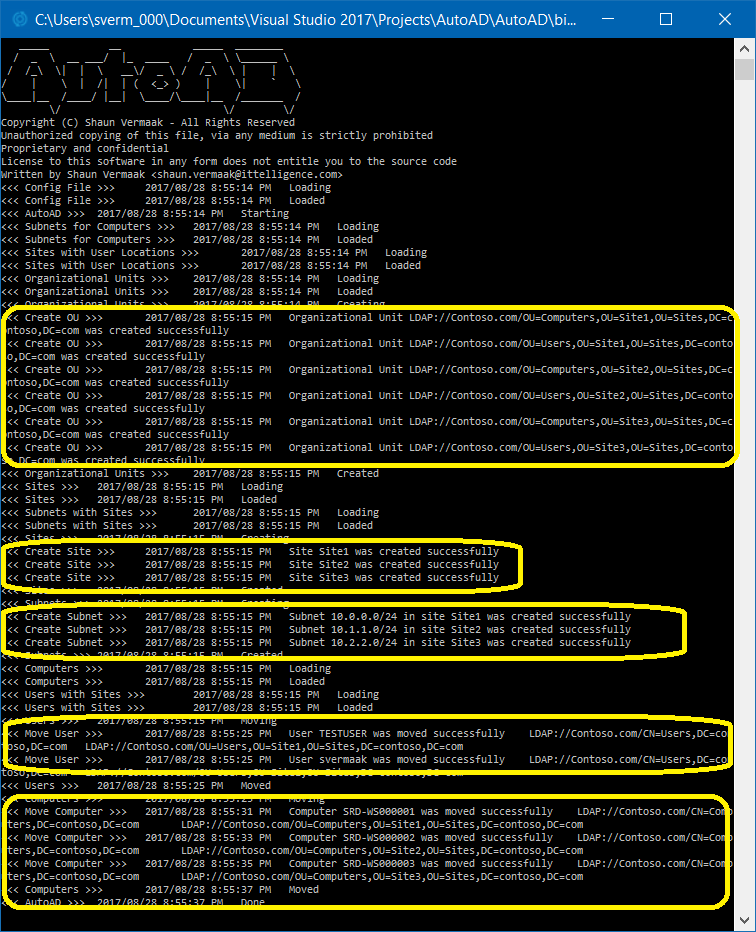
AutoAD.exe output

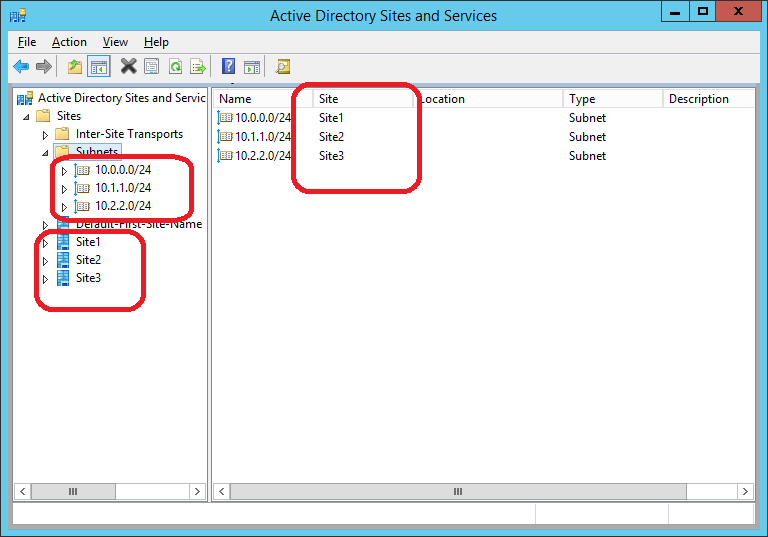
Sites and subnets automatically created by AutoAD

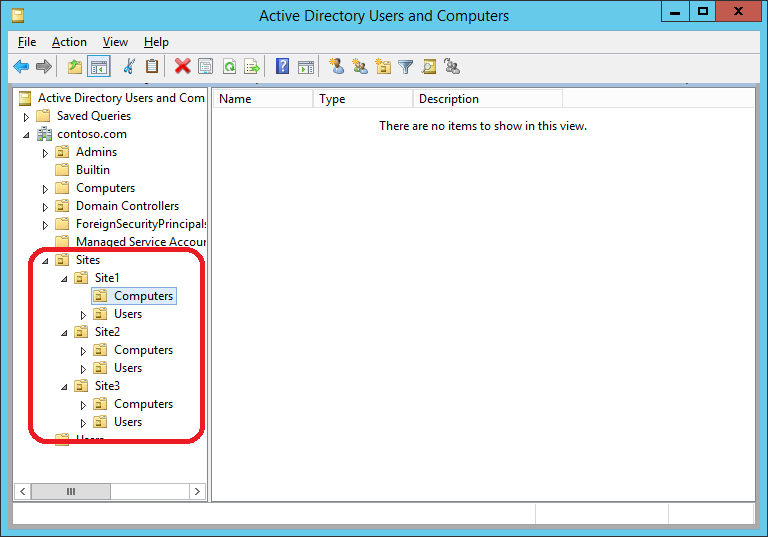
Organizational Units automatically created by AutoAD

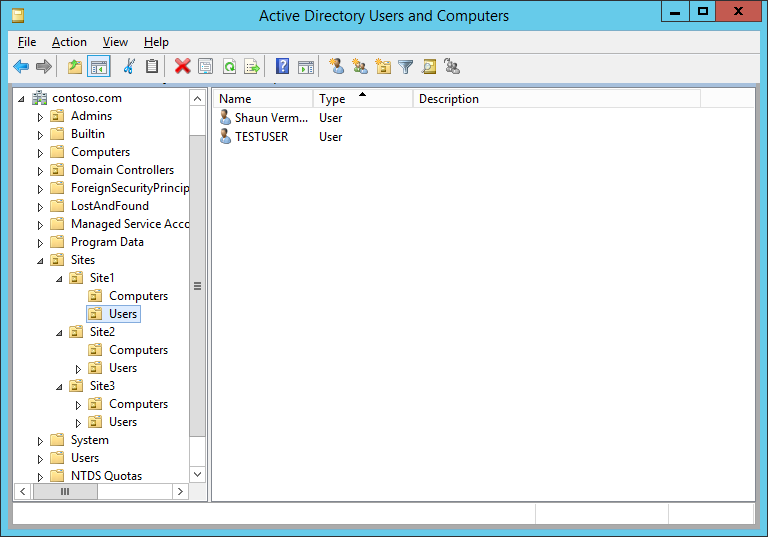
Object placement (example 1)

Object placement (example 2)

Object placement (example 3)

Object placement (example 4)

CONCLUSION

Using this process will keep Active Directory organized and objects in the correct Organizational Units

Active Directory Password Reset Tool

BENEFITS

  • Sets a unique, secure password on each password reset
  • Helpdesk employee users do not need to use or install RSAT (at least not for those only resetting passwords)
  • End-users do not get passwords such as Password1 or Company1 and continue with this bad practice by continuing with passwords such as Password2 or Company2

IMPLEMENTATION

1) Download and extract PasswordResetTool.zip (here is VirusTotal scan) to a folder of your choice.

2) Run Configurator.exe (Configurator Editor).

a) On the Settings tab, enter the FQDN and NetBIOS for the domain on for which Password Reset Tool needs to reset passwords for

b) Specify length that passwords should be reset to for user and administrator accounts

c) Save the configuration file

DEMO EXECUTION

Once configuration has been completed, the Password Reset Tool can be executed

Once the Reset Password button is pressed, the specified user account password is reset to a pronounceable, random password

After the process, the connection password and user field are cleared.

RELEVANT CODE

DirectoryEntry directionEntry = new DirectoryEntry(domainPath, domainName + "\\" + connectionUserName, @connectionPassword);
    if (directionEntry != null)
    {
        DirectorySearcher search = new DirectorySearcher(directionEntry);
        search.Filter = "(SAMAccountName=" + userToReset + ")";
        SearchResult result = search.FindOne();
        if (result != null)
        {
            DirectoryEntry userEntry = result.GetDirectoryEntry();
            if (userEntry != null)
            {
                userEntry.Invoke("SetPassword", new object[] { password });
                userEntry.Properties["pwdLastSet"].Value = 0;
                userEntry.Properties["LockOutTime"].Value = 0x0000;
                userEntry.CommitChanges();
            }
        }
    }
    return password;

CONCLUSION

Using initial secure and unique passwords during reset contributes to a far more secure environment.

Active Directory Cleanup Tool (ADCleanup)

INTRODUCTION

ADCleanup is my implementation of a set-and-forget Active Directory cleanup tool. Once this tool is implemented correctly, you never need to worry about dormant accounts ever again.

IMPLEMENTATION

1) Download and extract ADCleanup.zip (here is VirusTotal scan) to a folder of your choice, saved on the computer on which it will be scheduled to run.

2) Create a location in Active Directory to store inactive user accounts and record the distinguished name (DN).

3) Create a location in Active Directory to store inactive computer accounts and record the distinguished name (DN).

4) Run Configurator.exe (Configurator Editor).

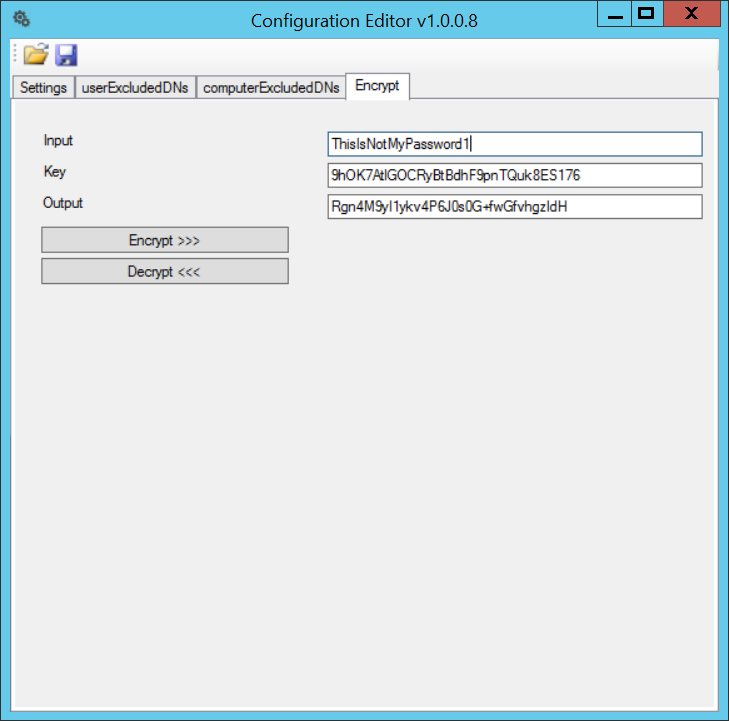
a) On the Encrypt tab, enter the password for the account that will be performing the cleanup task. Encrypt it with key 9hOK7AtlGOCRyBtBdhF9pnTQuk8ES176 and record encrypted password

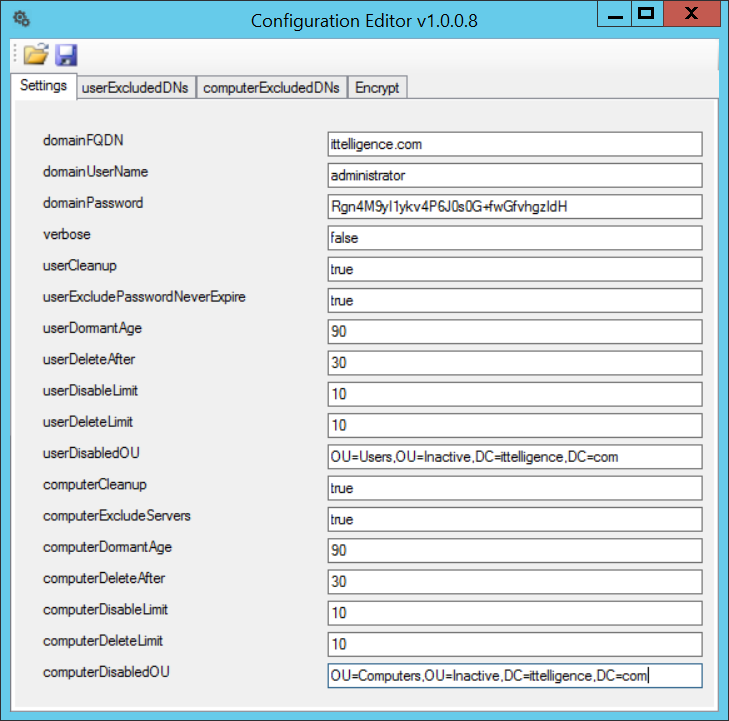
b) On the Settings tab, enter the fully qualified domain name, cleanup account user name and the encrypted password recorded in step 4a

c) Set userCleanup to true to enable the process to clean up user accounts. Set user cleanup parameters

d) Set userDisabledOUto value recorded in step 2

e) Set computerCleanup to true to enable the process to clean up user accounts. Set computer cleanup parameters

f) Set computerDisabledOU to value recorded in step3

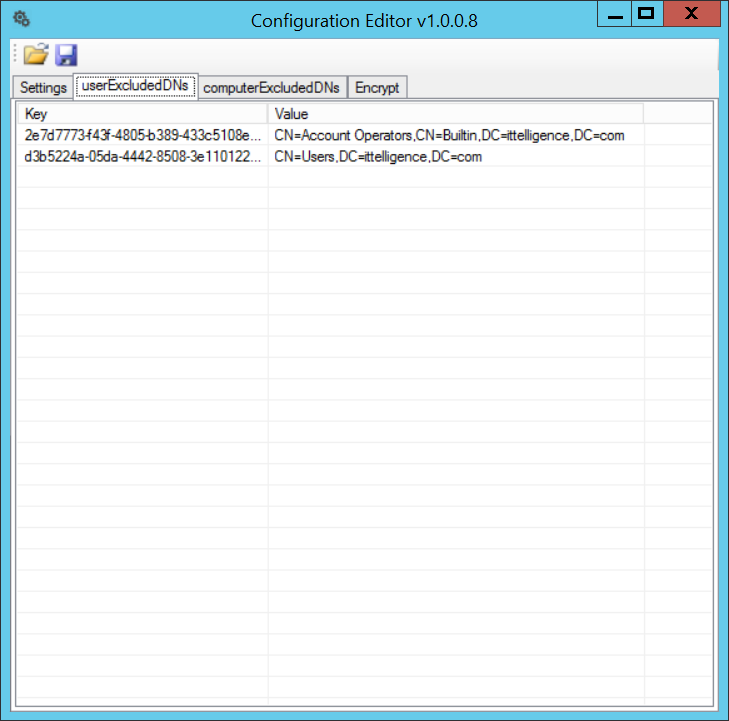
g) On the userExcludedDNs tab, specify any distinguished name of an organizational unit that should be excluded from the cleanup process  (+ or INS to add, – or DEL to delete, Enter or double-click to edit)

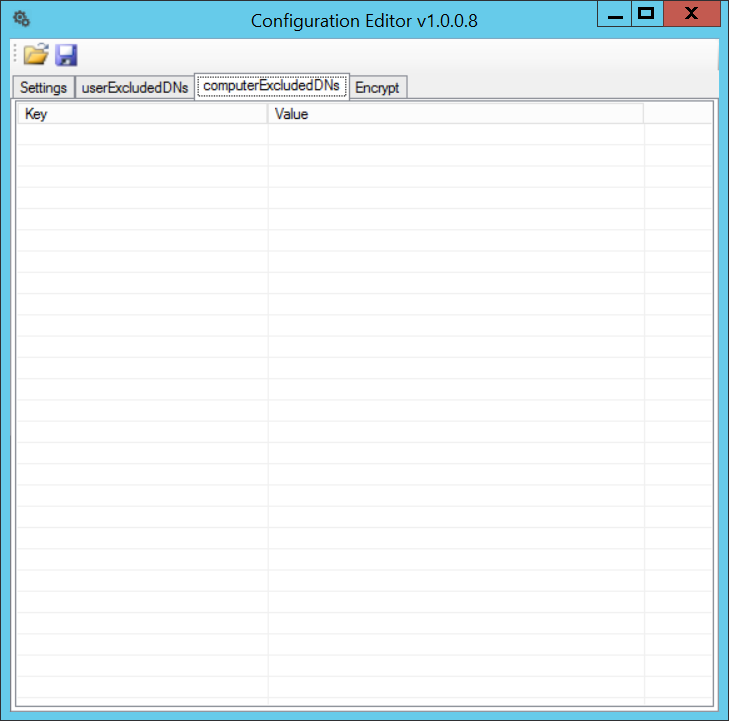
g) On the computerExcludedDN stab, specify any distinguished name of an organizational unit that should be excluded from the cleanup process (+ or INS to add, – or DEL to delete, Enter or double-click to edit)

h) Schedule ADCleanup.exe to execute via a scheduled task. Upon every execution, the tool will clean up user and computer objects as per your configuration

CONCLUSION

Using this process, (or one similar) will keep Active Directory clean from the unused computer and user objects, and increases server security in the process.

MoveSysvol – Automate the relocation of the Sysvol folder (DFSR Version)

MoveSysvol (DFSR version) automated by Shaun Vermaak is a batch to automatically relocate the Sysvol folder as per https://technet.microsoft.com/en-us/library/cc816594(v=ws.10).aspx

The following must be in the working folder or in path:
MoveSysvol.bat
SetDFSR.vbs
sysvol.inf

UPDATE: Please ensure that all DCs are in the default Domain Controllers OU

Usage: MoveSysvol.bat OLDSYSVOLPATH NEWSYSVOLPATH DOMAINFQDN
Example: MoveSysvol.bat C:WindowsSYSVOL D:SYSVOL TESTDOMAIN.COM

Attachment(s):
[list-attachments]

Test Passwords Against Active Directory User

Tool to test password against Active Directory user. Multiple passwords can be tested by ; separating them

Usage: CheckCredentials.exe FQDN USERNAME PASSWORD1[;PASSWORD2;PASSWORD3..]

[sourcecode language=”vb”]
using System;
using System.Collections.Generic;
using System.Linq;
using System.Text;
using System.Threading.Tasks;
using System.DirectoryServices.AccountManagement;
using System.Diagnostics;

namespace CheckCredentials
{
class Program
{
static void Main(string[] args)
{
if (args.GetUpperBound(0) == 2)
{
foreach (string password in args[2].Split(‘;’))
{
using (PrincipalContext pc = new PrincipalContext(ContextType.Domain, args[0]))
{

// validate the credentials
bool isValid = pc.ValidateCredentials(args[1], password);

if (isValid)
{
Console.WriteLine(@"{1}@{0} has password {2}", args[0], args[1], password);
}

}
}
}
else
{
Console.WriteLine("Usage:{0} FQDN USERNAME PASSWORD1[;PASSWORD2;PASSWORD3..]", Process.GetCurrentProcess().ProcessName + ".exe");
}
}
}
}
[/sourcecode]

Attachment(s): [list-attachments]

View Shaun Vermaak's profile on LinkedIn

VBS implementation of REG.exe for use in GPOs

Usage: REG.vbs /Action:ADD|/Action:DELETE /Key:REGISTRYKEY [/Value:REGISTRYVALUE] [/DATA:REGISTRYVALUEDATA] [/TYPE:REGISTRYVALUETYPE]

Examples:
REG.vbs /Action:Add /Key:HKLM\SOFTWARE\NewKey
REG.vbs /Action:Add /Key:HKLMSOFTWARENewKey /Value:New_REG_SZ /Data:Value /Type:REG_SZ
REG.vbs /Action:Add /Key:HKLMSOFTWARENewKey /Value:New_REG_Binary /Data:”0,0,0,0,0,0,0,0,0,0,0,0,0,0,0,0,0,0,0,0,0,0,0,0″ /Type:REG_BINARY
REG.vbs /Action:Add /Key:HKLMSOFTWARENewKey /Value:New_REG_DWORD /Data:0 /Type:REG_DWORD
REG.vbs /Action:Add /Key:HKLMSOFTWARENewKey /Value:New_REG_EXPAND_SZ /Data:Value /Type:REG_EXPAND_SZ
REG.vbs /Action:Add /Key:HKLMSOFTWARENewKey /Value:New_REG_MULTI_SZ /Data:”Value1,Value2,Value3″ /Type:REG_MULTI_SZ
REG.vbs /Action:Delete /Key:HKLMSOFTWARENewKey /Value:New_REG_SZ
REG.vbs /Action:Delete /Key:HKLMSOFTWARENewKey

Attachment(s):
[list-attachments]