Active Directory – Securely Set Local Account Passwords

How it works

A token is generated for a supplied account with the desired password. 

Example of a token: k8vVeIYZeI+6rkvlvw8eLOEnHK2yTcBfHQP4UEZrCgigcagy7+qt969LISkmHH/7CS5KfVWLEZh8cZMzCkVYGw==

This token (an AES-256 encrypted version of the username and the password) is passed to the SecurelySetPassword tool which is executed at start-up via an Active Directory Group Policy.

The token is decrypted and used to set the password for the specified account to the desired password.

Step 1: Download

Download SecurelySetPassword tool

Step 2: Create and Test Token

1) Run SecurelySetPassword.exe USERNAME PASSWORD (Note how the generated token is different on each run, this is because the value is salted for added security)

2) Copy token. It will be used in the implementation steps

3) To test the token, run SecurelySetPassword.exe TOKEN (Note for a successful test the user needs to exists)

Step 3: Copy SecurelySetPassword.exe to a network share

Copy SecurelySetPassword.exe to a network share accessible by all users (such as NETLOGON share)

Step 4: Implement Active Directory Group Policy

1) Start Microsoft Group Policy Management Console (GPMC.msc

2) Create and link a new Group Policy with the desired scope

3) Browse to Computer Configuration > Preferences > Windows Settings > Files and add a new file object

4) Set the Source files(s) path to the location of SecurelySetPassword.exe (\\ittelligence.com\NETLOGON\Software\SecurelySetPassword\SecurelySetPassword.exe in my case)

5) Set the Destination file to %CommonAppdataDir%\SecurelySetPassword\SecurelySetPassword.exe

6) Browse to Computer Configuration > Preferences > Control Panel Settings > Scheduled Tasks and add a new scheduled task object 

7) On the Triggers tab create new trigger and set to At startup

8) On the Actions tab create a Start a program action to %CommonAppdataDir%\SecurelySetPassword\SecurelySetPassword.exe with token as argument

I hope you found this tutorial useful. You are encouraged to ask questions, report any bugs or make any other comments about it below.

Phasing in a Group Policy

Group policies can be applied selectively to specific devices with the help of groups. Utilising this, it is possible to phase-in group policies, over a period of time, by randomly adding non-members user or computers at a set interval, to a group filtering a group policy.

Introduction


Some settings, especially security related, are postponed indefinitely because no built in phase-in mechanism exists. Sure you can apply a GPO via a group but you have to remember to keep adding members to it and even then, you will
probably not add members in randomly. The process below tackles these issues by automating the GPO phase-in process.


Please note: The process below is intended to be configured on the group that is configured as a security filter on a GPO


Implementation


1) Download and extract ADRandomAddToGroup.zip (here is VirusTotal scan) to a folder of your choice, on the computer which it will be scheduled to run on.


2) Get group DN


3) Run Configurator.exe (Configurator Editor).


All configuration is stored within the ADRandomAddToGroup.ConsoleApp.exe file and can be either edited directly or with my Configuration Editor tool.


a) On the Settings tab, enter the Group’s distinguished name (DN), recorded in Step 2.

b) Configure whether users or computers should be randomly added, and how many to add at a time. For this example, users are added randomly, five at a time.


c) On the userExcludedDNs tab, add distinguished names of OUs that contains objects that should never be added to this group. (Use +/-/Insert/Delete/Spacebar to manage entries.)


d) On the userIncludedDNs tab, add distinguished names of OUs that contains objects that should be added to this group. (Use +/-/Insert/Delete/Spacebar to manage entries.)


e) Similarly, included and excluded distinguished names can be configured for computer objects.

f) Save the configuration file and close Configuration Editor.


This is how the XML file look for the above setting if you choose to edit it manually.

<?xml version="1.0" encoding="utf-8"?>
<configuration>
<configSections>
<section name="userExcludedDNs" type="System.Configuration.NameValueSectionHandler" />
<section name="userIncludedDNs" type="System.Configuration.NameValueSectionHandler" />
<section name="computerExcludedDNs" type="System.Configuration.NameValueSectionHandler" />
<section name="computerIncludedDNs" type="System.Configuration.NameValueSectionHandler" />
</configSections>
<userExcludedDNs>
<add key="35206bba-ff72-40da-ba30-26c93e29470b" value="CN=Account Operators,CN=Builtin,DC=dundermifflin,DC=com" />
<add key="7f8e789c-0978-4378-b718-08501995a307" value="CN=Users,DC=dundermifflin,DC=com" />
</userExcludedDNs>
<userIncludedDNs>
<add key="UserExclusion2" value="CN=Users,DC=dundermifflin,DC=com" />
<add key="091bb899-58b4-427d-a5a9-da29dde49f0a" value="OU=Test Users,OU=Accounts,OU=Dunder Mifflin,DC=dundermifflin,DC=com" />
</userIncludedDNs>
<computerExcludedDNs />
<computerIncludedDNs />
<appSettings>
<add key="groupDN" value="CN=DG-Tier2Users,OU=Delegation Groups,OU=Groups,OU=Dunder Mifflin,DC=dundermifflin,DC=com" />
<add key="userAddToGroup" value="true" />
<add key="userAddToGroupLimit" value="5" />
<add key="computerAddToGroup" value="false" />
<add key="computerAddToGroupLimit" value="0" />
</appSettings>
<startup>
<supportedRuntime version="v4.0" sku=".NETFramework,Version=v4.5" />
</startup>
</configuration>

Demo Execution


1) Output for the ADRandomAddToGroup.ConsoleApp.exe command


2) Random members added to group after first execution


3) Random members added to group after second execution


CODE


Here is the section in the code that manages the Random Group Members.

try
{
if (string.IsNullOrEmpty(domainFQDN))
{
domainFQDN = ActiveDirectory.GetFQDN(groupDN);
}

DirectoryEntry group;
if (!string.IsNullOrEmpty(domainUserName))
{
group = new DirectoryEntry("LDAP://" + domainFQDN + "/" + groupDN, domainUserName, domainPassword);
}
else
{
group = new DirectoryEntry("LDAP://" + domainFQDN + "/" + groupDN);
}

//Connect to domain
DirectoryEntry de = new DirectoryEntry("LDAP://" + domainFQDN, domainUserName, domainPassword);
if (!string.IsNullOrEmpty(domainUserName))
{
de = new DirectoryEntry("LDAP://" + domainFQDN, domainUserName, domainPassword);
}
else
{
de = new DirectoryEntry("LDAP://" + domainFQDN);
}

if (userAddToGroup)
{
//Loop through users
try
{                      
using (DirectorySearcher ds = new DirectorySearcher())
{
SortOption sortOption = new SortOption("objectGUID", SortDirection.Ascending);

ds.SearchRoot = de;
ds.PageSize = 1000;
ds.Filter = "(&(objectCategory=person)(objectClass=user))";
ds.PropertiesToLoad.Add("memberOf");
ds.PropertiesToLoad.Add("distinguishedName");
ds.PropertiesToLoad.Add("description");
ds.PropertiesToLoad.Add("userAccountControl");
ds.PropertiesToLoad.Add("lastLogonTimestamp");
ds.PropertiesToLoad.Add("lastLogon");
ds.PropertiesToLoad.Add("pwdLastSet");
ds.PropertiesToLoad.Add("whenCreated");
ds.PropertiesToLoad.Add("objectGUID");
ds.SearchScope = SearchScope.Subtree;
ds.Sort = sortOption;

SearchResultCollection result = ds.FindAll();

int userAddToGroupCount = 0;

foreach (SearchResult sr in result)
{
try
{
string distinguishedName = "";
if (sr.Properties.Contains("distinguishedName"))
{
distinguishedName = sr.Properties["distinguishedName"][0].ToString();
}

DirectoryEntry user = sr.GetDirectoryEntry();
if ((!ActiveDirectory.EntryInDN(user, userExcludedDNs)) && (ActiveDirectory.EntryInDN(user, userIncludedDNs)))
{
if (userAddToGroupCount < userAddToGroupLimit)
{
if (ActiveDirectory.AddToGroup(group, distinguishedName))
{
//Increase count
userAddToGroupCount++;

//Log and display
Logging.LogAndDisplay("Informational", "Added user '" + distinguishedName + "' to group '" + groupDN + "'", logFile);
}
}
//else
//{
//    //Verbose
//    Logging.LogAndDisplay("Informational", "[NOT REAL] Added user '" + distinguishedName + "' to group '" + groupDN + "'", logFile);
//}
}
}
catch(Exception ex)
{
//Item error
Logging.LogAndDisplay("Warning", ex.Message, logFile);
}
}
}
}
catch(Exception ex)
{
//Catch global user error
Logging.LogAndDisplay("Error", ex.Message, logFile);
}
}

if (computerAddToGroup)
{
//Loop through computers
try
{
using (DirectorySearcher ds = new DirectorySearcher())
{
SortOption sortOption = new SortOption("objectGUID", SortDirection.Ascending);

ds.SearchRoot = de;
ds.PageSize = 1000;
ds.Filter = "(objectCategory=computer)";
ds.PropertiesToLoad.Add("memberOf");
ds.PropertiesToLoad.Add("distinguishedName");
ds.PropertiesToLoad.Add("description");
ds.PropertiesToLoad.Add("userAccountControl");
ds.PropertiesToLoad.Add("lastLogonTimestamp");
ds.PropertiesToLoad.Add("lastLogon");
ds.PropertiesToLoad.Add("pwdLastSet");
ds.PropertiesToLoad.Add("whenCreated");
ds.PropertiesToLoad.Add("objectGUID");
ds.SearchScope = SearchScope.Subtree;
ds.Sort = sortOption;

SearchResultCollection result = ds.FindAll();

int computerAddToGroupCount = 0;

foreach (SearchResult sr in result)
{
try
{
string distinguishedName = "";
if (sr.Properties.Contains("distinguishedName"))
{
distinguishedName = sr.Properties["distinguishedName"][0].ToString();
}

DirectoryEntry computer = sr.GetDirectoryEntry();
if ((!ActiveDirectory.EntryInDN(computer, computerExcludedDNs)) && (ActiveDirectory.EntryInDN(computer, computerIncludedDNs)))
{
if (computerAddToGroupCount < computerAddToGroupLimit)
{
if (ActiveDirectory.AddToGroup(group, distinguishedName))
{
//Increase count
computerAddToGroupCount++;

//Log and display
Logging.LogAndDisplay("Informational", "Added computer '" + distinguishedName + "' to group '" + groupDN + "'", logFile);
}
}
//else
//{
//    //Verbose
//    Logging.LogAndDisplay("Informational", "[NOT REAL] Added computer '" + distinguishedName + "' to group '" + groupDN + "'", logFile);
//}
}
}
catch (Exception ex)
{
//Item error
Logging.LogAndDisplay("Warning", ex.Message, logFile);
}
}
}
}
catch(Exception ex)
{
//Catch global computer error
Logging.LogAndDisplay("Error", ex.Message, logFile);
}
}
}
catch(Exception ex)
{
//Catch global group error
Logging.LogAndDisplay("Error", ex.Message, logFile);
}


Conclusion


Using this process, it is easy to set and forget a GPO so that it randomly adds to the scope of management without manual intervention.


Strategy to centrally manage Local Administrators group from Active Directory

Uncontrolled local administrators groups within any organisation pose a huge security risk. Because these groups are locally managed it becomes difficult to audit and maintain them.

Introduction


Active Directory does provide mechanisms such as Group Policy Preferences, Restricted Groups etc. which can manage groups centrally. The issue is that local Administrators groups can differ vastly from computer to computer and because of this it is difficult
to standardize settings within a policy. This leads to over permissions because these individual permissions are painful to define and a higher privileged than required is usually assigned.


To make it worse, in a mature environment you first need visibility on current members and chances are that you would need to rely on other parties to rectify or change these because of the initial requirements.


In this article, I explain my approach to centrally manage Local Administrators group from Active Directory using a custom developed application.


Definitions


Local Administrators group The local built-in Administrators group found on each computer.
AD Local Admin group An Active Directory group for each computer that is added to the Local Administrators group of the computer. Its purpose is to hold all the members intended to have Administrative permission to a particular computer.
Local Administrator Permission Referring to the actual permissions given to Administrators.
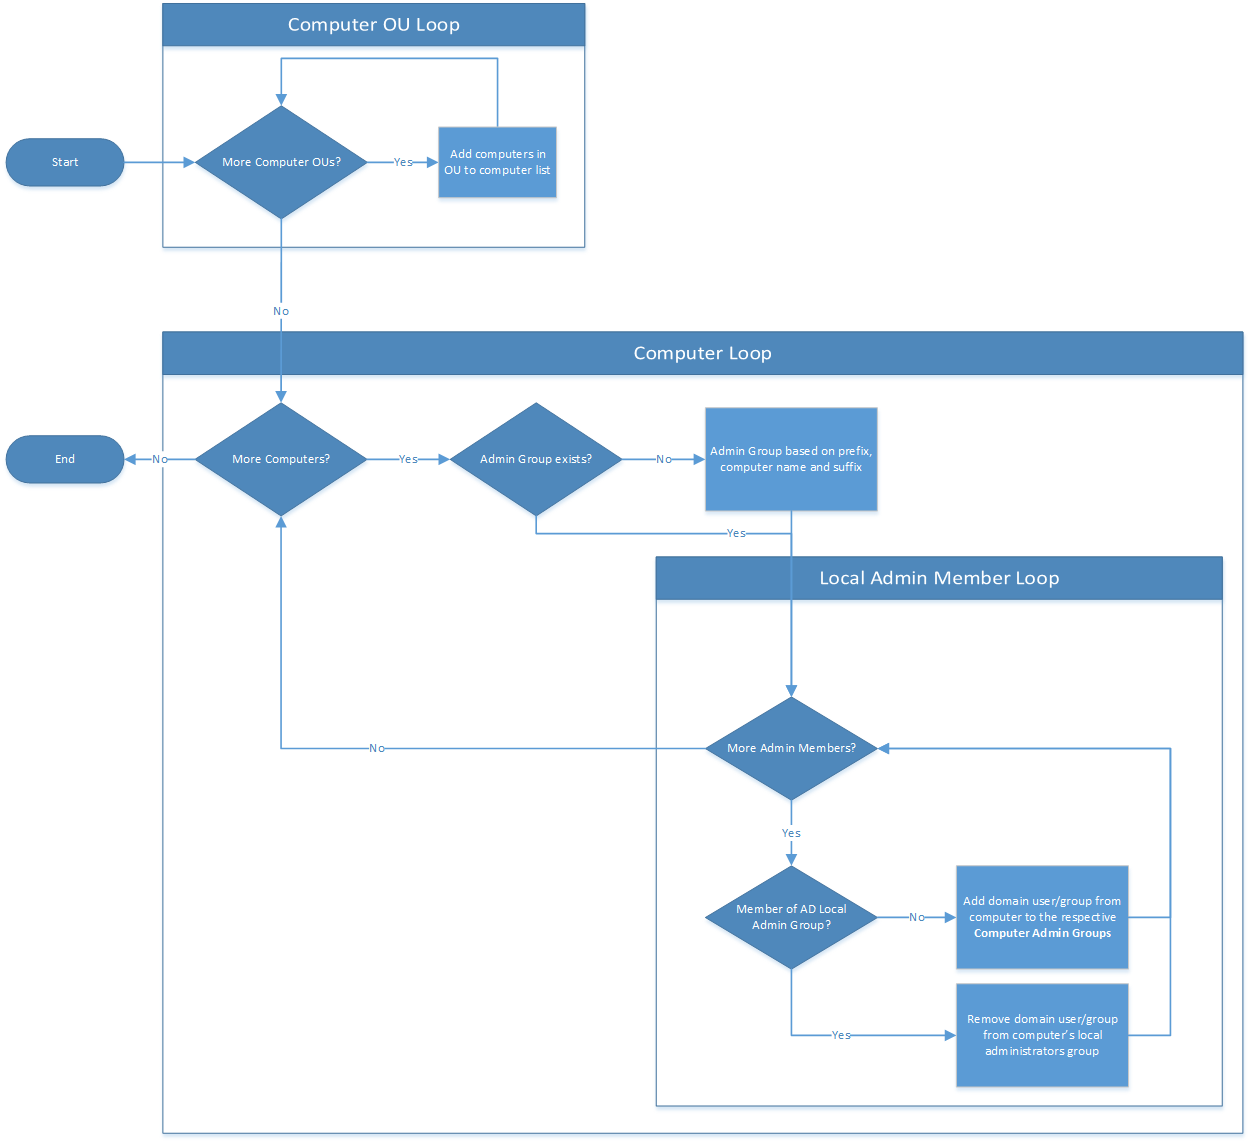
 

Process Flow


Computer OU Loop

Application enumerates computers in the computer OUs specified and adds them to a collection.


Computer Loop

Creates a computer AD Local Admin group for each computer if it doesn’t already exist.


Local Admin Member Loop

Add members of Local Administrators group to AD Local Admin group. If the member is already part of the AD Local Admin group, remove it from computer’s Local Administrators group. It is important to note that these
two actions will not occur within same execution to allow Kerberos tokens to update.


Benefits


  • Rebuilding computers with the same computer name will restore all administrators.
  • Enable auditing of users with local Administrators permissions without directly querying computer.
    • AD Local Admin group members can be queried directly from Active Directory without connecting to remote computers.
  • Enforce a stronger password policy for the user accounts with Administrator permission to certain computers.
    • Add required AD Local Admin group to a group defined in a fine-grained password policy
  • Remove dormant/orphaned entries.
  • Central management of local administrator permissions.
    • Simply add users or groups (preferably role groups) to the AD Local Admin group to give local Administrator permissions on computers.
  • Any new members will automatically be removed from Local Administrators group and added to the AD LocalAdmins group
  • After implementation, local administrator permission can be enforced via AD.


Implementation


1) Download and extract
AdminGroups.zip (here is VirusTotal scan)
to a folder of your choice on the computer on which it will be scheduled to run.

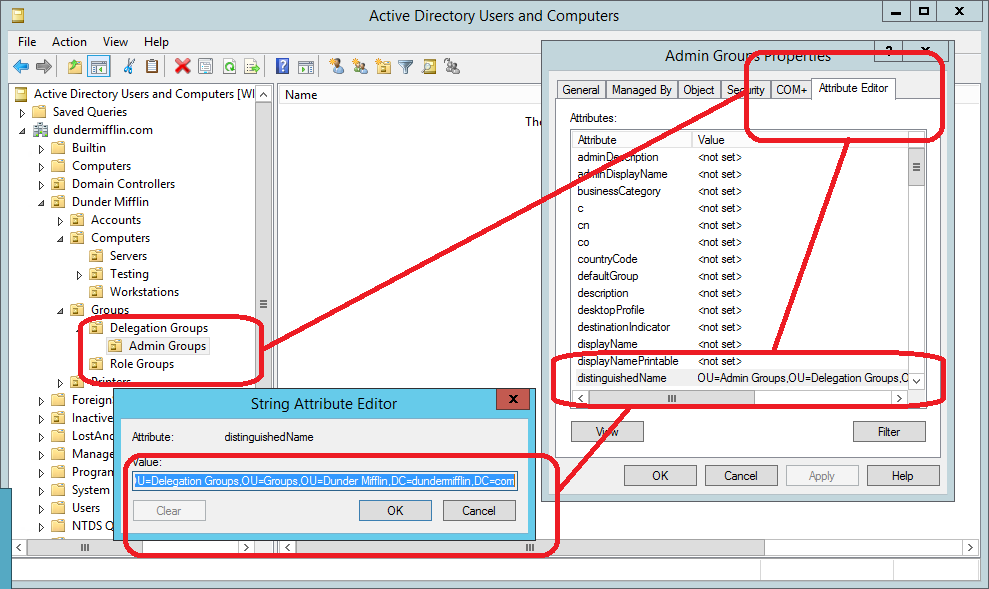
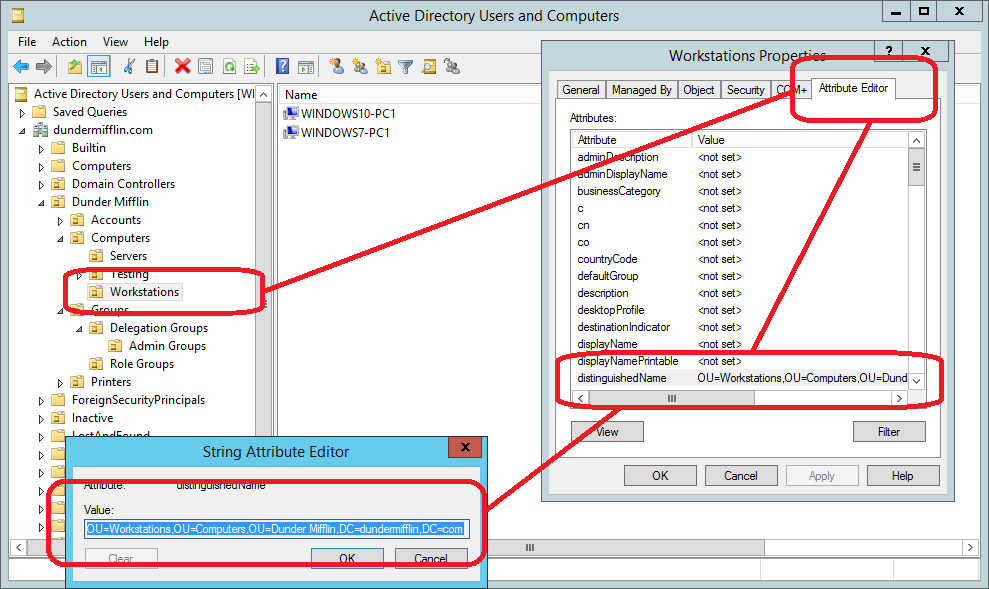
2) Create a location in Active Directory to create AD Local Admin groups in and record the distinguished name (DN).


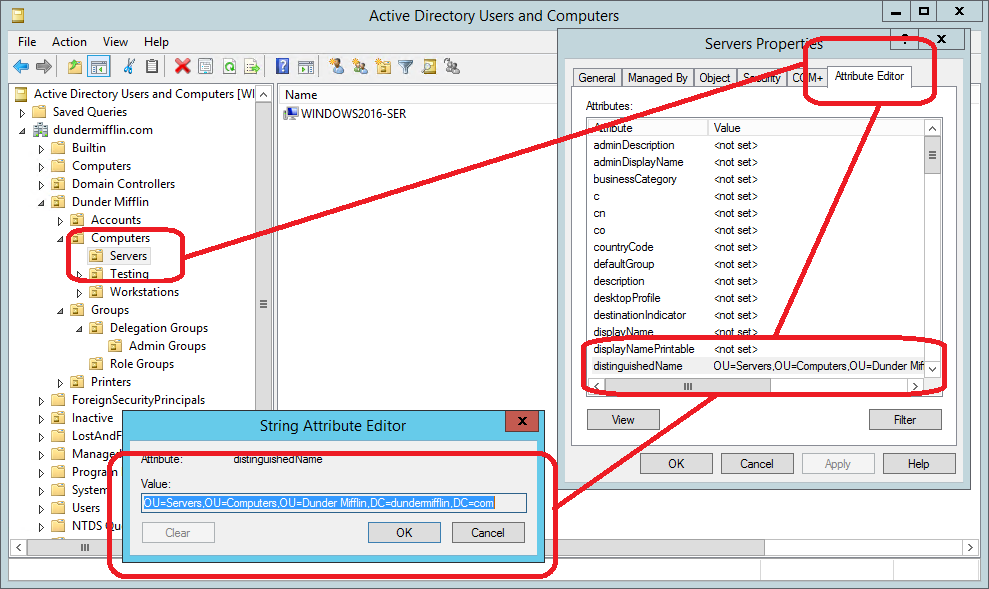
3) Record all the Computer OU’s distinguished name (DN) for the computers that AD Local Admin groups need to be created for. These can be workstations or servers but generally this in only done for servers.


4) Run

Configurator.exe (Configurator Editor).


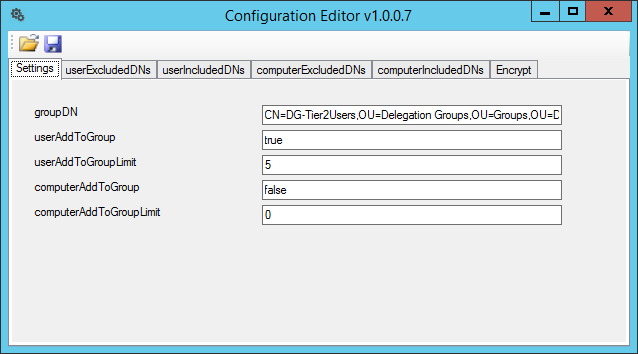
All configuration is stored within the AdminGroups.ConsoleApp.exe.config file and can be either edited directly or with my Configuration Editor tool.


a) On the Settings tab, enter the Admin Group OU’s distinguished name (DN), recorded in Step 2.

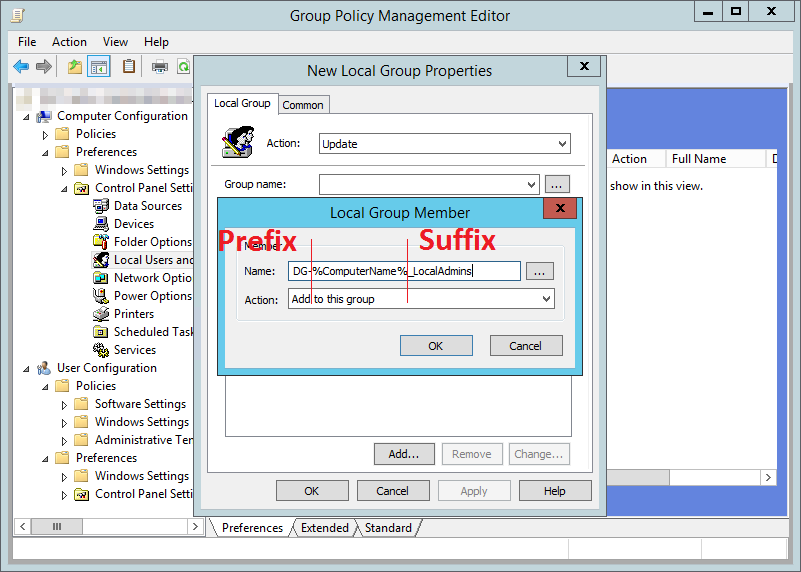
b) Enter the prefix that should be used when creating AD Local Admin Group.

c) Enter the suffix that should be used when creating AD Local Admin Group.

d) Optionally add a Group Name to add the computer account to on execution. This is useful if you want other policies to trigger or if you want to see process of the AdminGroups tool.


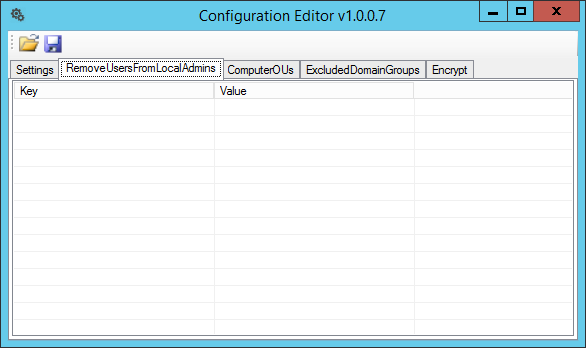
e) On the RemoveUsersFromLocalAdmins tab, enter usernames of local accounts that you want to automatically remove from the Local Administrators group.
Use this if redundant local user account with Administrators rights exist, perhaps accounts created as part of the imaging/build process. (Use +/-/Insert/Delete/Spacebar to manage entries.)


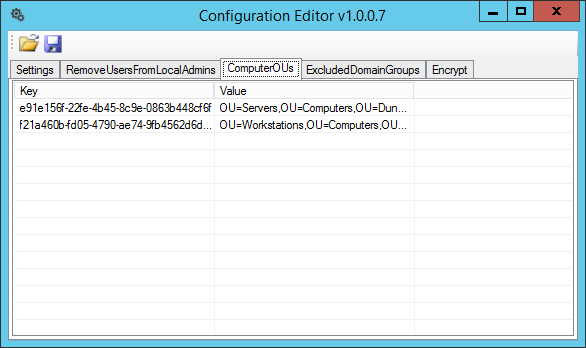
f) On the ComputerOUs tab, enter the Computer OU’s distinguished name (DN), recorded in Step 3. (Use +/-/Insert/Delete/Spacebar to manage entries.)


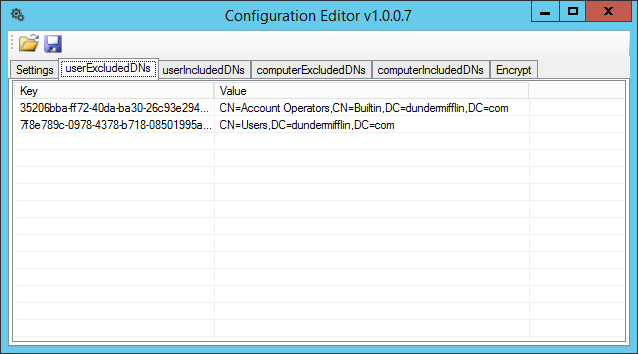
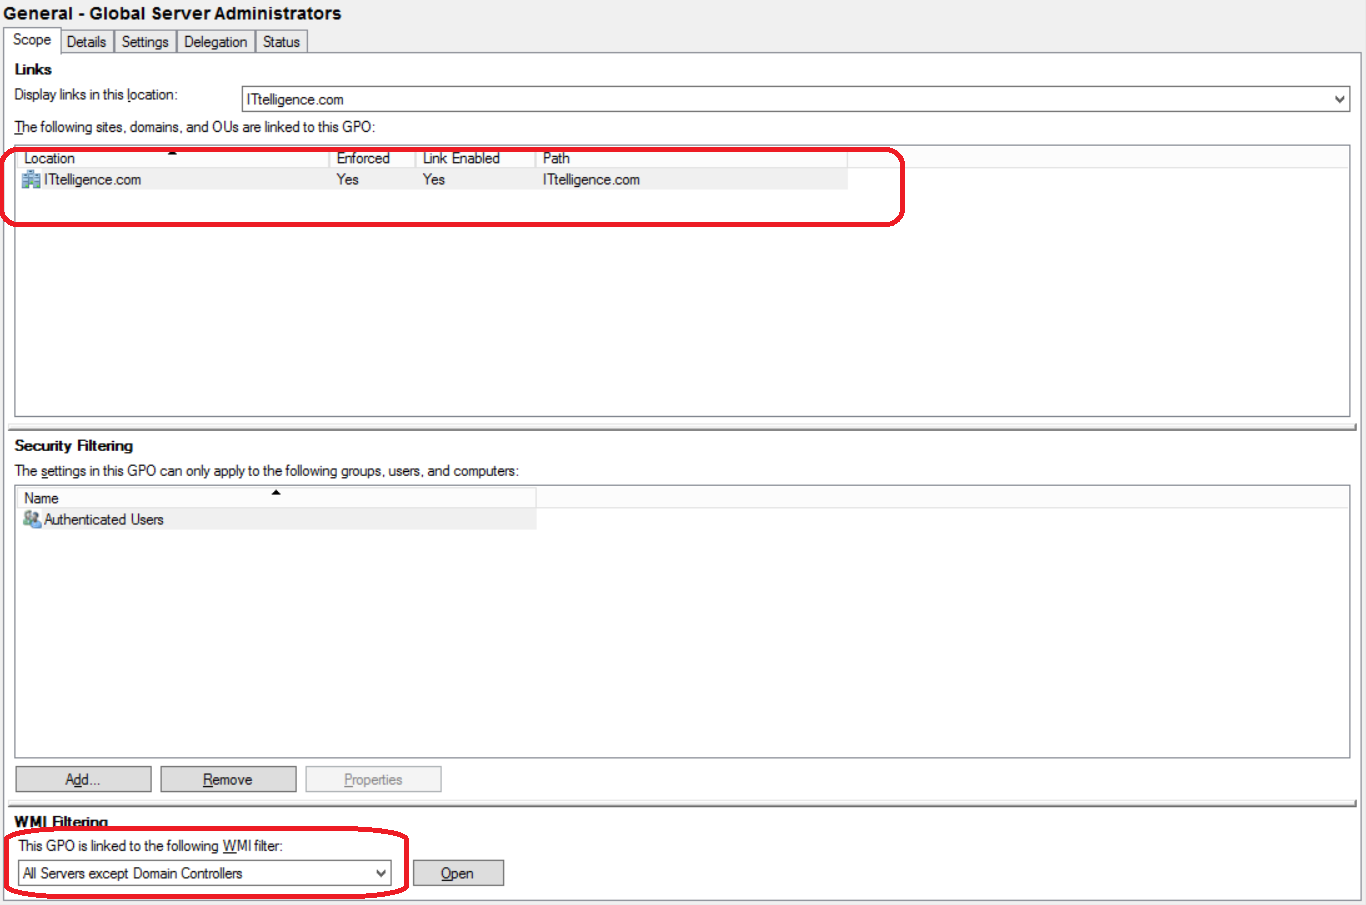
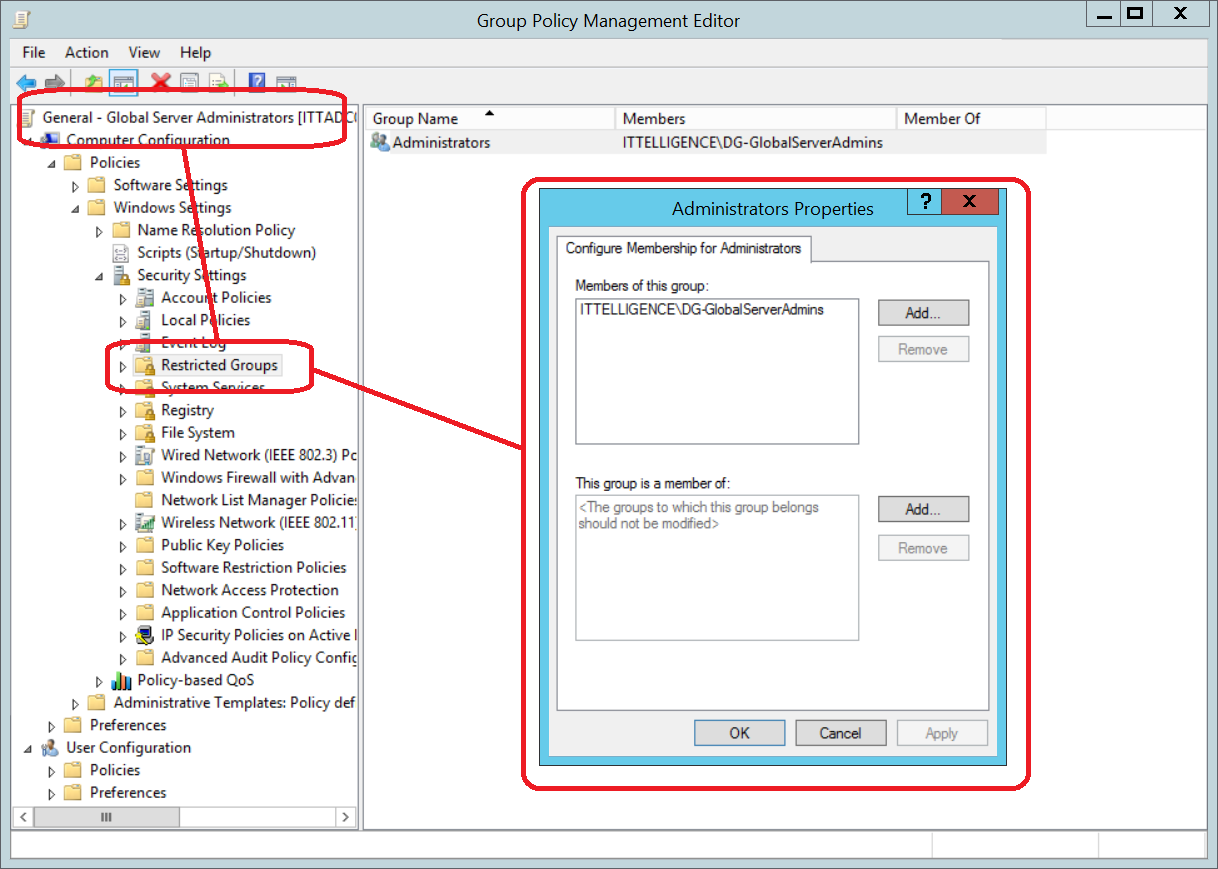
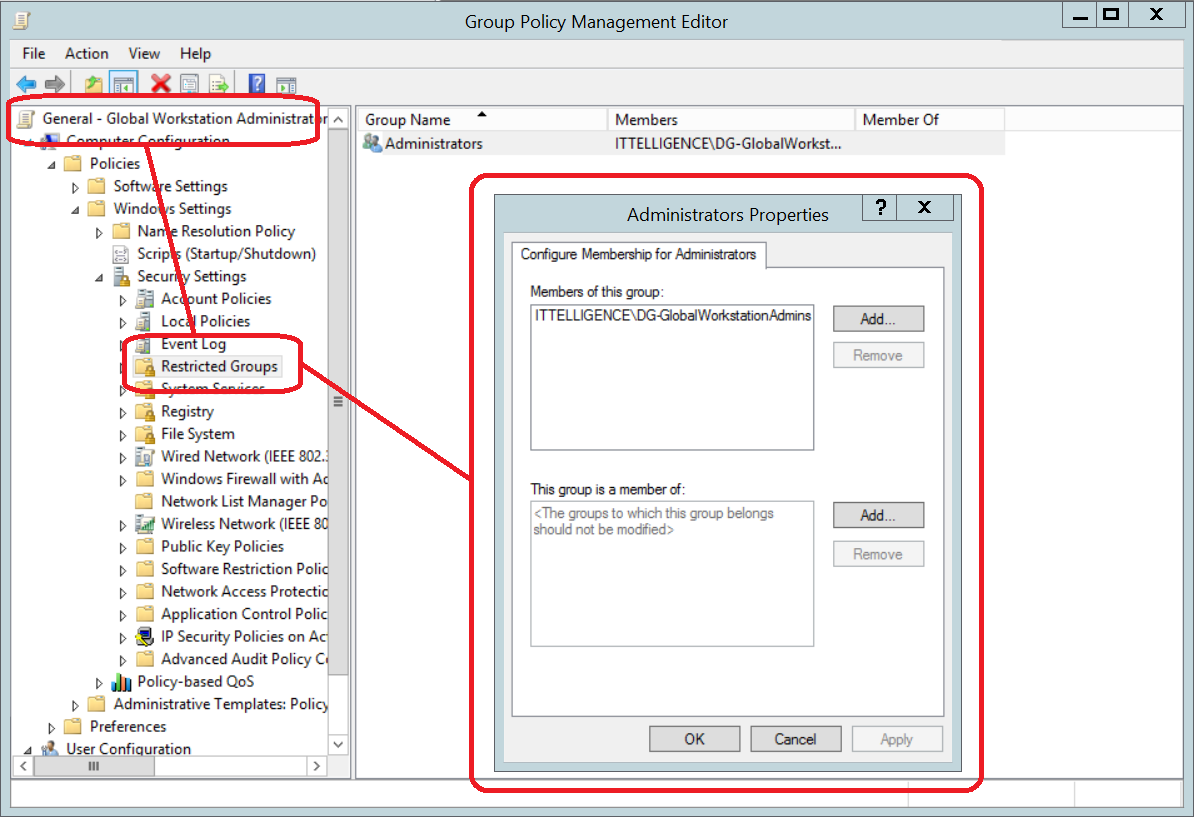
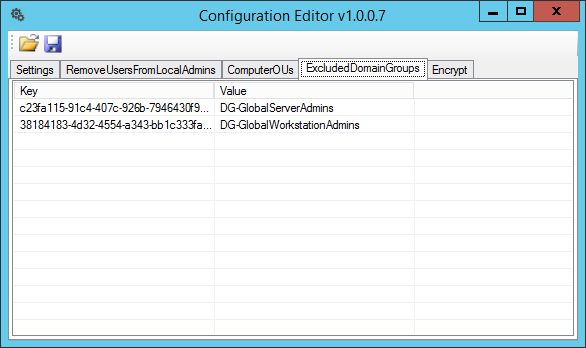
g) Add any groups that should not be automatically synced and removed from the AD Local Admins groups, for example, Global Admins. (Use +/-/Insert/Delete/Spacebar to manage entries.)


h) Save configuration file and close Configuration Editor.


This is how the XML file look for the above setting if you choose to edit it manually.

<?xml version="1.0" encoding="utf-8"?>
<configuration>
<configSections>
<section name="RemoveUsersFromLocalAdmins" type="System.Configuration.NameValueSectionHandler" />
<section name="ComputerOUs" type="System.Configuration.NameValueSectionHandler" />
<section name="ExcludedDomainGroups" type="System.Configuration.NameValueSectionHandler" />
</configSections>
<ComputerOUs>
<add key="e91e156f-22fe-4b45-8c9e-0863b448cf6f" value="OU=Servers,OU=Computers,OU=Dunder Mifflin,DC=dundermifflin,DC=com" />
<add key="f21a460b-fd05-4790-ae74-9fb4562d6d0b" value="OU=Workstations,OU=Computers,OU=Dunder Mifflin,DC=dundermifflin,DC=com" />
</ComputerOUs>
<RemoveUsersFromLocalAdmins />
<ExcludedDomainGroups>
<add key="c23fa115-91c4-407c-926b-7946430f93df" value="DG-GlobalServerAdmins" />
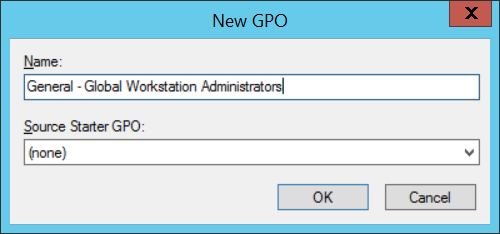
<add key="38184183-4d32-4554-a343-bb1c333faef3" value="DG-GlobalWorkstationAdmins" />
</ExcludedDomainGroups>
<appSettings>
<add key="AdminGroupOU" value="OU=Admin Groups,OU=Delegation Groups,OU=Groups,OU=Dunder Mifflin,DC=dundermifflin,DC=com" />
<add key="Prefix" value="DG-" />
<add key="Suffix" value="_LocalAdmins" />
<add key="AddComputerToADGroup" value="" />
</appSettings>
<startup>
<supportedRuntime version="v4.0" sku=".NETFramework,Version=v4.5" />
</startup>
</configuration>


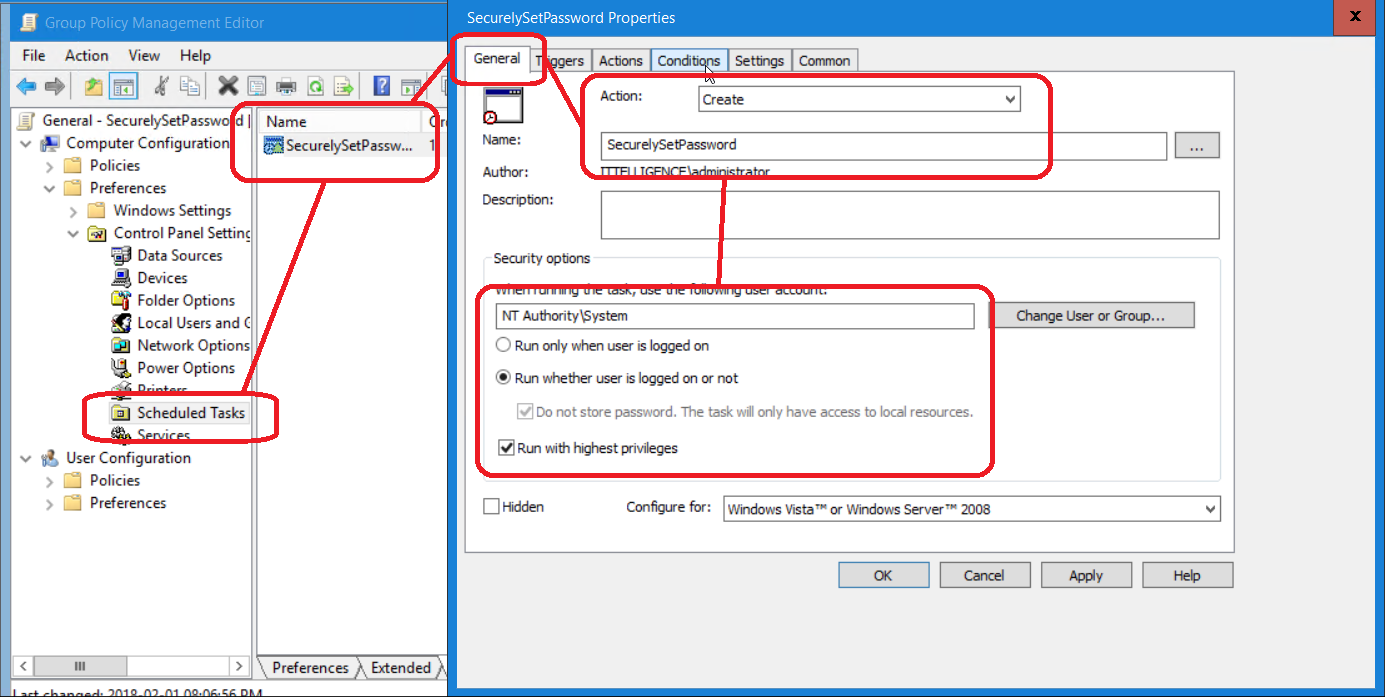
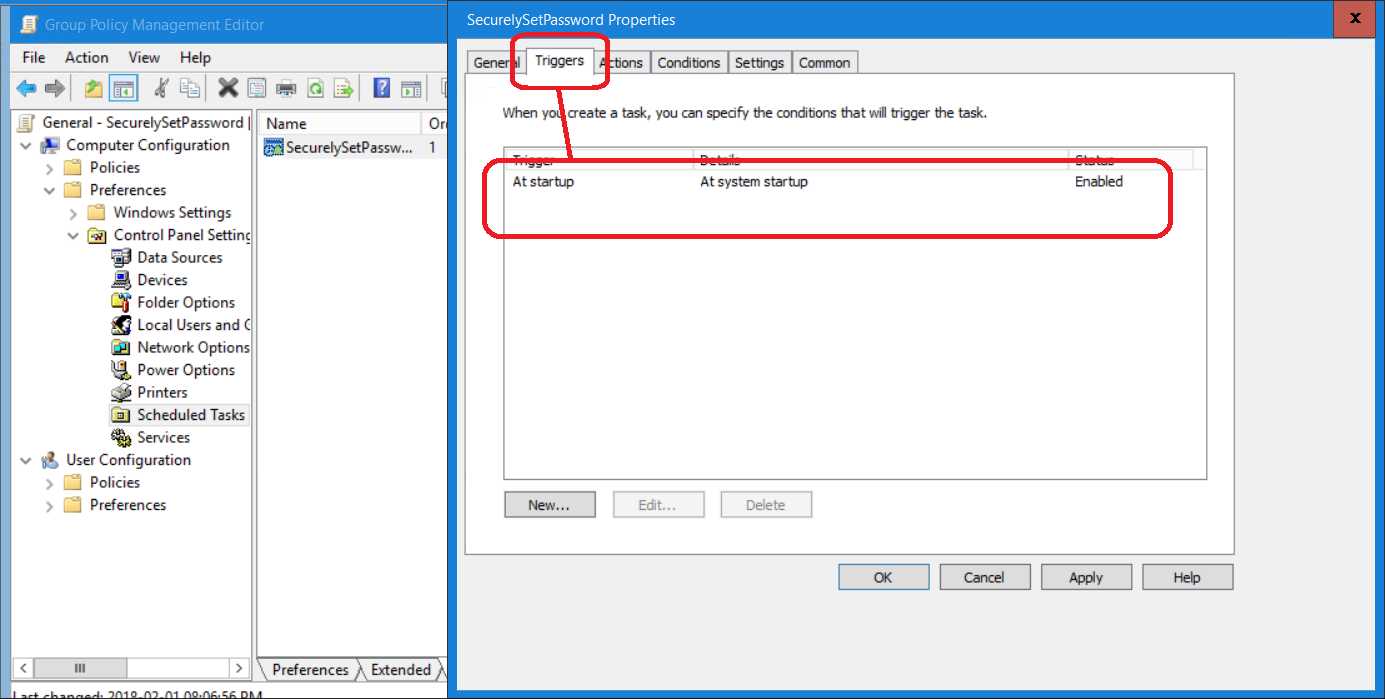
i) Schedule AdminGroups.ConsoleApp.exe to run one every day. Remember to set the running account to an account with rights


Demo Execution


1) Below is screenshots of my three demo computers’ Local Administrators groups pre-execution.


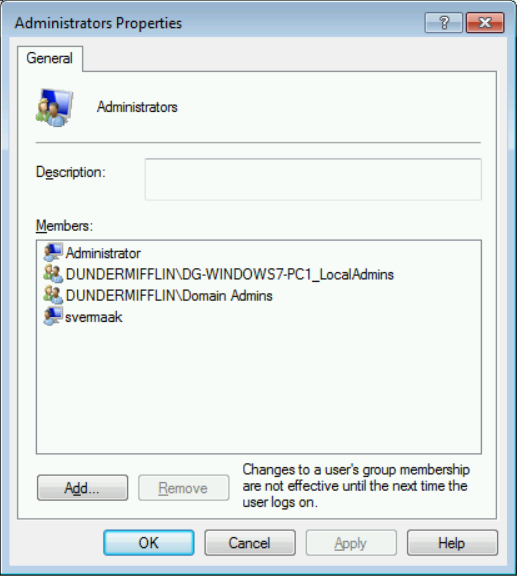
Windows 7 original Local Administrators Group

Windows 10 original Local Administrators Group

Windows 2016 original Local Administrators Group


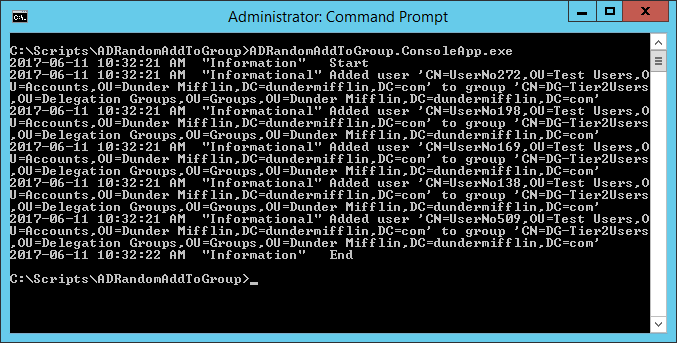
2) Below are screenshots of AdminGroup output and my three demo computers’ Local Administrators groups after first execution


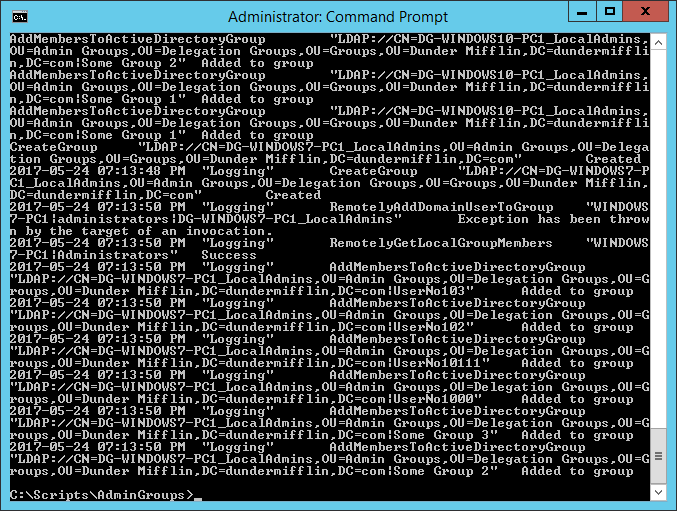
AdminGroups output after first execution

Windows 7 Local Administrators Group after first execution

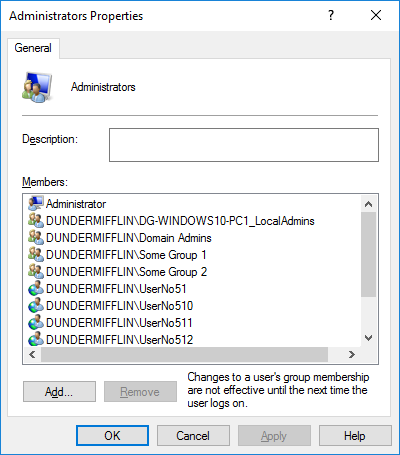
Windows 10 Local Administrators Group after first execution

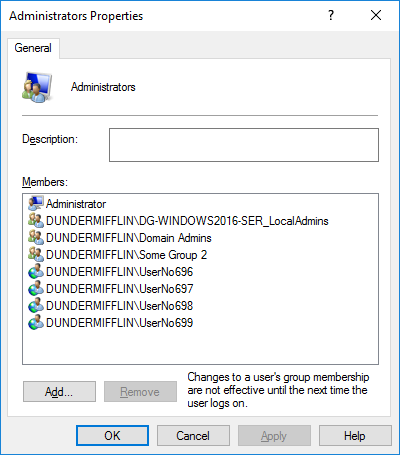
Windows 2016 Local Administrators Group after first execution


3) Below is screenshots of AdminGroup output and my three demo computers’ Local Administrators groups after second execution.


AdminGroups output after second execution

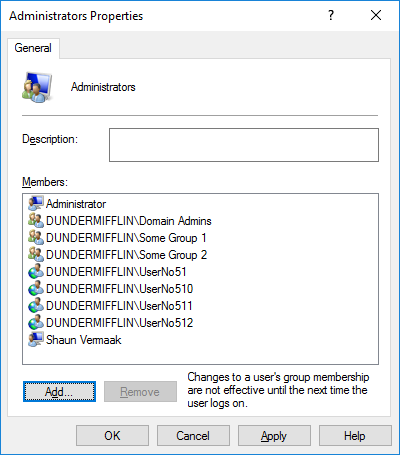
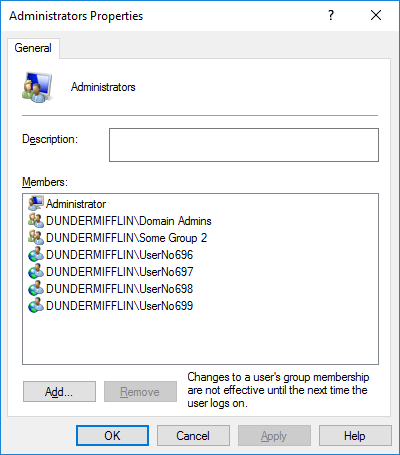
Windows 7 Local Administrators Group after second execution

Windows 10 Local Administrators Group after second execution

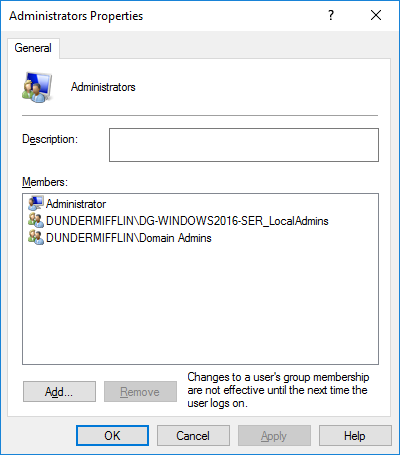
Windows 2016 Local Administrators Group after second execution


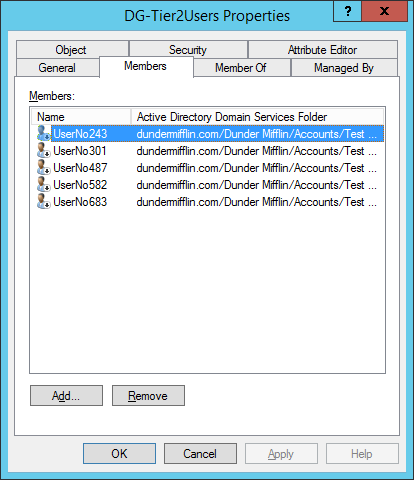
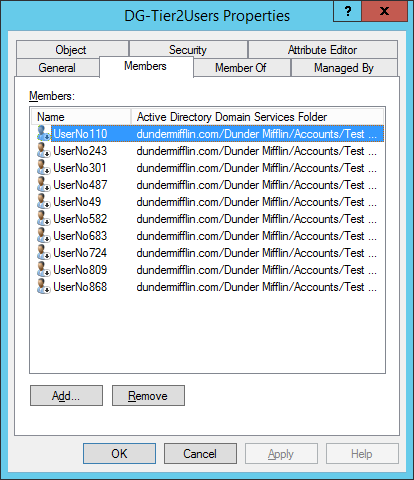
Where did members go? They are now safely within the AD Local Admins groups.


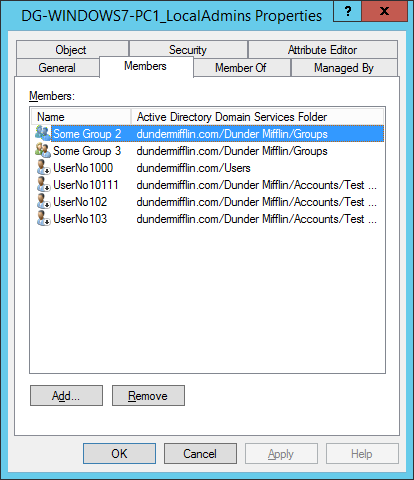
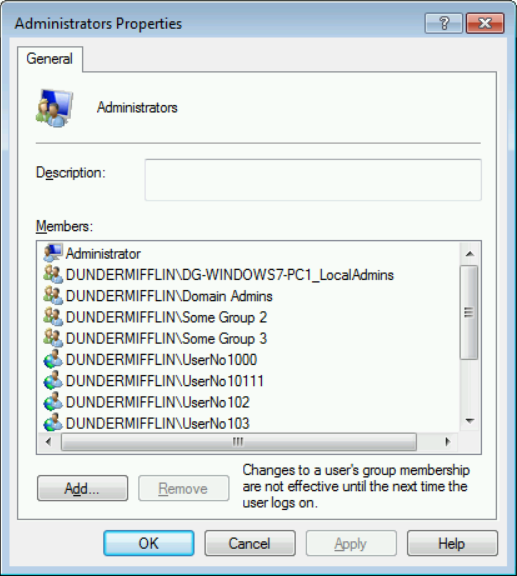
Windows 7 AD Local Admins Group

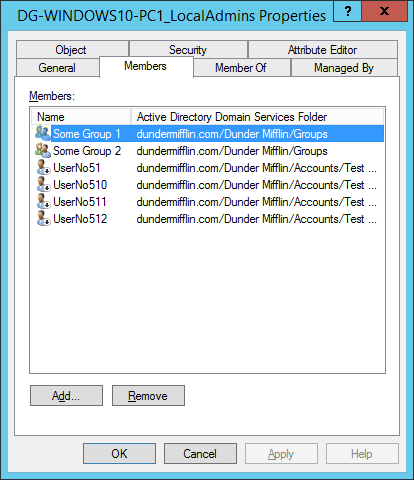
Windows 10 AD Local Admins Group

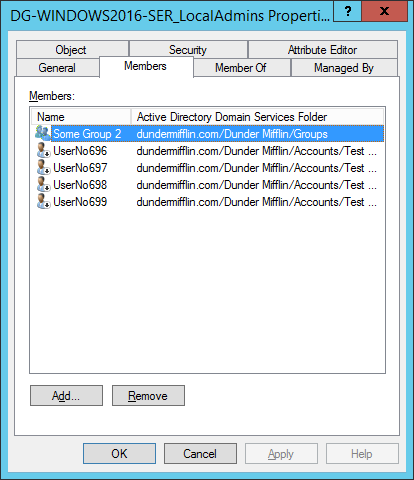
Windows 2016 AD Local Admins Group


Code


Here is the section in code that manages the AD Local Admin Groups.

public static bool CreateAdminGroup(string DomainName, Models.Computer Computer, string AdminGroupOU, string AdminGroupName, List < string > ExcludedDomainGroups, out string Message) {
	Message = "";
	string message = "";
	try {
		//If this fails, no point in continueing
		if (ActiveDirectory.CreateActiveDirectoryGroup(AdminGroupOU, AdminGroupName, out message)) {
			//Add command output to return message
			Message = Message + System.Environment.NewLine + message;

			//If this fails, no point in continueing
			if (ActiveDirectory.RemotelyAddDomainGroupToLocalGroup(Computer.ComputerName, DomainName, AdminGroupName, "administrators", out message)) {
				//Add command output to return message
				Message = Message + System.Environment.NewLine + message;

				List < Models.GroupMember > groupMembers = new List < Models.GroupMember > ();

				//If this fails, no point in continueing
				if (ActiveDirectory.RemotelyGetLocalGroupMembers(Computer.ComputerName, "Administrators", true, false, ref groupMembers, out message)) {
					//Add command output to return message
					Message = Message + System.Environment.NewLine + message;

					foreach(Models.GroupMember groupMember in groupMembers) {
						//Handle excluded domain groups
						if ((!AdminGroupName.EndsWith(groupMember.GroupMemberName)) && (groupMember.GroupMemberName != "Domain Admins") && (!ExcludedDomainGroups.Contains(groupMember.GroupMemberName))) {
							if (ActiveDirectory.AddMemberToActiveDirectoryGroup(AdminGroupOU, AdminGroupName, groupMember.GroupMemberName, out message)) {
								//Add command output to return message
								Message = Message + System.Environment.NewLine + message;

								if (message.EndsWith("Group already exists")) {
									ActiveDirectory.RemotelyRemoveDomainGroupFromLocalGroup(Computer.ComputerName, DomainName, groupMember.GroupMemberName, "administrators", out message);

									//Add command output to return message
									Message = Message + System.Environment.NewLine + message;
								}
							} else {
								//Add command output to return message
								Message = Message + System.Environment.NewLine + message;
							}
						}
					}
				} else {
					//Add command output to return message
					Message = Message + System.Environment.NewLine + message;
				}
			} else {
				//Add command output to return message
				Message = Message + System.Environment.NewLine + message;
			}
		} else {
			//Add command output to return message
			Message = Message + System.Environment.NewLine + message;
		}

		return true;
	} catch (Exception ex) {
		Message = Message + System.Environment.NewLine + ex.Message;
		return false;
	}
}


Conclusion


Using this process, or one similar will give better visibility on existing users with Local Administrators permissions and the ability to better manage them.


Securing Active Directory Administrators Groups

A hard and fast method for reducing Active Directory Administrators members.

Introduction

Anyone that has gone through any security hardening process can confirm that simply saying something was done incorrectly does not mean that you can just apply suggested remediation steps, especially in a mature environment.


Take recommendation Appendix E, F and G from the AD DS Operations Best Practices for Securing Active Directory for example, even though I agree with all of the points, just removing user accounts from the Administrators groups (Enterprise Admins, Domain Admins or Administrators) without addressing the application requirement could have a significant impact on
daily operations.


Based on my experience, the biggest reason why user and service accounts were added to Domain Admins and the like was that default delegation model in Active Directory lacks an appropriate group that just gives server/workstation administrative rights.


This article describes the process of creating these delegation groups so that members of Domain Admins etc. can be removed without any impact, drastically increasing Active Directory overall security. It must be stressed that this is an intermediate
process, the lesser of two evils if you will and that these other issues will be addressed in future articles.


Creating Global Administrators Delegation

1) WMI Filters

Create WMI filter that will identify the three device types. In the article two of these, All Servers except Domain Controllers and All Workstations will be used. This allows
delegation policy to apply to the correct device type dynamically.


a) Create an All Workstations WMI filter according to company naming convention

Select * from WIN32_OperatingSystem where ProductType=1


b) Create an All Domain Controllers WMI filter according to company naming convention

Select * from WIN32_OperatingSystem where ProductType=2


c) Create an All Servers except Domain Controllers WMI filter according to company naming convention

Select * from WIN32_OperatingSystem where ProductType=3


2) Groups

Create a group for each device type and a group that will have rights to all device types. These will contain the administrators for each device type.


a) Create Global Server Administrators group, Global Workstations Administrators group and Global Administrators group according to company naming convention.


b) Add Global Administrators group as a member of both Global Server Administrators group and Global Workstations Administrators group.


3) Group Policies

Create a group policy for each device type. It should filter based on the device types and will contain the delegation settings.


3.1) Global Server Administrators Group Policy


a) Create new GPO and name it according to company naming convention. It will contain the configuration of the Global Server Administrators group.


b) Ensure group policy is linked from domain root and that it is enforced. Link the All Servers except Domain Controllers WMI filter to group policy.


c) Add Administrators group to Restricted Groups and add Global Server Administrators group as a member. This is mainly done for legacy devices.


d) Add Administrators (built-in) group to Local Users and Groups preference update item and add Global Server Administrators group as a member.


3.2) Global Workstations Administrators Group Policy


a) Create new GPO and name it according to company naming convention. It will contain the configuration of the Global Workstation Administrators group.


b) Ensure group policy is linked from domain root and that it is enforced. Link the All Workstations WMI filter to group policy.


c) Add Administrators group to Restricted Groups and add Global Workstation Administrators group as a member. This is mainly done for legacy devices.


d) Add Administrators (built-in) group to Local Users and Groups preference update item and add Global Workstation Administrators group as a member.


4) Remove User/Service Accounts

At this point, everything is ready to start removing accounts from Administrators groups by following the following logic:


Account Requirement Action
Account requires AD rights Remove from Administrators groups (Enterprise Admins, Domain Admins or Administrators) and temporarily into Account Operators group until correct rights can be determined
Account requires Administrators rights to all devices Remove from Administrators groups (Enterprise Admins, Domain Admins or Administrators) and add to Global Administrators group
Account requires Administrators rights to servers Remove from Administrators groups (Enterprise Admins, Domain Admins or Administrators) and add to Global Server Administrators group
Account requires Administrators rights to workstations Remove from Administrators groups (Enterprise Admins, Domain Admins or Administrators) and add to Global Workstation Administrators group


Please note: It is best to add these user/service accounts to role groups as explained in this article:

https://www.experts-exchange.com/articles/29366/Delegation-the-proper-way.html


Conclusion

Adding user accounts to Administrators groups (Enterprise Admins, Domain Admins or Administrators) puts the environment at a significant risk because these user accounts can dump all the Active Directory hashes, bypassing all security and auditing mechanisms.
The above process can be used to drastically reduce the number of Admin members.


The hash extraction process is explained d in this article:

 https://www.experts-exchange.com/articles/29569/How-to-extract-hashes-from-IFM-backup.html